Running AI models in production typically requires managing complex infrastructure, GPUs, and scaling challenges. Replicate simplifies this by providing a cloud API to run thousands of AI models without managing any infrastructure.
In this tutorial, we'll build a backend that uses Replicate to generate images with state-of-the-art AI models like FLUX and Stable Diffusion. You'll learn how to run model predictions, handle async results, and store generated images with full type safety.
Want to jump straight to a running app? Clone this starter and deploy it to your own cloud.
What is Replicate?
Replicate is a platform that lets you run machine learning models via a simple API. It provides:
- Thousands of AI Models including image generation, LLMs, speech, and video
- No Infrastructure Management - automatic scaling and GPU provisioning
- Pay Per Use - only pay for what you run, no idle costs
- Simple API - run any model with a few lines of code
- Fast Cold Starts - models load in seconds
- Custom Models - deploy your own models or fine-tune existing ones
Popular models on Replicate include FLUX (image generation), Llama (LLM), Whisper (speech-to-text), and hundreds more.
What we're building
We'll create an AI-powered backend with:
- Image generation using FLUX and Stable Diffusion models
- Async prediction handling with webhooks for long-running models
- Image storage using Encore's object storage
- Type-safe endpoints for creating and retrieving predictions
- Status polling to track prediction progress
The backend will handle all the AI model orchestration while Replicate manages the infrastructure.
Getting started
Prefer to skip the setup? Use encore app create --example=ts/replicate-image-generator to start with a complete working example. This tutorial walks through building it from scratch to understand each component.
First, install Encore if you haven't already:
# macOS
brew install encoredev/tap/encore

# Linux
curl -L https://encore.dev/install.sh | bash

# Windows
iwr https://encore.dev/install.ps1 | iex
Create a new Encore application. This will prompt you to create a free Encore account if you don't have one (required for secret management):
encore app create replicate-app --example=ts/hello-world
cd replicate-app
Setting up Replicate
Creating your Replicate account
- Go to replicate.com and create a free account
- Navigate to your API tokens page
- Create a new API token and copy it
Replicate offers a free tier with credits to get started, then pay-per-use pricing based on model runtime.
Installing the Replicate SDK
Install the Replicate Node.js client:
npm install replicate
Backend implementation
Creating the AI service
Every Encore service starts with a service definition file (encore.service.ts). Services let you divide your application into logical components. At deploy time, you can decide whether to colocate them in a single process or deploy them as separate microservices, without changing a single line of code:
// ai/encore.service.ts
import { Service } from "encore.dev/service";

export default new Service("ai");
Configuring Replicate
To use Replicate's API, you need to authenticate with an API token. Encore provides built-in secrets management to securely store sensitive values like API keys:
// ai/replicate.ts
import Replicate from "replicate";
import { secret } from "encore.dev/config";

const replicateToken = secret("ReplicateToken");

export const replicate = new Replicate({
  auth: replicateToken(),
});
The secret() function creates a reference to a secret value that's stored securely outside your code. Set your Replicate API token for your local development environment:
# Development
encore secret set --dev ReplicateToken

# Production
encore secret set --prod ReplicateToken
Image generation endpoint
Create an endpoint to generate images using AI models. Replicate offers hundreds of text-to-image models including FLUX (fast, high-quality), Stable Diffusion, and specialized models for different artistic styles. We'll use FLUX Schnell, one of the fastest and most popular models:
// ai/generate.ts
import { api } from "encore.dev/api";
import { replicate } from "./replicate";

interface GenerateImageRequest {
  prompt: string;
  model?: "flux" | "stable-diffusion";
  aspectRatio?: "1:1" | "16:9" | "9:16";
}

interface GenerateImageResponse {
  id: string;
  status: string;
  output?: string[];
}

export const generateImage = api(
  { expose: true, method: "POST", path: "/ai/generate" },
  async (req: GenerateImageRequest): Promise<GenerateImageResponse> => {
    // Choose model based on request
    const modelVersion = req.model === "stable-diffusion"
      ? "stability-ai/sdxl:39ed52f2a78e934b3ba6e2a89f5b1c712de7dfea535525255b1aa35c5565e08b"
      : "black-forest-labs/flux-schnell";

    const input: any = {
      prompt: req.prompt,
    };

    // FLUX-specific parameters
    if (req.model !== "stable-diffusion") {
      input.aspect_ratio = req.aspectRatio || "1:1";
      input.num_outputs = 1;
    }

    const prediction = await replicate.predictions.create({
      version: modelVersion,
      input,
    });

    return {
      id: prediction.id,
      status: prediction.status,
      output: prediction.output as string[] | undefined,
    };
  }
);
Checking prediction status
AI models can take anywhere from a few seconds to a few minutes to generate images, depending on the model and complexity. Instead of making your users wait, you can return immediately and let them poll for results. Create an endpoint to check if a prediction is complete:
// ai/generate.ts (continued)
interface PredictionStatusRequest {
  id: string;
}

interface PredictionStatusResponse {
  id: string;
  status: string;
  output?: string[];
  error?: string;
}

export const getPredictionStatus = api(
  { expose: true, method: "GET", path: "/ai/predictions/:id" },
  async ({ id }: PredictionStatusRequest): Promise<PredictionStatusResponse> => {
    const prediction = await replicate.predictions.get(id);

    return {
      id: prediction.id,
      status: prediction.status,
      output: prediction.output as string[] | undefined,
      error: prediction.error ? String(prediction.error) : undefined,
    };
  }
);
Storing generated images
Generated images from Replicate are temporary URLs that expire. To keep images permanently accessible, you need to store them. With Encore, you can create object storage by simply defining a bucket in your code. The framework automatically provisions the infrastructure locally using a storage emulator:
// ai/storage.ts
import { Bucket } from "encore.dev/storage/objects";

export const images = new Bucket("generated-images", {
  public: true, // Make images publicly accessible via URL
});
This creates a storage bucket that's accessible from anywhere in your application. Now add an endpoint to download images from Replicate and store them in your bucket:
// ai/generate.ts (continued)
import { images } from "./storage";

interface SaveImageRequest {
  predictionId: string;
  imageUrl: string;
}

interface SaveImageResponse {
  url: string;
  key: string;
}

export const saveImage = api(
  { expose: true, method: "POST", path: "/ai/save-image" },
  async (req: SaveImageRequest): Promise<SaveImageResponse> => {
    // Download image from Replicate
    const response = await fetch(req.imageUrl);
    const imageBuffer = Buffer.from(await response.arrayBuffer());

    // Generate unique key
    const key = `${req.predictionId}-${Date.now()}.png`;

    // Upload to Encore's object storage
    await images.upload(key, imageBuffer, {
      contentType: "image/png",
    });

    // Get public URL
    const publicUrl = await images.publicUrl(key);

    return {
      url: publicUrl,
      key,
    };
  }
);
Testing the backend
Start your Encore backend (make sure Docker is running first):
encore run
Your API is now running locally. Open the local development dashboard at http://localhost:9400 to explore your API with interactive documentation and test endpoints directly in the browser.
Generate an image
Use curl or the API Explorer to generate an image:
# Generate with FLUX (fast, high quality)
curl -X POST http://localhost:4000/ai/generate \
  -H "Content-Type: application/json" \
  -d '{
    "prompt": "A serene Japanese garden with cherry blossoms and a koi pond",
    "model": "flux",
    "aspectRatio": "16:9"
  }'
Response:
{
  "id": "abc123xyz",
  "status": "starting"
}
Check prediction status
curl http://localhost:4000/ai/predictions/abc123xyz
When complete:
{
  "id": "abc123xyz",
  "status": "succeeded",
  "output": ["https://replicate.delivery/pbxt/abc123/output.png"]
}
Save the generated image
curl -X POST http://localhost:4000/ai/save-image \
  -H "Content-Type: application/json" \
  -d '{
    "predictionId": "abc123xyz",
    "imageUrl": "https://replicate.delivery/pbxt/abc123/output.png"
  }'
Response with your stored image:
{
  "url": "https://storage.encore.dev/generated-images/abc123xyz-1234567890.png",
  "key": "abc123xyz-1234567890.png"
}
Here's an example of a generated image:

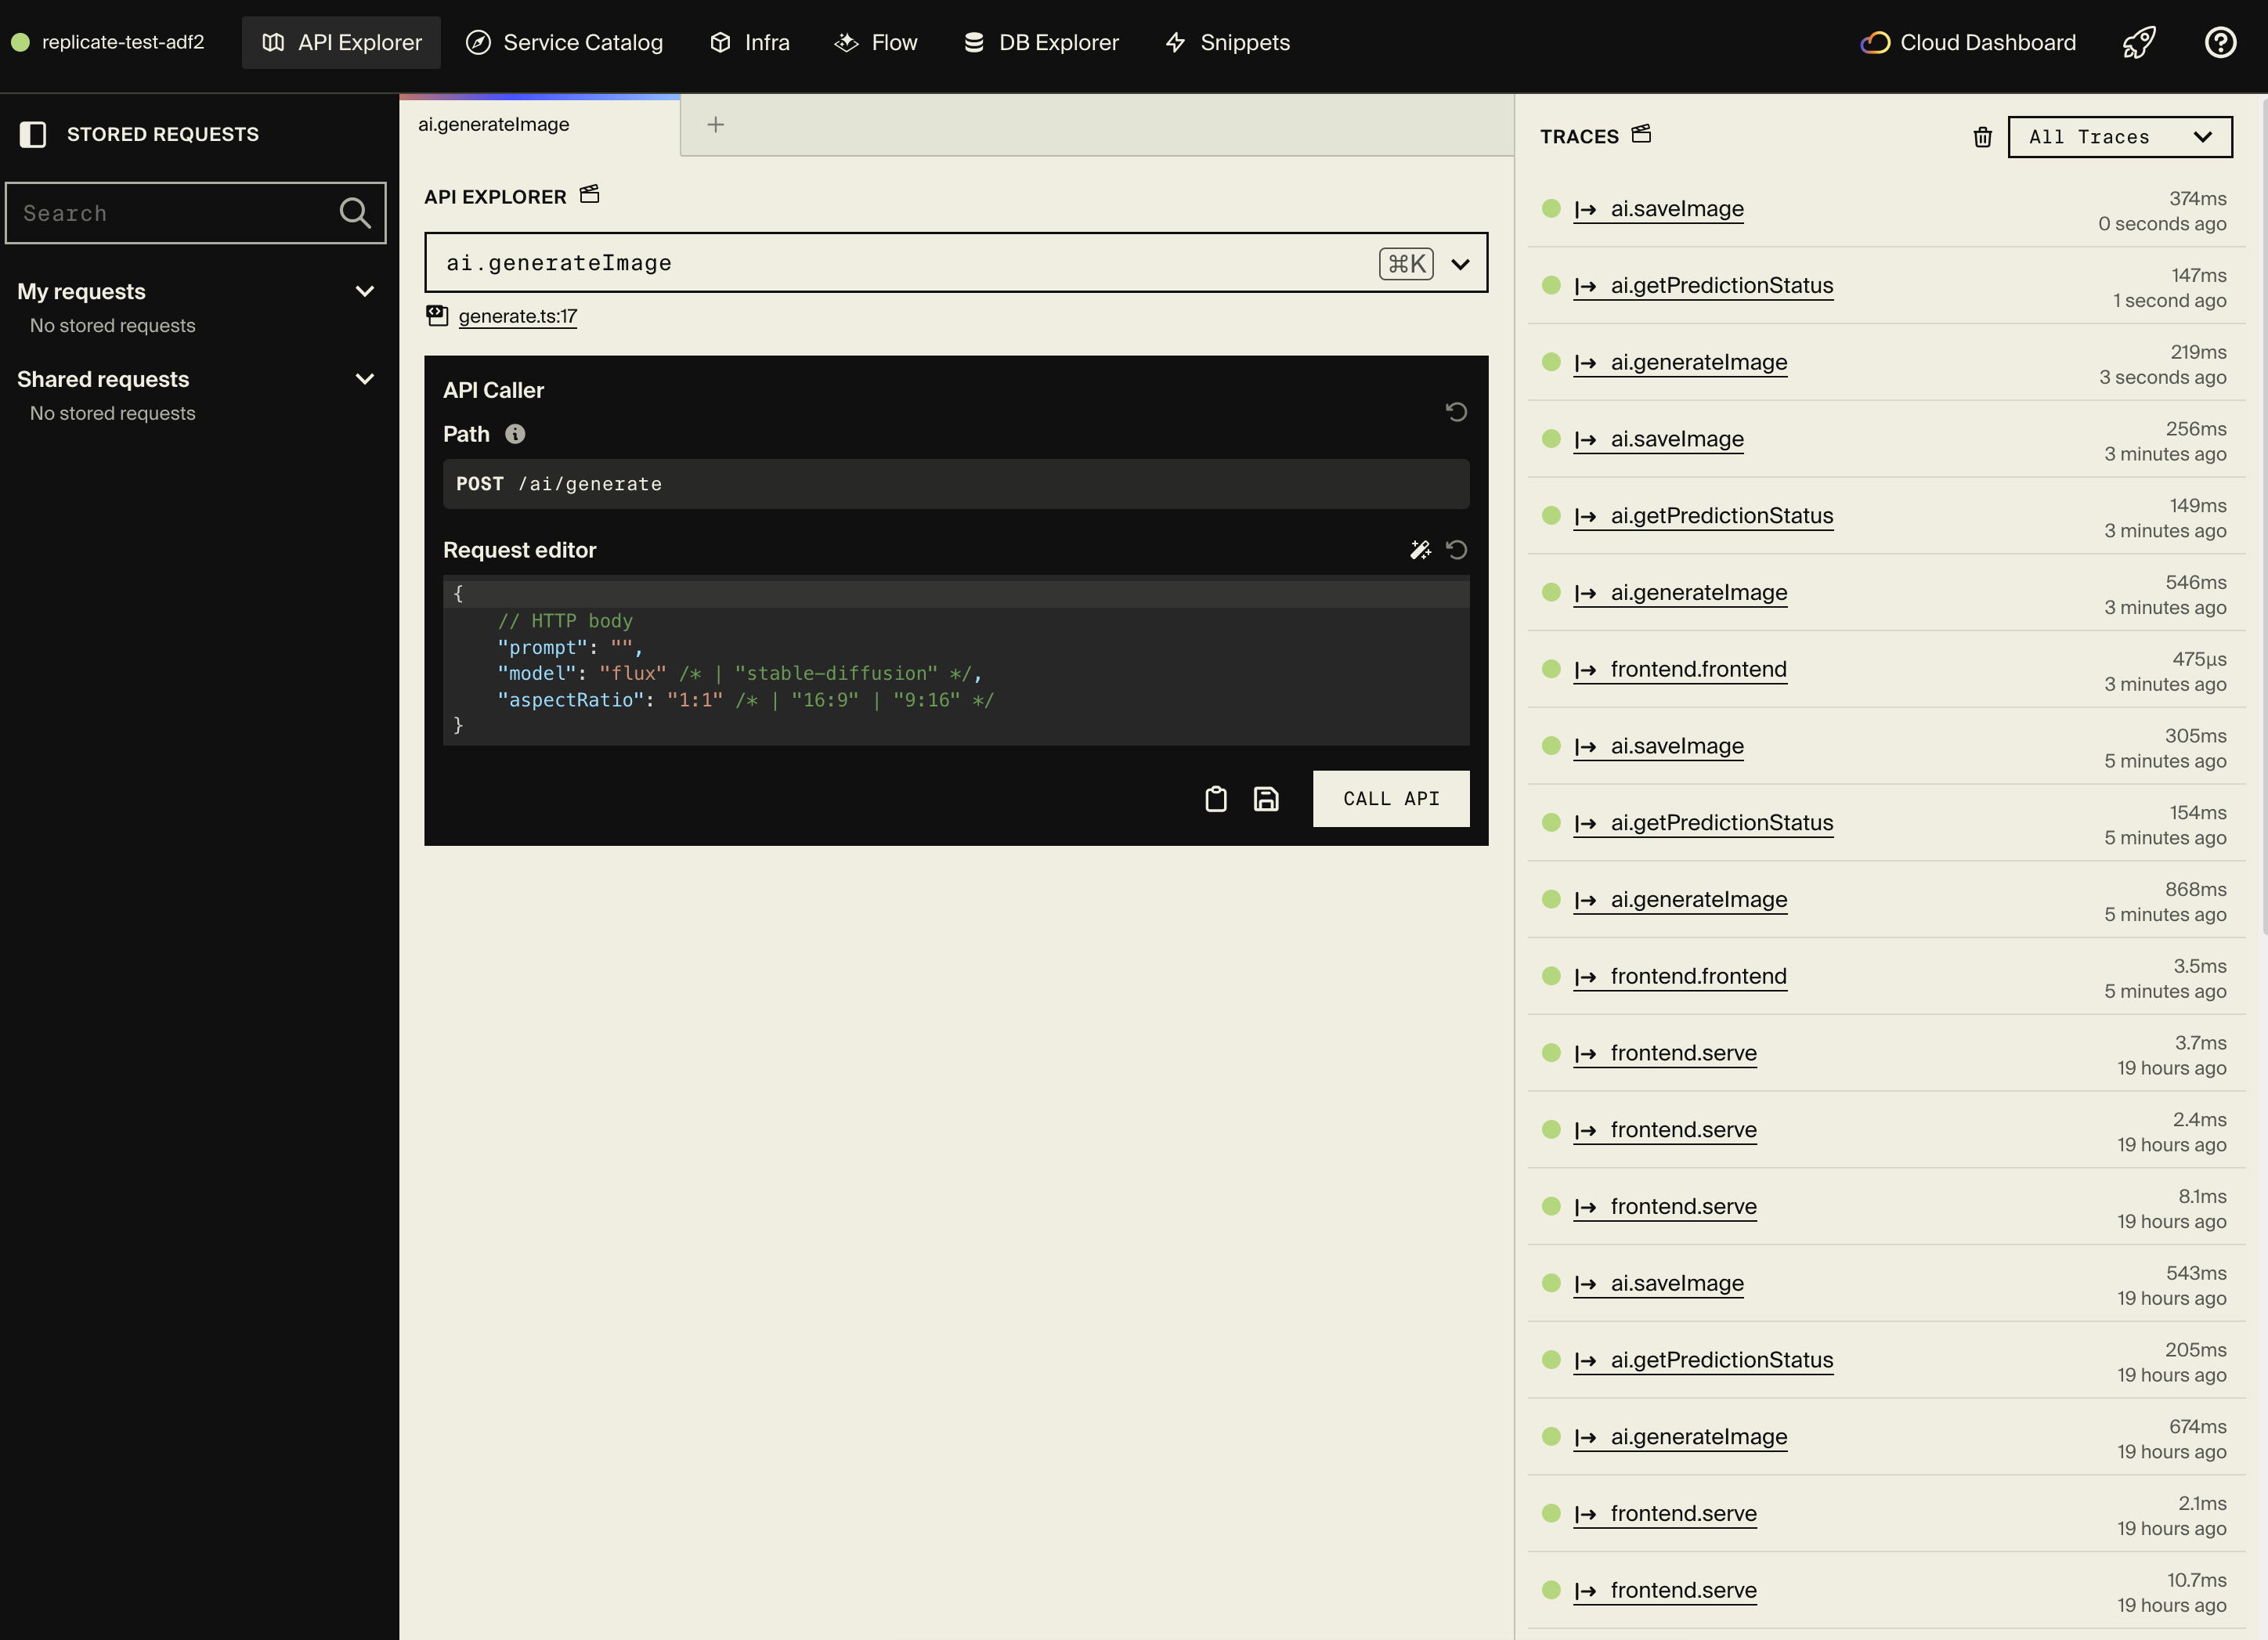
Using the API Explorer
The local development dashboard shows:
- All API endpoints with auto-generated documentation
- Request/Response schemas extracted from TypeScript types
- Interactive testing - run predictions directly in the browser
- Distributed tracing - see Replicate API calls, timing, and object storage operations
Here's what a trace looks like for an image generation request:

Example prompts to try
FLUX and Stable Diffusion work best with detailed, descriptive prompts:
# Photorealistic scene
"A cozy coffee shop interior with warm lighting, wooden tables,
vintage decor, and morning sunlight streaming through large windows,
photorealistic, 8k"

# Artistic style
"A cyberpunk city street at night with neon signs, rain-slicked
pavement, and flying cars, digital art, vibrant colors"

# Character design
"A friendly robot character with big eyes, metallic blue body,
and glowing chest panel, cute, Pixar style, 3D render"

# Nature scene
"A misty mountain landscape at sunrise with pine trees, a calm lake
reflection, and golden light, landscape photography"
Frontend integration
Generate a type-safe API client for your frontend:
encore gen client --output=./frontend/src/lib/client.ts
Use the client in your React/Next.js app:
import Client, { Local } from "./lib/client";

const client = new Client(Local);

// Generate image
const prediction = await client.ai.generateImage({
  prompt: "A beautiful sunset over mountains",
  model: "flux",
  aspectRatio: "16:9",
});

// Poll for completion
let status = await client.ai.getPredictionStatus({ id: prediction.id });
while (status.status !== "succeeded") {
  await new Promise(resolve => setTimeout(resolve, 1000));
  status = await client.ai.getPredictionStatus({ id: prediction.id });
}

// Save the image
if (status.output?.[0]) {
  const saved = await client.ai.saveImage({
    predictionId: prediction.id,
    imageUrl: status.output[0],
  });
  console.log("Image saved:", saved.url);
}
For CORS configuration when your frontend runs on a different origin, update your encore.app file:
{
  "id": "replicate-app",
  "global_cors": {
    "allow_origins_without_credentials": ["http://localhost:5173"]
  }
}
Serving a simple frontend
For quick demos and prototypes, you can serve a static HTML frontend directly from your Encore app using api.static():
// frontend/frontend.ts
import { api } from "encore.dev/api";

export const frontend = api.static(
  {
    expose: true,
    path: "/!path",
    dir: "./assets"
  },
);
Create an index.html file in frontend/assets/:
<!DOCTYPE html>
<html>
<head>
    <title>AI Image Generator</title>
    <style>
        body { font-family: system-ui; max-width: 800px; margin: 40px auto; }
        input { width: 100%; padding: 12px; margin: 8px 0; }
        button { padding: 12px 24px; background: #000; color: #fff; border: none; }
        img { max-width: 100%; margin: 16px 0; }
    </style>
</head>
<body>
    <h1>AI Image Generator</h1>
    <input id="prompt" placeholder="Describe your image..." />
    <button onclick="generate()">Generate</button>
    <div id="output"></div>

    <script>
        async function generate() {
            const prompt = document.getElementById('prompt').value;
            const output = document.getElementById('output');
            output.innerHTML = 'Generating...';

            // Start generation
            const res = await fetch('/ai/generate', {
                method: 'POST',
                headers: { 'Content-Type': 'application/json' },
                body: JSON.stringify({ prompt, model: 'flux', aspectRatio: '1:1' })
            });
            const prediction = await res.json();

            // Poll for completion
            let status = prediction;
            while (status.status !== 'succeeded' && status.status !== 'failed') {
                await new Promise(r => setTimeout(r, 1000));
                const statusRes = await fetch(`/ai/predictions/${prediction.id}`);
                status = await statusRes.json();
            }

            if (status.status === 'succeeded') {
                output.innerHTML = `<img src="${status.output[0]}" />`;
            } else {
                output.innerHTML = 'Generation failed';
            }
        }
    </script>
</body>
</html>
The path: "/!path" pattern serves as a fallback route, meaning it will match any path that doesn't match your API endpoints. This works great for single-page applications.
Static files are served directly from Encore's Rust runtime with zero JavaScript execution, making them extremely fast. When you deploy with git push encore, your frontend deploys alongside your backend, giving you a single URL you can immediately share to demo your prototype.
For production applications with more complex frontend needs (React, Next.js, build pipelines), we recommend deploying your frontend to Vercel, Netlify, or similar services and using the generated API client to call your Encore backend.
Deployment
Deploy your AI-powered backend:
git add .
git commit -m "Add Replicate image generation"
git push encore
Set your production Replicate token:
encore secret set --prod ReplicateToken
Note: Encore Cloud is great for prototyping with fair use limits. For production workloads with higher usage, you can connect your AWS or GCP account and Encore will provision infrastructure directly in your cloud account.
Advanced features
Using webhooks for long-running models
For models that take longer to run, use webhooks instead of polling:
export const generateImageWebhook = api(
  { expose: true, method: "POST", path: "/ai/generate-async" },
  async (req: GenerateImageRequest): Promise<GenerateImageResponse> => {
    const prediction = await replicate.predictions.create({
      version: "black-forest-labs/flux-schnell",
      input: {
        prompt: req.prompt,
        aspect_ratio: req.aspectRatio || "1:1",
      },
      webhook: "https://your-app.com/ai/webhook",
      webhook_events_filter: ["completed"],
    });

    return {
      id: prediction.id,
      status: prediction.status,
    };
  }
);

// Handle webhook
export const handleWebhook = api.raw(
  { expose: true, method: "POST", path: "/ai/webhook" },
  async (req, res) => {
    const chunks: Buffer[] = [];
    for await (const chunk of req) {
      chunks.push(chunk);
    }
    const body = JSON.parse(Buffer.concat(chunks).toString());

    // Process completed prediction
    if (body.status === "succeeded") {
      // Save image, notify user, etc.
    }

    res.writeHead(200);
    res.end(JSON.stringify({ received: true }));
  }
);
Running other models
Replicate has thousands of models. Here are some popular ones:
Large Language Models:
const output = await replicate.run(
  "meta/llama-2-70b-chat",
  {
    input: {
      prompt: "Explain quantum computing in simple terms",
    },
  }
);
Speech to Text (Whisper):
const output = await replicate.run(
  "openai/whisper",
  {
    input: {
      audio: "https://example.com/audio.mp3",
    },
  }
);
Video Generation:
const output = await replicate.run(
  "stability-ai/stable-video-diffusion",
  {
    input: {
      image: "https://example.com/image.png",
    },
  }
);
Image-to-image transformations
Use Stable Diffusion for image editing:
interface TransformImageRequest {
  imageUrl: string;
  prompt: string;
  strength?: number; // 0-1, how much to transform
}

export const transformImage = api(
  { expose: true, method: "POST", path: "/ai/transform" },
  async (req: TransformImageRequest): Promise<GenerateImageResponse> => {
    const prediction = await replicate.predictions.create({
      version: "stability-ai/sdxl",
      input: {
        image: req.imageUrl,
        prompt: req.prompt,
        strength: req.strength || 0.8,
      },
    });

    return {
      id: prediction.id,
      status: prediction.status,
    };
  }
);
Cost optimization
Replicate charges based on compute time. Here are tips to optimize costs:
- Use faster models - FLUX Schnell is faster than FLUX Pro
- Batch requests - generate multiple variations at once
- Cache results - store generated images to avoid re-generating
- Set timeouts - prevent runaway costs on failed predictions
- Monitor usage - track prediction counts and costs in Replicate dashboard
Next steps
- Explore Replicate's model collection for more AI capabilities
- Add image upscaling for higher resolution
- Implement background removal for product images
- Try video generation models
- Build a custom model and deploy it
If you found this tutorial helpful, consider starring Encore on GitHub to help others discover it.
Related Articles

 Ivan Cernja
 Ivan Cernja
 Ivan Cernja