Secure AI Code Execution with Daytona and Encore.ts
Build infrastructure for AI coding agents with sandboxed execution

When AI agents generate code, you need somewhere safe to run it. Whether it's Claude writing a Python script, GPT-4 generating data analysis code, or your custom agent automating tasks—executing AI-generated code on your server is risky. The LLM might hallucinate dangerous operations, or an adversarial prompt could trick it into generating malicious code.
Daytona is purpose-built for this problem. Their tagline says it all: "Secure and Elastic Infrastructure for Running Your AI-Generated Code." Each execution runs in a completely isolated sandbox that can't access your infrastructure, making it safe to run whatever code your AI produces.
Common use cases:
- AI coding agents - LLMs generate and execute code automatically
- Code playgrounds - Users experiment with code in their browser
- Educational platforms - Students submit and run exercises
- Data analysis - AI-powered scripts process and analyze data
In this tutorial, we'll build a backend with Encore.ts that executes AI-generated code securely using Daytona sandboxes. You'll learn how to create isolated environments, run code safely, implement timeouts and file operations, and track execution history in a PostgreSQL database.
Want to jump straight to a running app? Clone this starter and deploy it to your own cloud.
What is Daytona?
Daytona provides secure sandbox environments specifically designed for running AI-generated code. It offers:
- Isolated Execution - Each sandbox is completely isolated from your infrastructure
- Multi-Language Support - Python, TypeScript, Go, and more
- File System Access - Read and write files within the sandbox
- Process Management - Control running processes and resource limits
- Git Operations - Clone repositories and work with version control
- AI Integrations - Official LangChain integration and MCP Server support
Daytona handles the complexity of secure code execution so you can focus on your AI agent logic. If you're building LLM-powered applications with observability, check out our Langfuse tutorial for tracing and monitoring your AI interactions.
What we're building
We'll create AI agent infrastructure—a secure backend that can execute whatever code your AI produces. Whether you're building a coding assistant, an automated data analyst, or a code playground, this gives you the execution layer.
The backend will include:
- AI code execution API - Run AI-generated Python, TypeScript, or JavaScript in isolated sandboxes
- Sandbox management - Automatically create, manage, and clean up execution environments
- PostgreSQL database - Auto-provisioned storage for execution history and debugging
- Timeout protection - Prevent infinite loops and runaway AI-generated code
- File operations - Let AI-generated scripts read and write files within the sandbox
- Execution validation - Capture outputs, errors, and exit codes to feed back to the AI
By the end, you'll have a production-ready API that can safely execute AI-generated code without compromising your infrastructure.
Getting started
Prefer to skip the setup? Use encore app create --example=ts/daytona to start with a complete working example. This tutorial walks through building it from scratch to understand each component.
First, install Encore if you haven't already:
# macOS
brew install encoredev/tap/encore

# Linux
curl -L https://encore.dev/install.sh | bash

# Windows
iwr https://encore.dev/install.ps1 | iex
Create a new Encore application. This will prompt you to create a free Encore account if you don't have one (required for secret management):
encore app create daytona-app --example=ts/hello-world
cd daytona-app
Setting up Daytona
Creating your Daytona account
- Go to daytona.io and sign up
- Navigate to the Daytona Dashboard
- Create a new API key and save it securely
Installing the SDK
Install the Daytona TypeScript SDK:
npm install @daytonaio/sdk
This provides the official TypeScript interface for creating and managing Daytona sandboxes programmatically.
Backend implementation
Creating the execution service
Every Encore service starts with a service definition file (encore.service.ts). Services let you divide your application into logical components. At deploy time, you can decide whether to colocate them in a single process or deploy them as separate microservices, without changing a single line of code:
// execution/encore.service.ts
import { Service } from "encore.dev/service";

export default new Service("execution");
Configuring Daytona
Store your API key securely using Encore's built-in secrets management:
// execution/daytona.ts
import { Daytona } from "@daytonaio/sdk";
import { secret } from "encore.dev/config";

const daytonaApiKey = secret("DaytonaApiKey");

export const daytona = new Daytona({
  apiKey: daytonaApiKey(),
});
Set your API keys for local development:
# Daytona API key
encore secret set --dev DaytonaApiKey

# Anthropic API key (for the AI code generation endpoint)
encore secret set --dev AnthropicApiKey
For production:
encore secret set --prod DaytonaApiKey
encore secret set --prod AnthropicApiKey
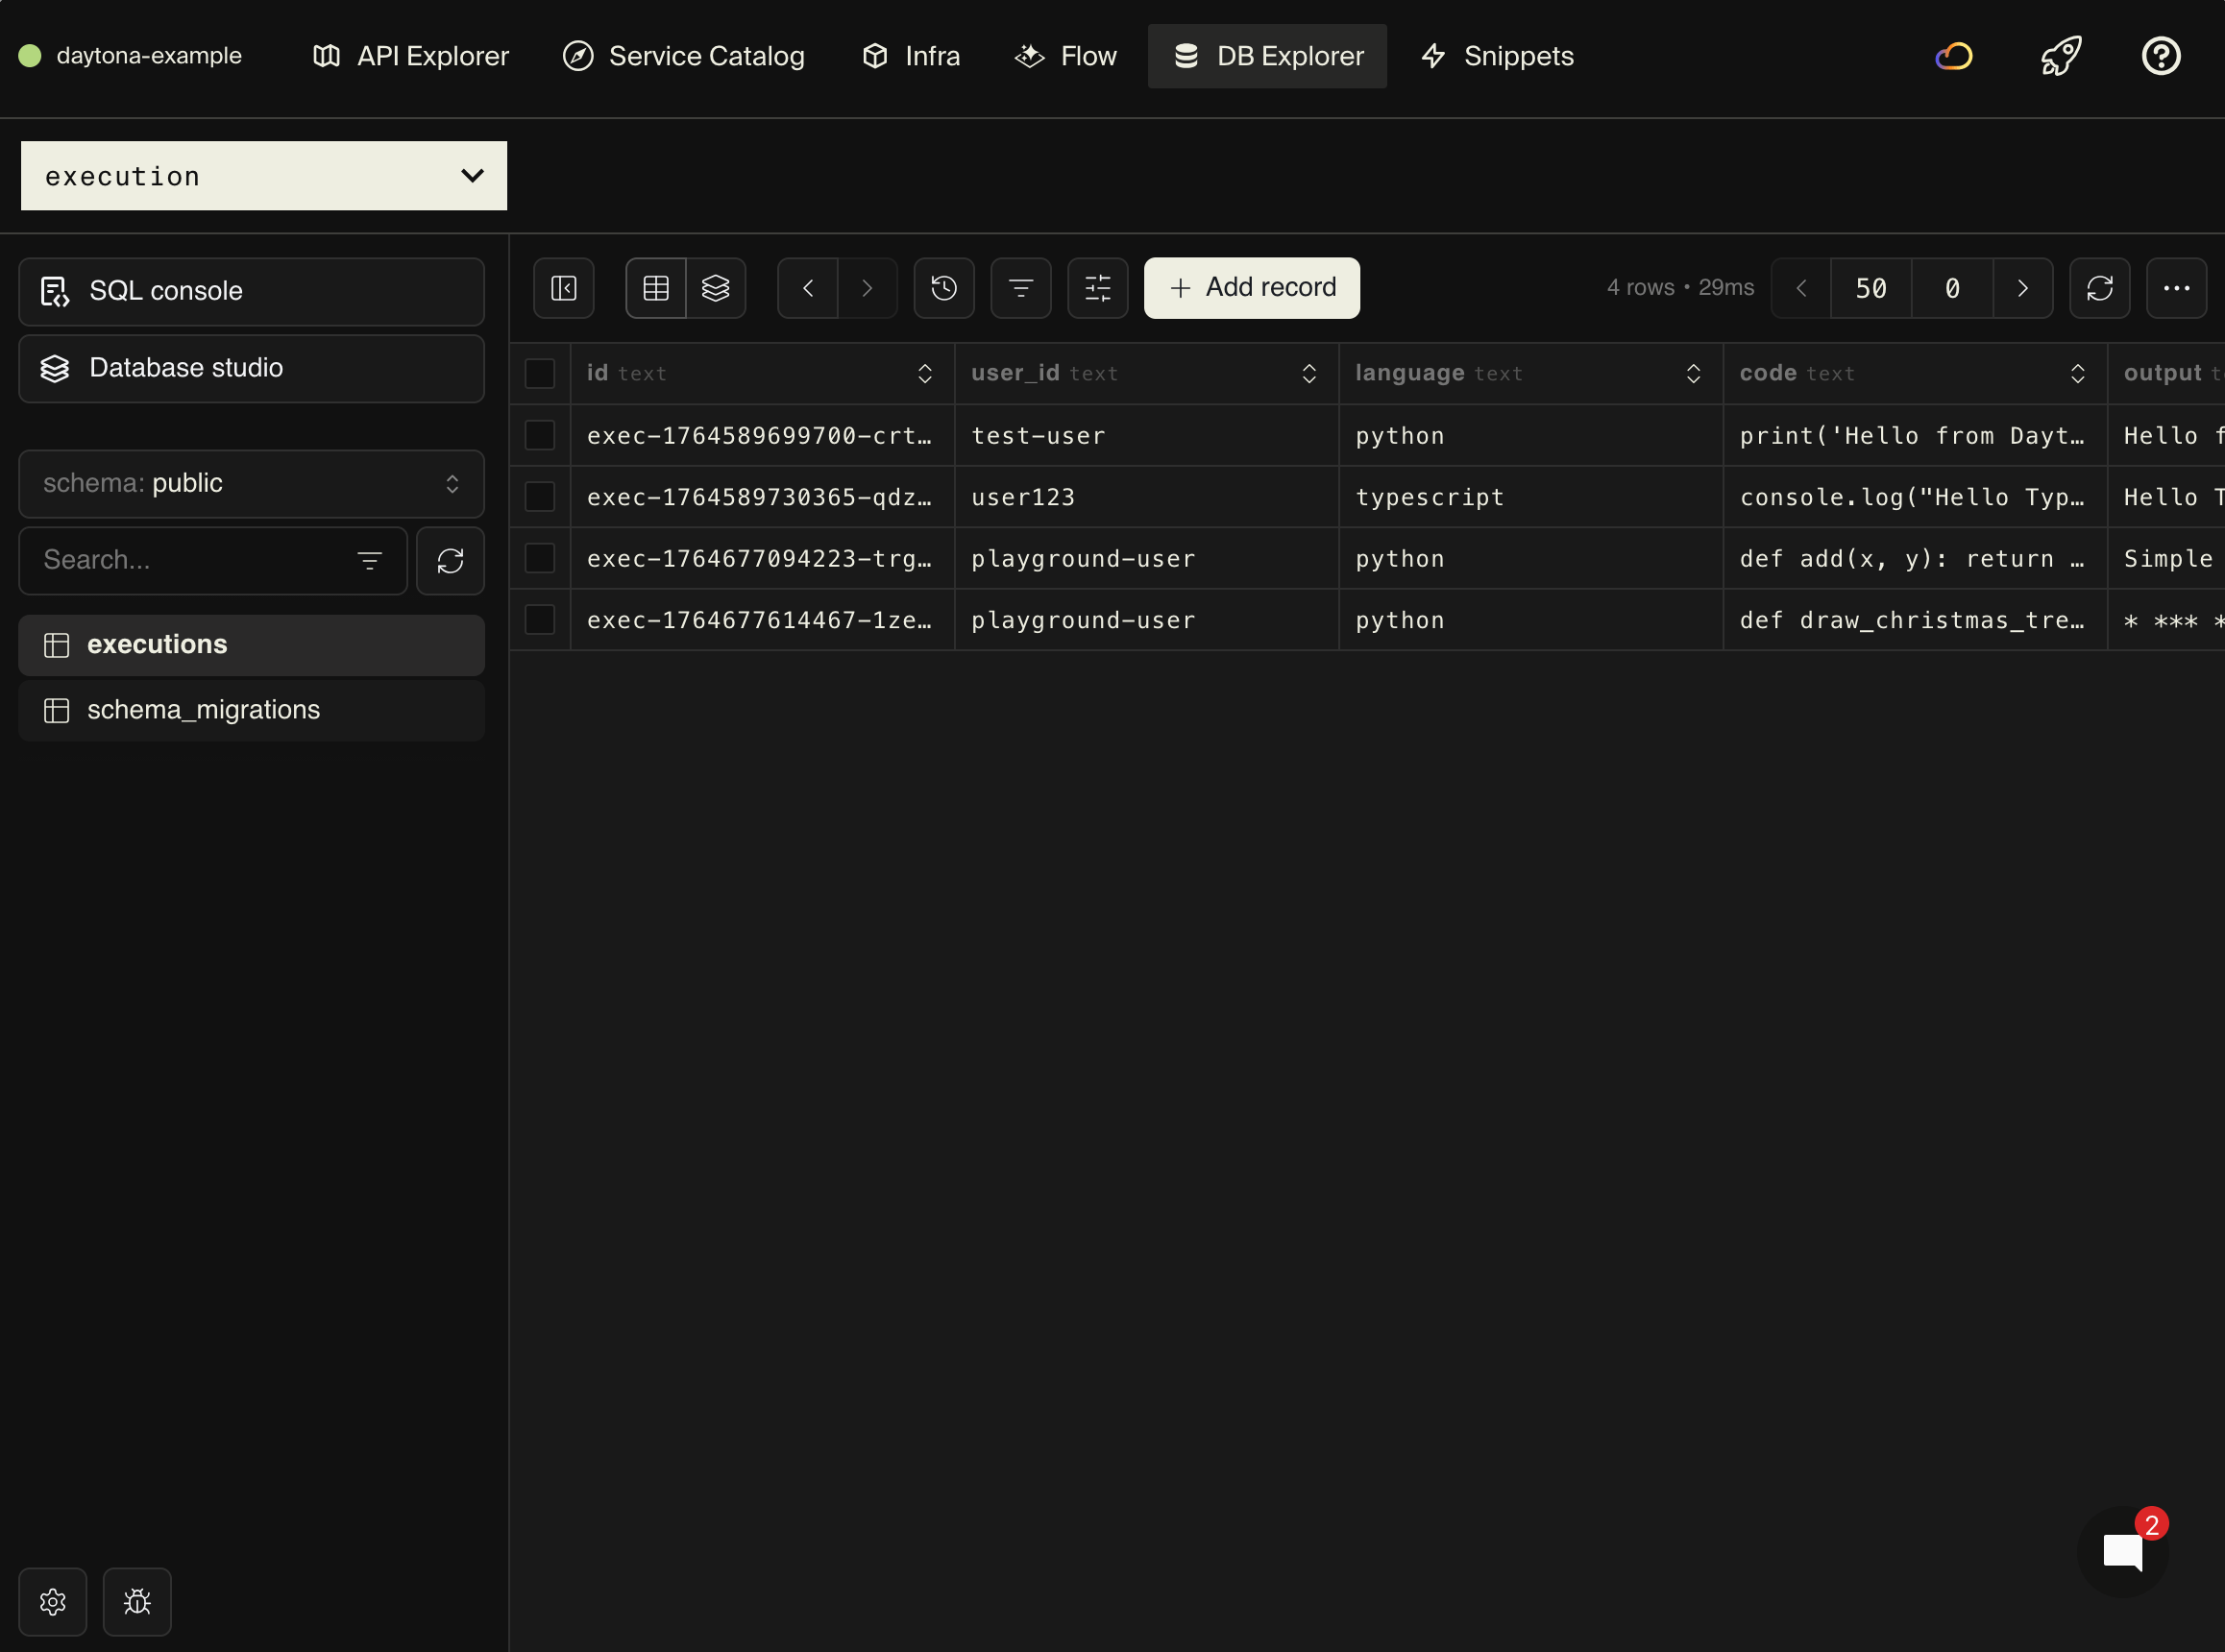
Setting up the database
To store execution history and results, create a PostgreSQL database. With Encore, you can create a database by simply defining it in code. The framework automatically provisions the infrastructure locally using Docker.
Create the database instance:
// execution/db.ts
import { SQLDatabase } from "encore.dev/storage/sqldb";

export const db = new SQLDatabase("execution", {
  migrations: "./migrations",
});
Create the migration file:
-- execution/migrations/1_create_executions.up.sql
CREATE TABLE executions (
  id TEXT PRIMARY KEY,
  user_id TEXT,
  language TEXT NOT NULL,
  code TEXT NOT NULL,
  output TEXT,
  error TEXT,
  exit_code INTEGER,
  execution_time_ms INTEGER,
  sandbox_id TEXT,
  created_at TIMESTAMP NOT NULL DEFAULT CURRENT_TIMESTAMP
);

CREATE INDEX idx_executions_user ON executions(user_id, created_at DESC);
CREATE INDEX idx_executions_sandbox ON executions(sandbox_id);
Executing code securely
Now for the main feature: executing code safely. Whether it's AI-generated code from an LLM or user-submitted code from a playground, the challenge is the same—you never know what it might do. It could try to access your filesystem, make network requests to internal services, or run infinite loops. Daytona solves this by creating isolated sandbox environments where each execution is completely separated from your infrastructure.
Create an endpoint that executes code in a Daytona sandbox:
// execution/execute.ts
import { api } from "encore.dev/api";
import { daytona } from "./daytona";
import { db } from "./db";
import log from "encore.dev/log";

interface ExecuteRequest {
  code: string;
  language: "python" | "typescript" | "javascript";
  userId?: string;
}

interface ExecuteResponse {
  id: string;
  output: string;
  error?: string;
  exitCode: number;
  executionTimeMs: number;
}

export const execute = api(
  { expose: true, method: "POST", path: "/execute" },
  async (req: ExecuteRequest): Promise<ExecuteResponse> => {
    const startTime = Date.now();
    const executionId = `exec-${Date.now()}-${Math.random().toString(36).slice(2, 11)}`;

    log.info("Creating sandbox", { executionId, language: req.language });

    // Create a new sandbox for this execution
    const sandbox = await daytona.create({
      language: req.language,
    });

    try {
      log.info("Executing code", { executionId, sandboxId: sandbox.id });

      // Execute the code in the sandbox
      const result = await sandbox.process.codeRun(req.code);

      const executionTime = Date.now() - startTime;

      // Store execution record
      await db.exec`
        INSERT INTO executions (
          id, user_id, language, code, output, error, exit_code,
          execution_time_ms, sandbox_id
        )
        VALUES (
          ${executionId}, ${req.userId}, ${req.language}, ${req.code},
          ${result.result}, ${result.stderr || null}, ${result.exitCode},
          ${executionTime}, ${sandbox.id}
        )
      `;

      log.info("Execution completed", {
        executionId,
        exitCode: result.exitCode,
        executionTimeMs: executionTime,
      });

      return {
        id: executionId,
        output: result.result || "",
        error: result.stderr || undefined,
        exitCode: result.exitCode,
        executionTimeMs: executionTime,
      };
    } catch (error) {
      const executionTime = Date.now() - startTime;
      const errorMessage = error instanceof Error ? error.message : "Unknown error";

      // Store failed execution
      await db.exec`
        INSERT INTO executions (
          id, user_id, language, code, error, exit_code,
          execution_time_ms, sandbox_id
        )
        VALUES (
          ${executionId}, ${req.userId}, ${req.language}, ${req.code},
          ${errorMessage}, -1, ${executionTime}, ${sandbox.id}
        )
      `;

      throw error;
    } finally {
      // Clean up the sandbox
      await sandbox.delete();
      log.info("Sandbox deleted", { executionId, sandboxId: sandbox.id });
    }
  }
);
Here's how the execution flow works:
- Create a fresh sandbox - Each execution gets its own isolated environment with the specified language runtime
- Run the code -
sandbox.process.codeRun()executes the code and captures stdout, stderr, and exit code - Store the results - Save execution details to the database for history and debugging
- Handle errors - If something goes wrong, we still store the error information
- Clean up - Always delete the sandbox in the
finallyblock to prevent resource leaks
Security note: Each execution happens in a completely isolated sandbox. Even if the code tries to access your filesystem, make network requests to your private services, or run malicious commands, it can't escape the sandbox or affect your infrastructure or other users' executions.
Listing execution history
For debugging, auditing, or showing users their past executions, you'll want to retrieve execution history. This is especially useful for educational platforms where students can review their practice attempts, or for code playgrounds where users return to their previous experiments.
Create an endpoint to retrieve past executions for a specific user:
// execution/execute.ts (continued)
interface ExecutionRecord {
  id: string;
  language: string;
  code: string;
  output: string | null;
  error: string | null;
  exitCode: number | null;
  executionTimeMs: number | null;
  createdAt: Date;
}

interface HistoryRequest {
  userId: string;
  limit?: number;
}

interface HistoryResponse {
  executions: ExecutionRecord[];
}

export const getHistory = api(
  { expose: true, method: "GET", path: "/execute/history/:userId" },
  async ({ userId, limit = 50 }: HistoryRequest): Promise<HistoryResponse> => {
    const rows = await db.query<{
      id: string;
      language: string;
      code: string;
      output: string | null;
      error: string | null;
      exit_code: number | null;
      execution_time_ms: number | null;
      created_at: Date;
    }>`
      SELECT id, language, code, output, error, exit_code, execution_time_ms, created_at
      FROM executions
      WHERE user_id = ${userId}
      ORDER BY created_at DESC
      LIMIT ${limit}
    `;

    const executions: ExecutionRecord[] = [];
    for await (const row of rows) {
      executions.push({
        id: row.id,
        language: row.language,
        code: row.code,
        output: row.output,
        error: row.error,
        exitCode: row.exit_code,
        executionTimeMs: row.execution_time_ms,
        createdAt: row.created_at,
      });
    }

    return { executions };
  }
);
This endpoint queries the database for all executions by a specific user, ordered by most recent first. The limit parameter defaults to 50 to prevent overwhelming responses, but you can adjust it based on your needs. The response includes everything about each execution: the code that was run, its output, any errors, execution time, and when it happened.
File operations in sandboxes
Sometimes code needs to work with files—reading configuration, processing data files, or writing output. Daytona sandboxes provide a full filesystem that's isolated from your server. You can write files to the sandbox before execution, and the code can create, read, and modify files within its isolated environment.
This is perfect for scenarios like:
- Data processing scripts that need input files
- Code that generates reports or artifacts
- Testing file I/O operations
- Working with configuration files
Add an endpoint that executes code with file access:
// execution/files.ts
import { api } from "encore.dev/api";
import { daytona } from "./daytona";
import log from "encore.dev/log";

interface ExecuteWithFilesRequest {
  code: string;
  language: "python" | "typescript";
  files?: Record<string, string>; // filename -> content
}

interface ExecuteWithFilesResponse {
  output: string;
  filesCreated: string[];
}

export const executeWithFiles = api(
  { expose: true, method: "POST", path: "/execute/files" },
  async (req: ExecuteWithFilesRequest): Promise<ExecuteWithFilesResponse> => {
    const sandbox = await daytona.create({
      language: req.language,
    });

    try {
      // Write input files to sandbox
      if (req.files) {
        for (const [filename, content] of Object.entries(req.files)) {
          await sandbox.fs.write(filename, content);
          log.info("Wrote file to sandbox", { filename });
        }
      }

      // Execute the code
      const result = await sandbox.process.codeRun(req.code);

      if (result.exitCode !== 0) {
        throw new Error(`Execution failed: ${result.stderr}`);
      }

      // List files created in the sandbox
      const files = await sandbox.fs.list("/workspace");
      const createdFiles = files.map((f) => f.name);

      return {
        output: result.result || "",
        filesCreated: createdFiles,
      };
    } finally {
      await sandbox.delete();
    }
  }
);
The flow here is straightforward: first, we write any input files to the sandbox using sandbox.fs.write(). Then we execute the code, which can read those files, create new ones, or modify them. After execution, we can list all files in the workspace to see what the code created. This is particularly useful for validating that scripts generated the expected output files.
Full AI agent loop
Here's where it all comes together. This endpoint takes a natural language prompt, asks an LLM to generate code, executes it in Daytona, and returns the results. If the code fails, it feeds the error back to the LLM and retries:
// execution/ai-generate.ts
import { api } from "encore.dev/api";
import { daytona } from "./daytona";
import { secret } from "encore.dev/config";

const anthropicKey = secret("AnthropicApiKey");

interface GenerateAndRunRequest {
  prompt: string;
  language: "python" | "typescript";
  maxRetries?: number;
}

interface GenerateAndRunResponse {
  code: string;
  output: string;
  success: boolean;
  attempts: number;
}

export const generateAndRun = api(
  { expose: true, method: "POST", path: "/ai/generate-and-run" },
  async (req: GenerateAndRunRequest): Promise<GenerateAndRunResponse> => {
    const maxRetries = req.maxRetries ?? 2;
    let lastError = "";
    let generatedCode = "";

    for (let attempt = 1; attempt <= maxRetries + 1; attempt++) {
      // Build the prompt - include error context if retrying
      const systemPrompt = `You are a code generator. Output ONLY valid ${req.language} code, no explanations or markdown.`;
      const userPrompt = lastError
        ? `${req.prompt}\n\nPrevious attempt failed with error:\n${lastError}\n\nFix the code.`
        : req.prompt;

      // Call Claude to generate code
      const response = await fetch("https://api.anthropic.com/v1/messages", {
        method: "POST",
        headers: {
          "Content-Type": "application/json",
          "x-api-key": anthropicKey(),
          "anthropic-version": "2023-06-01",
        },
        body: JSON.stringify({
          model: "claude-haiku-4-5",
          max_tokens: 1024,
          messages: [
            { role: "user", content: `${systemPrompt}\n\n${userPrompt}` }
          ],
        }),
      });

      const data = await response.json();
      generatedCode = data.content[0].text;

      // Execute in Daytona sandbox
      const sandbox = await daytona.create({ language: req.language });

      try {
        const result = await sandbox.process.codeRun(generatedCode);

        if (result.exitCode === 0) {
          return {
            code: generatedCode,
            output: result.result || "",
            success: true,
            attempts: attempt,
          };
        }

        // Code failed - save error for retry
        lastError = result.stderr || result.result || "Unknown error";
      } finally {
        await sandbox.delete();
      }
    }

    // All retries exhausted
    return {
      code: generatedCode,
      output: lastError,
      success: false,
      attempts: maxRetries + 1,
    };
  }
);
This pattern is the core of most AI coding agents:
- Generate - LLM creates code based on the user's prompt
- Execute - Run it safely in Daytona
- Validate - Check if it succeeded (exit code 0)
- Retry - If it failed, feed the error back to the LLM and try again
You can extend this with test cases, output validation, or more sophisticated prompting strategies.
Testing locally
Start your backend (make sure Docker is running first):
encore run
Your API is now running locally. Open the local development dashboard at http://localhost:9400 to explore your API.
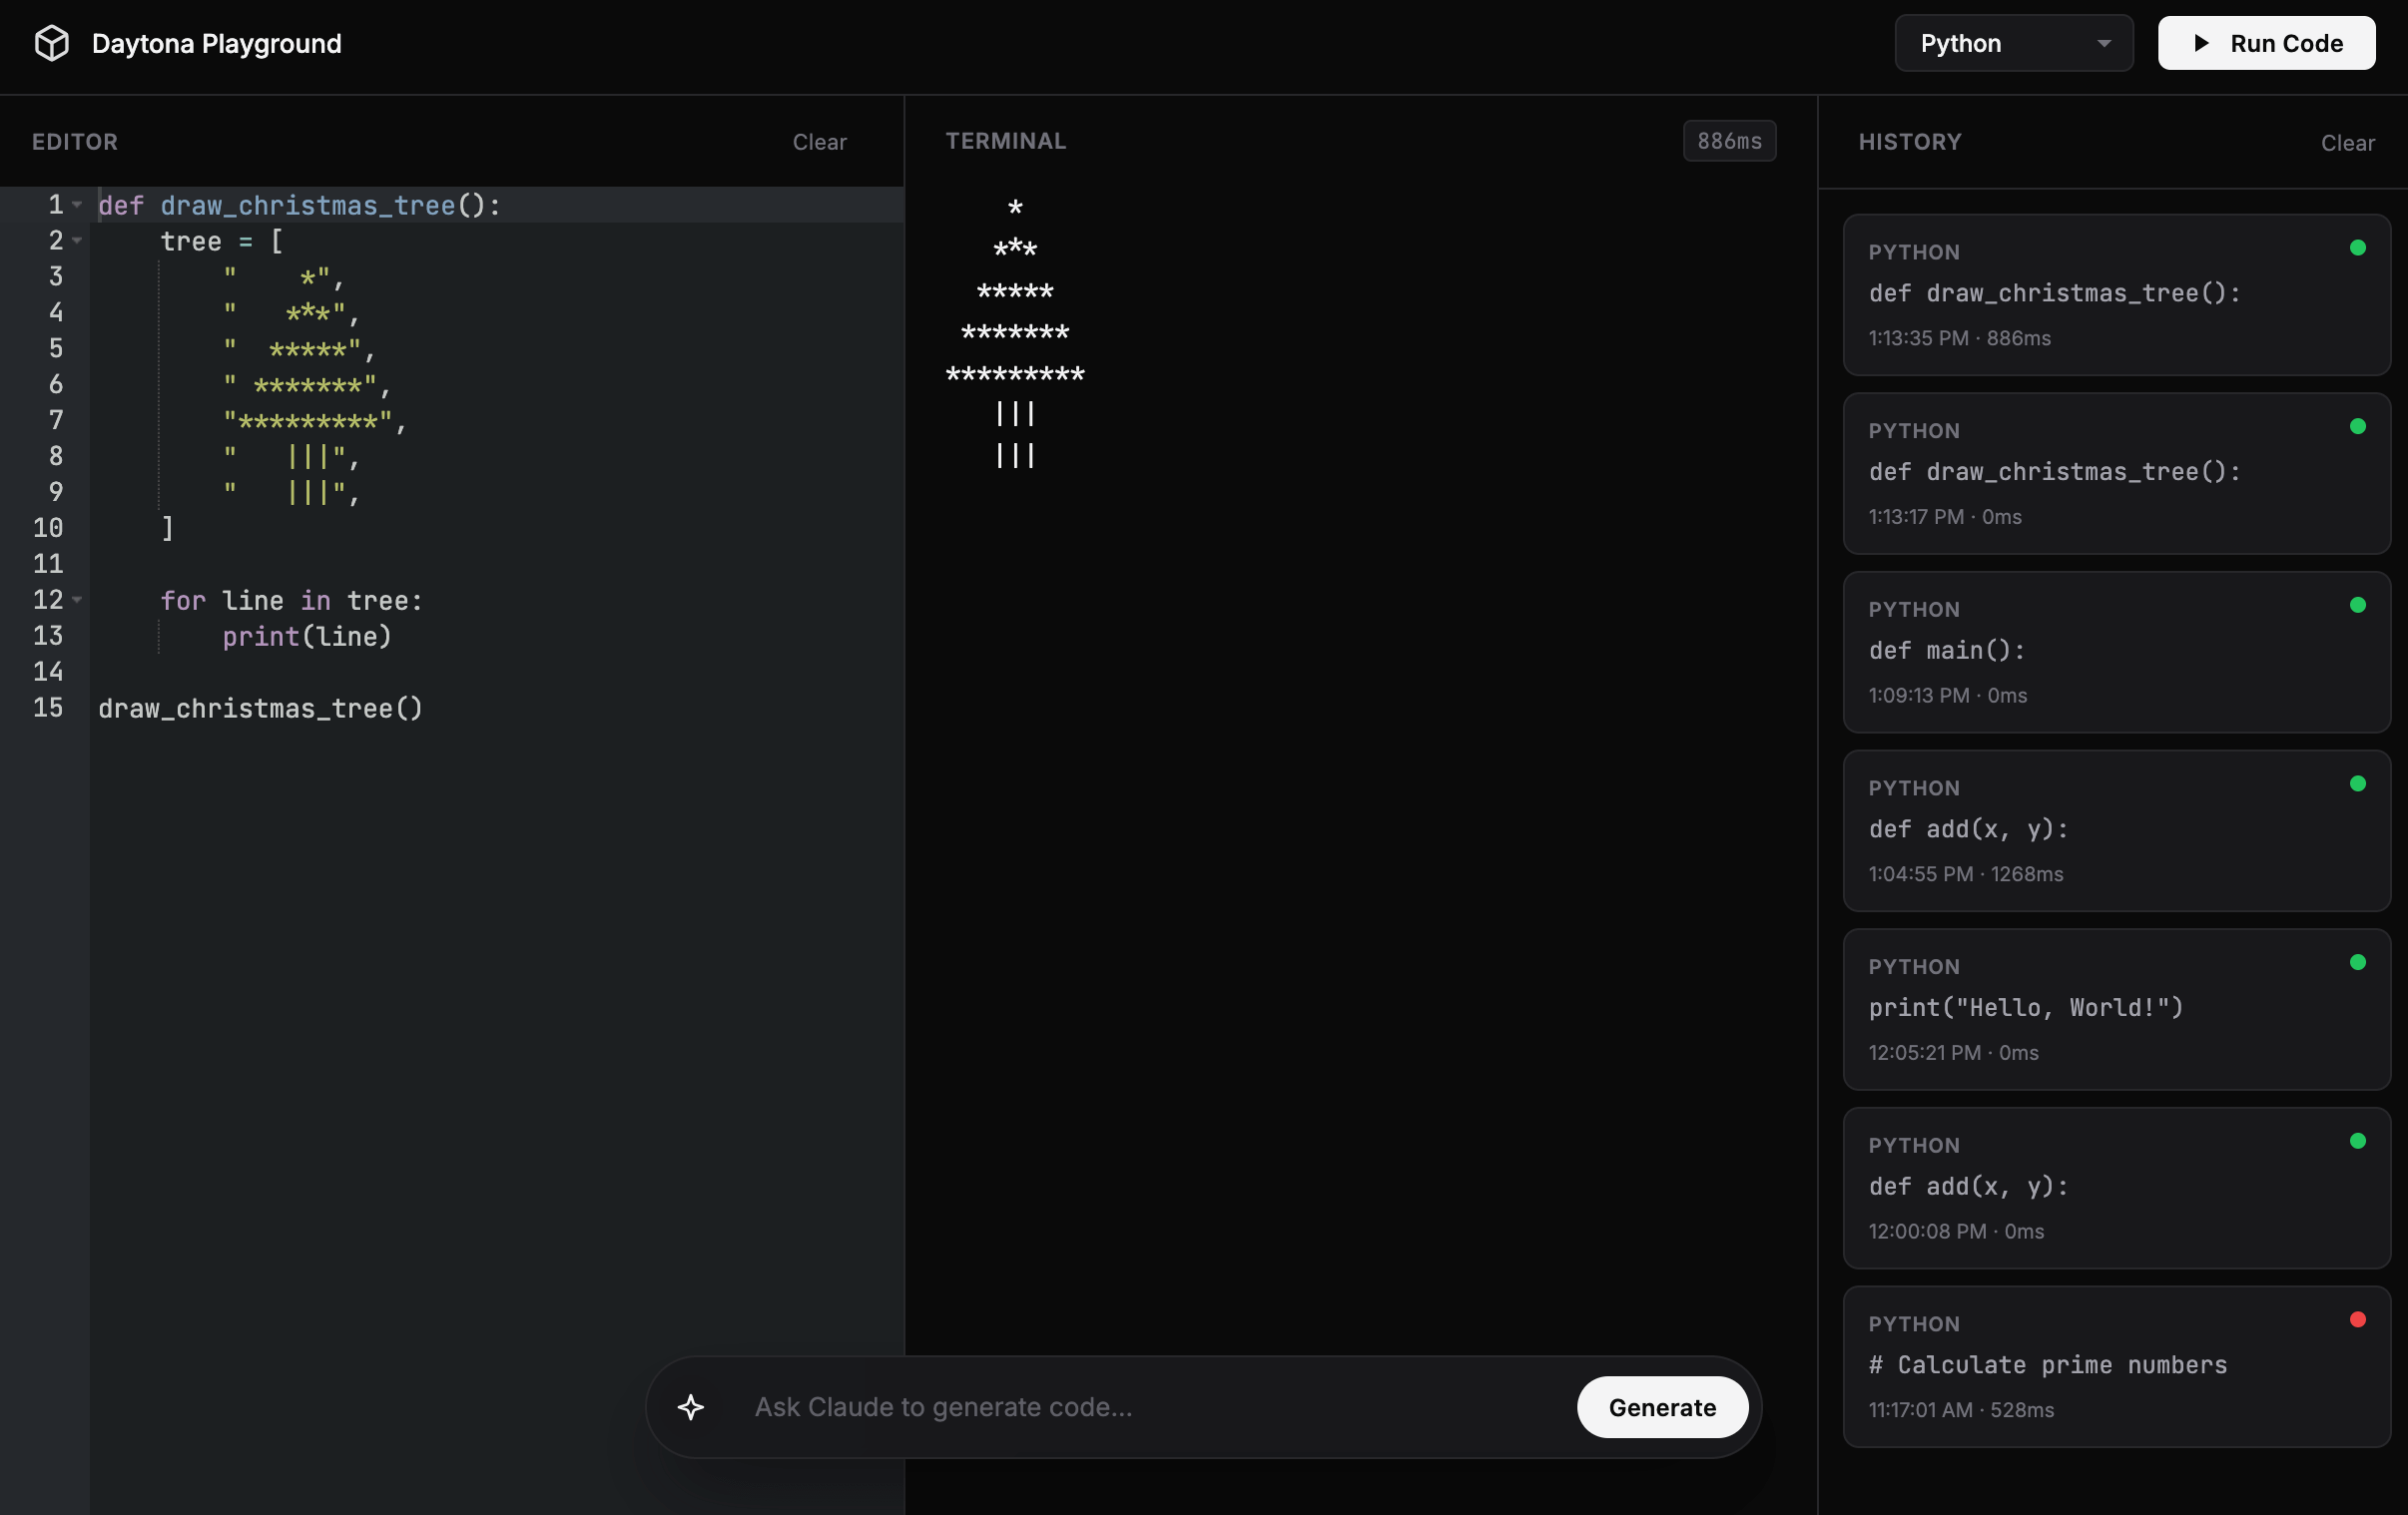
Execute AI-generated Python code
Imagine an LLM generated this data analysis script. Execute it safely:
curl -X POST http://localhost:4000/execute \
  -H "Content-Type: application/json" \
  -d '{
    "code": "# AI-generated data analysis\ndata = [23, 45, 67, 89, 12, 34]\navg = sum(data) / len(data)\nprint(f\"Average: {avg}\")\nprint(f\"Max: {max(data)}, Min: {min(data)}\")",
    "language": "python",
    "userId": "ai-agent-1"
  }'
Response:
{
  "id": "exec-1234567890-abc",
  "output": "Average: 45.0\nMax: 89, Min: 12\n",
  "exitCode": 0,
  "executionTimeMs": 1250
}
Execute AI-generated TypeScript code
curl -X POST http://localhost:4000/execute \
  -H "Content-Type: application/json" \
  -d '{
    "code": "// AI-generated utility function\nconst fibonacci = (n: number): number => n <= 1 ? n : fibonacci(n-1) + fibonacci(n-2);\nconsole.log(`Fibonacci(10) = ${fibonacci(10)}`);",
    "language": "typescript",
    "userId": "ai-agent-1"
  }'
Test the full AI loop
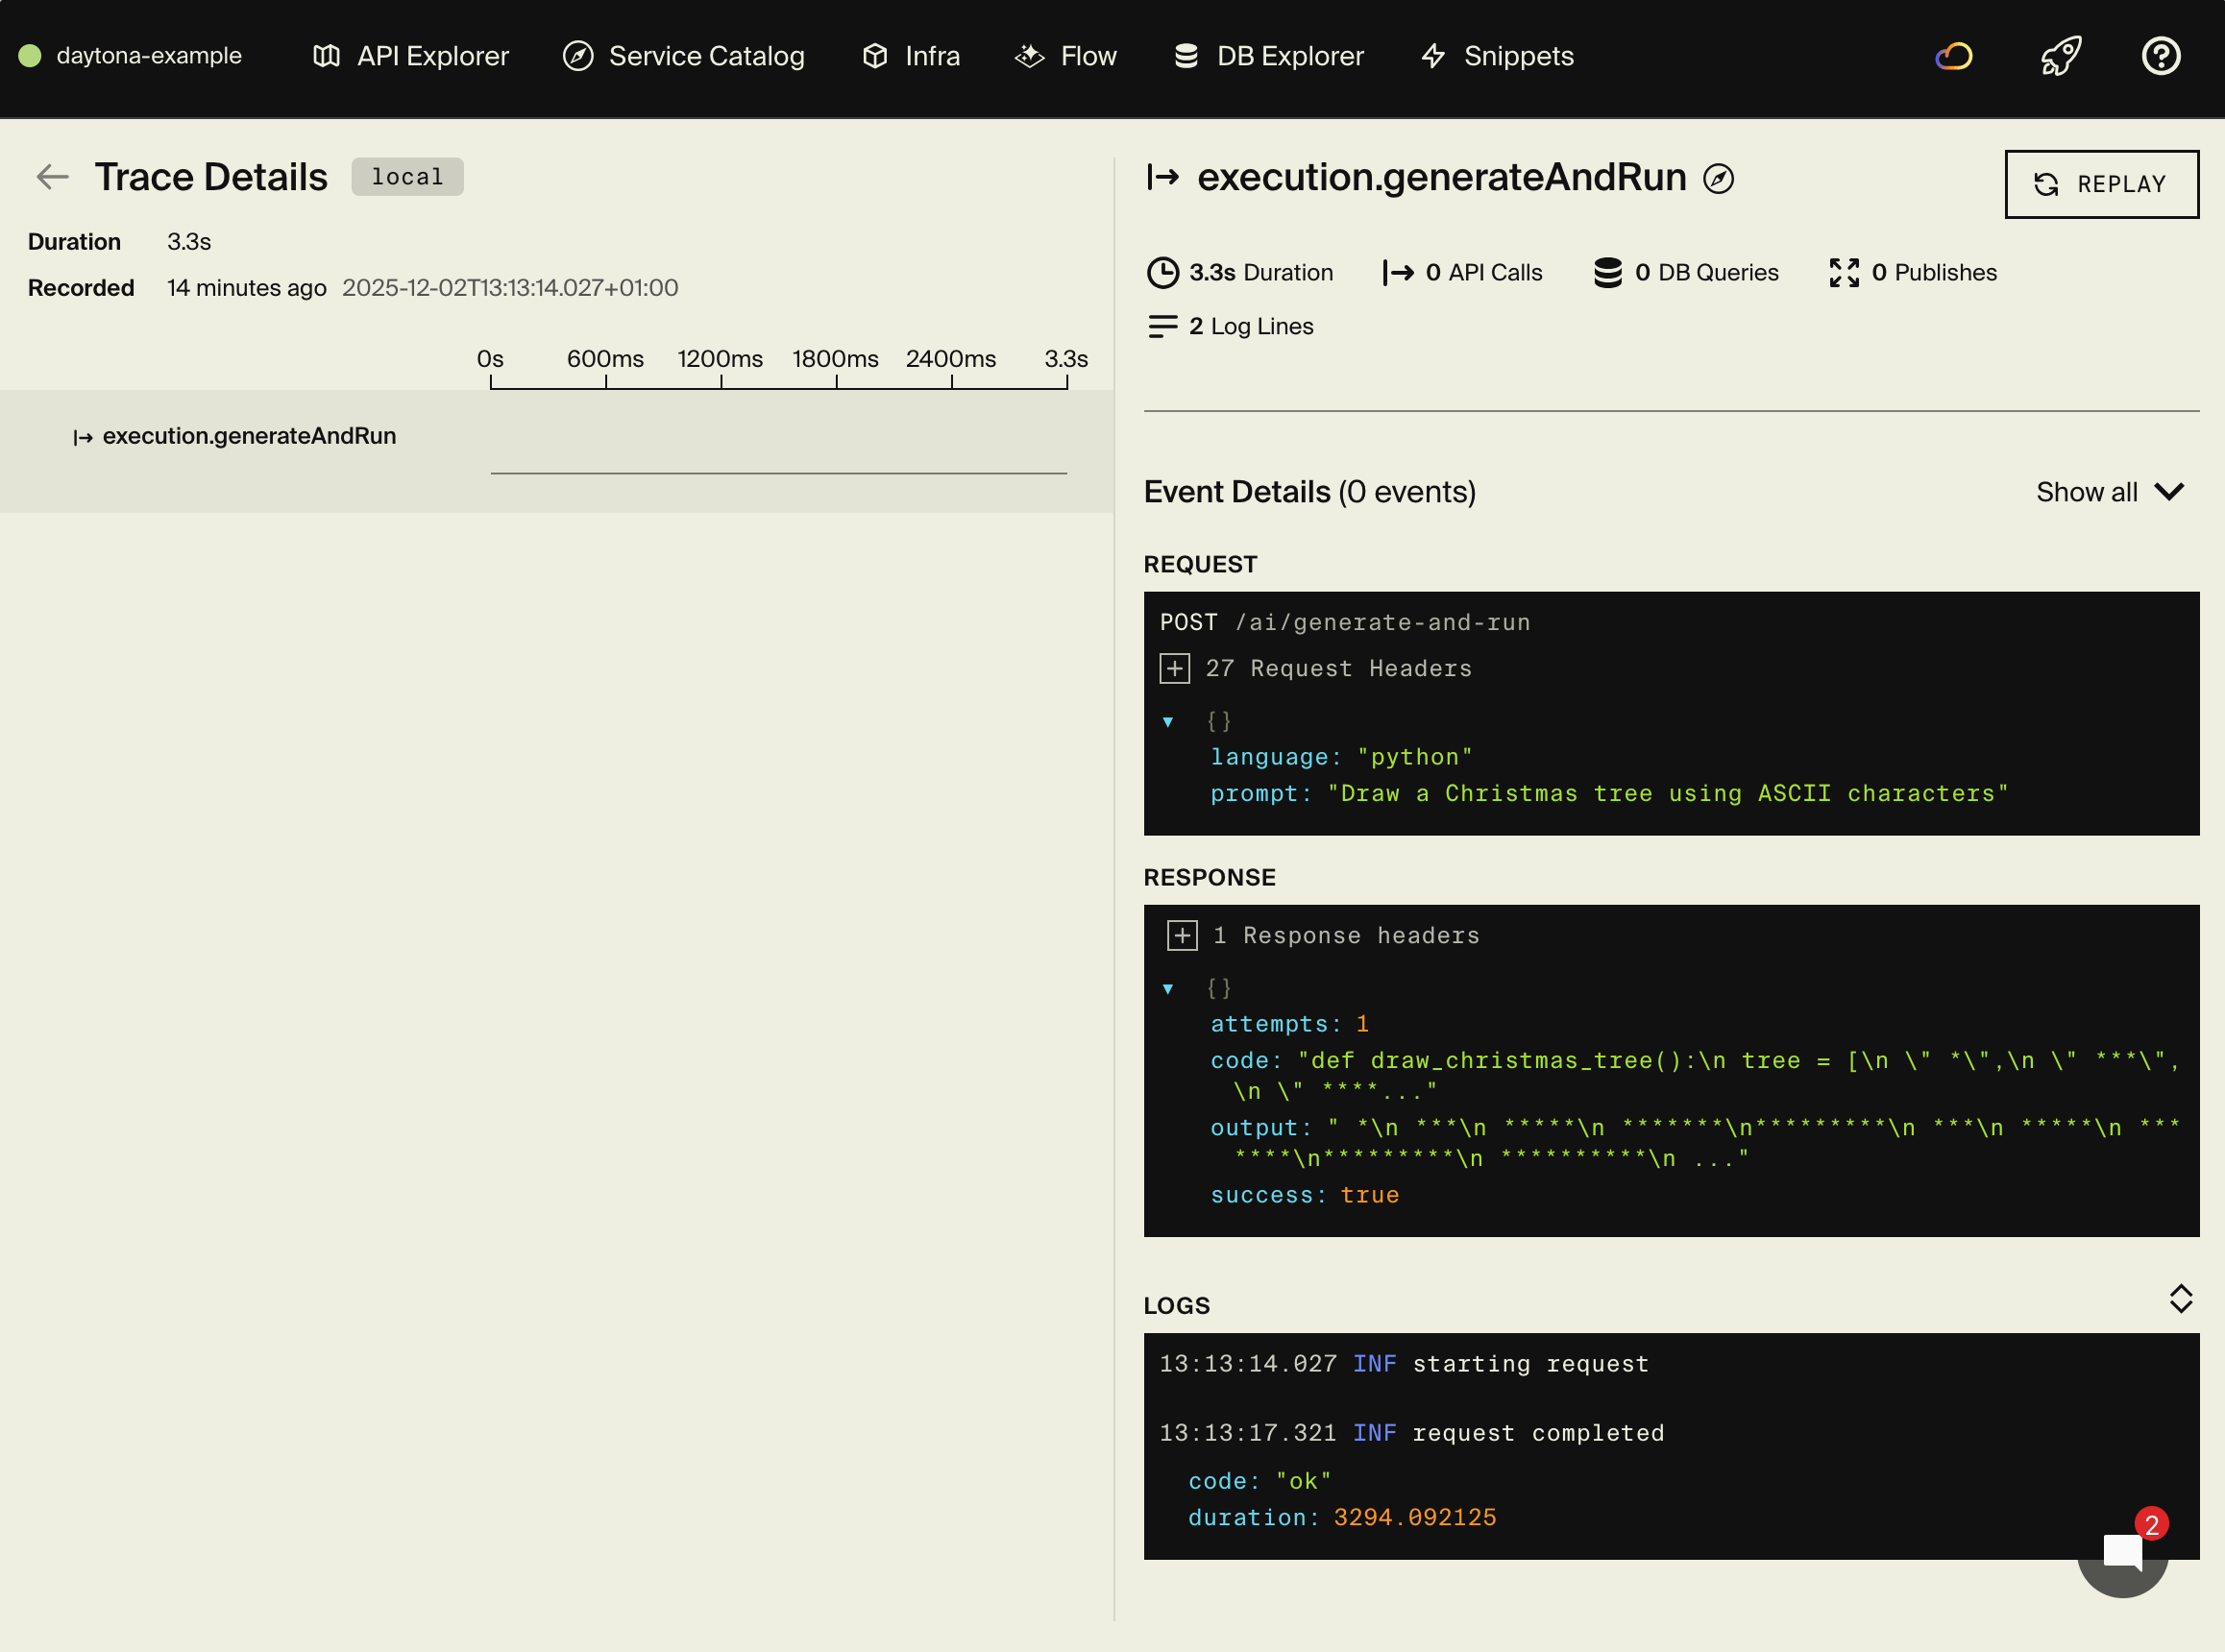
This is the real magic—give it a prompt and watch it generate, execute, and return results:
curl -X POST http://localhost:4000/ai/generate-and-run \
  -H "Content-Type: application/json" \
  -d '{
    "prompt": "Write a Python script that calculates the first 10 prime numbers and prints them",
    "language": "python"
  }'
Response:
{
  "code": "def is_prime(n):\n    if n < 2:\n        return False\n    for i in range(2, int(n**0.5) + 1):\n        if n % i == 0:\n            return False\n    return True\n\nprimes = []\nn = 2\nwhile len(primes) < 10:\n    if is_prime(n):\n        primes.append(n)\n    n += 1\nprint(primes)",
  "output": "[2, 3, 5, 7, 11, 13, 17, 19, 23, 29]\n",
  "success": true,
  "attempts": 1
}
If the LLM generates buggy code, it'll automatically retry with the error context and try to fix it.
Test error handling
LLMs sometimes hallucinate non-existent modules or write buggy code. The execute endpoint captures these errors:
curl -X POST http://localhost:4000/execute \
  -H "Content-Type: application/json" \
  -d '{
    "code": "import nonexistent_module",
    "language": "python",
    "userId": "ai-agent-1"
  }'
You'll get an error response with the Python error message captured from the sandbox.
Get execution history
curl http://localhost:4000/execute/history/user123
Execute with files
curl -X POST http://localhost:4000/execute/files \
  -H "Content-Type: application/json" \
  -d '{
    "code": "import json\nwith open(\"data.json\") as f:\n    data = json.load(f)\nprint(data)",
    "language": "python",
    "files": {
      "data.json": "{\"message\": \"Hello from file!\"}"
    }
  }'
Exploring the local dashboard
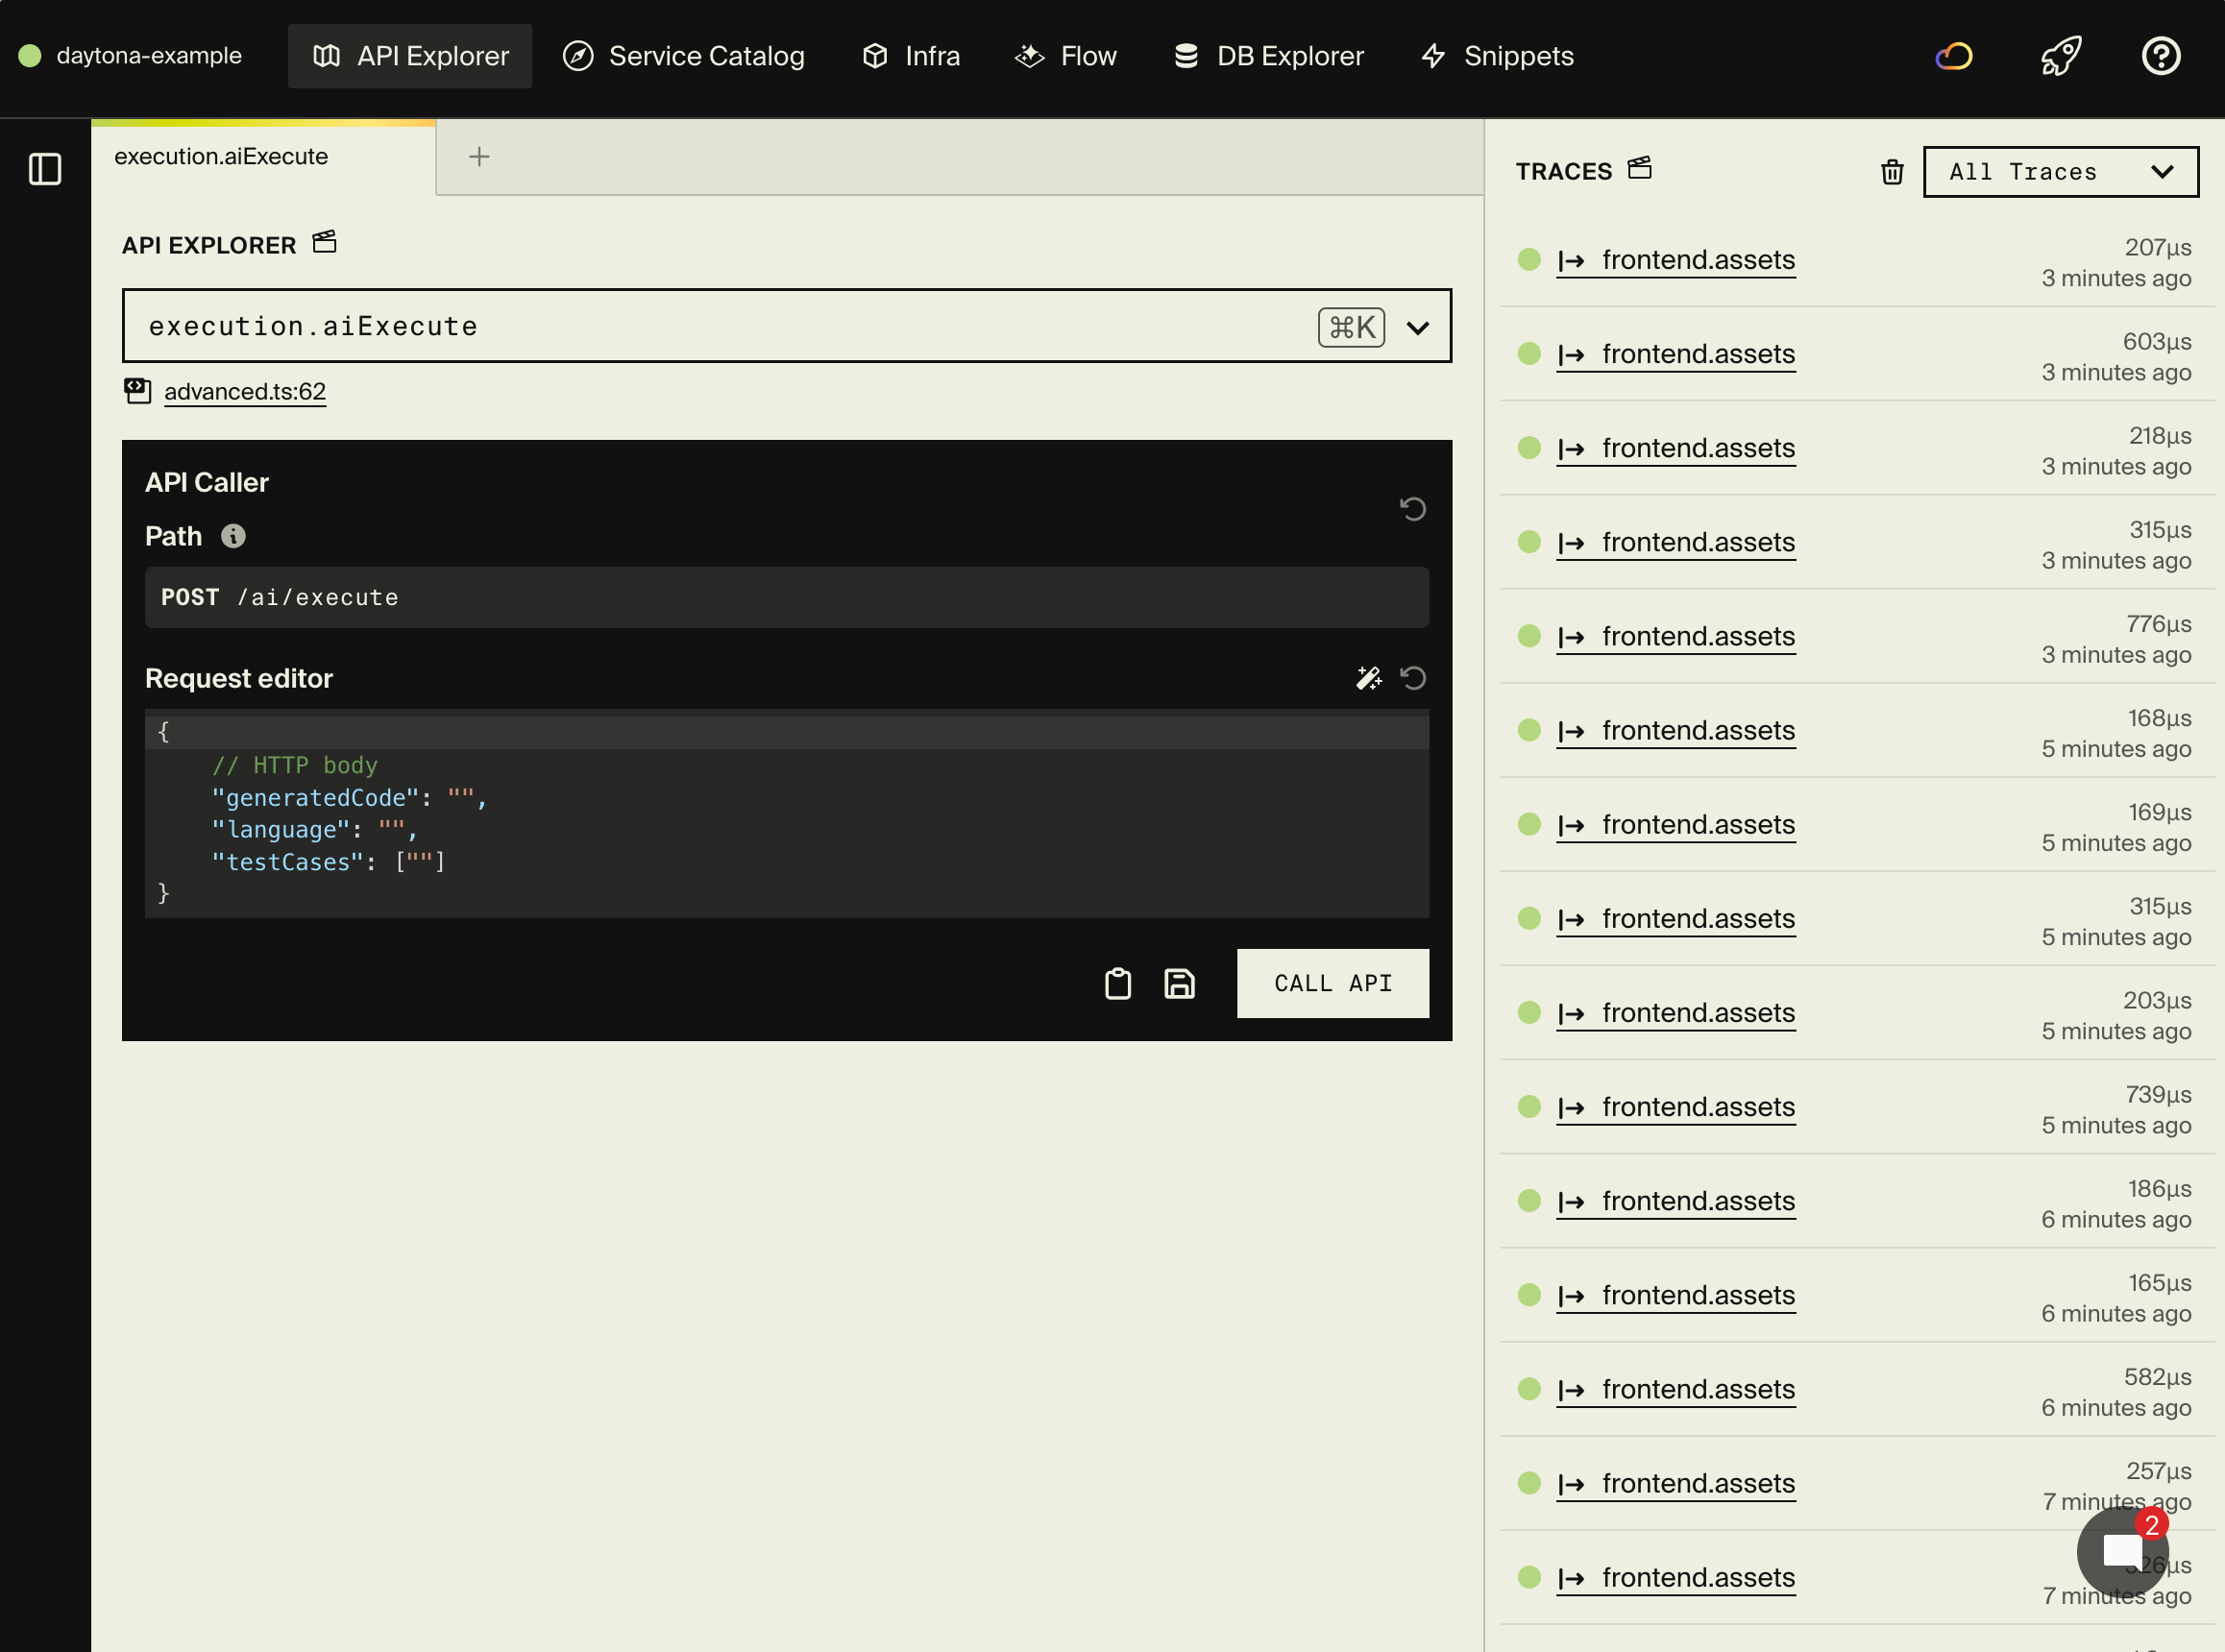
The local development dashboard at http://localhost:9400 provides:
- API Explorer - Test code execution interactively
- Service Catalog - Auto-generated API documentation
- Architecture Diagram - Visual representation of your services
- Distributed Tracing - See the full flow including Daytona sandbox creation and execution
- Database Explorer - Browse execution history and results
Advanced features
Reusable sandboxes
Creating a new sandbox for every execution is the safest approach, but it adds overhead—each sandbox creation takes a few seconds. If you're running many executions in quick succession and trust that your cleanup is thorough, you can reuse sandboxes for better performance.
Trade-off: Reusing sandboxes is faster but requires careful cleanup between executions to prevent state from leaking between runs. For maximum security, stick with fresh sandboxes for each execution.
Better alternative: Instead of reusing live sandboxes, consider using Daytona's Snapshots feature to create pre-built environments that start instantly. Snapshots let you save a sandbox state (with dependencies pre-installed) and create new sandboxes from that snapshot in seconds, giving you both speed and isolation.
Here's how to implement a simple sandbox pool:
// Keep a pool of sandboxes
let sandboxPool: Map<string, any> = new Map();

async function getOrCreateSandbox(language: string) {
  const key = `sandbox-${language}`;

  if (!sandboxPool.has(key)) {
    const sandbox = await daytona.create({ language });
    sandboxPool.set(key, sandbox);
  }

  return sandboxPool.get(key);
}
Execution timeouts
Without timeouts, a user could submit code with an infinite loop or a very slow operation, consuming resources indefinitely. Timeouts are essential for protecting your system from runaway executions. By racing the code execution against a timer, you can automatically cancel executions that take too long.
Add timeout protection to prevent long-running executions:
export const executeWithTimeout = api(
  { expose: true, method: "POST", path: "/execute/timeout" },
  async (req: { code: string; language: string; timeoutMs?: number }) => {
    const timeout = req.timeoutMs || 5000;
    const sandbox = await daytona.create({ language: req.language });

    try {
      const result = await Promise.race([
        sandbox.process.codeRun(req.code),
        new Promise((_, reject) =>
          setTimeout(() => reject(new Error("Execution timeout")), timeout)
        ),
      ]);

      return { output: (result as any).result };
    } finally {
      await sandbox.delete();
    }
  }
);
This uses Promise.race() to run the code execution alongside a timeout timer. Whichever completes first wins—if the code finishes in time, you get the result; if the timer fires first, the execution is rejected with a timeout error. The sandbox still gets cleaned up in the finally block regardless of which path is taken.
Git operations
One powerful feature of Daytona sandboxes is Git integration. You can clone repositories directly into the sandbox and execute scripts from them. This is perfect for:
- Running tests from a specific repository
- Executing code that depends on a library from GitHub
- Building CI/CD workflows
- Testing code against different repository versions
For more complex setups, you can use Daytona's Declarative Builder to create custom Docker images with specific dependencies pre-installed, making your sandboxes start even faster.
Clone and work with repositories in sandboxes:
export const executeFromRepo = api(
  { expose: true, method: "POST", path: "/execute/repo" },
  async (req: { repoUrl: string; script: string }) => {
    const sandbox = await daytona.create({ language: "python" });

    try {
      // Clone the repository
      await sandbox.git.clone(req.repoUrl, "/workspace/repo");

      // Execute a script from the repo
      const result = await sandbox.process.codeRun(
        `cd /workspace/repo && ${req.script}`
      );

      return { output: result.result };
    } finally {
      await sandbox.delete();
    }
  }
);
Resource limits
Daytona automatically provides resource isolation and limits for sandboxes. You can also configure network limits to control what external services your code can access, preventing data exfiltration or unauthorized API calls.
For persistent data across multiple executions, consider using Volumes instead of relying on the sandbox filesystem, which is ephemeral.
Use cases
AI coding agent
This is the primary use case Daytona is built for. AI coding assistants like GitHub Copilot, Cursor, or custom GPT-based agents generate code based on user prompts. But how do you verify that the generated code actually works? By using Daytona as an execution backend, you can run the AI-generated code in a safe environment and validate the results before showing them to the user.
This creates a feedback loop: generate code → execute it → check output → if wrong, regenerate with error context.
Here's an endpoint that executes AI-generated code and runs test cases to validate correctness:
export const aiExecute = api(
  { expose: true, method: "POST", path: "/ai/execute" },
  async (req: { generatedCode: string; language: string; testCases: string[] }) => {
    const sandbox = await daytona.create({ language: req.language });

    try {
      // Run the AI-generated code
      const result = await sandbox.process.codeRun(req.generatedCode);

      // Run test cases to validate
      const testResults = [];
      for (const testCase of req.testCases) {
        const testResult = await sandbox.process.codeRun(testCase);
        testResults.push({
          passed: testResult.exitCode === 0,
          output: testResult.result,
        });
      }

      return {
        executionResult: result.result,
        testResults,
        allTestsPassed: testResults.every((t) => t.passed),
      };
    } finally {
      await sandbox.delete();
    }
  }
);
For production AI agents, Daytona provides a LangChain integration that makes it easy to use Daytona sandboxes as tools in your LangChain pipelines. They also support Language Server Protocol (LSP) for code intelligence features like autocomplete and diagnostics.
Code playground
Code playgrounds like CodePen, JSFiddle, or Replit let users write code and see results immediately. With Daytona handling the execution, you get the safety of server-side sandboxing without managing containers yourself.
For more interactive experiences, you can use Daytona's PTY (Pseudo Terminal) feature to create REPL-like environments.
export const playground = api(
  { expose: true, method: "POST", path: "/playground/run" },
  async (req: { code: string; language: string }) => {
    return await execute({
      code: req.code,
      language: req.language as any,
    });
  }
);
Educational platform
Online learning platforms like LeetCode, Codecademy, or freeCodeCamp need to run student code safely at scale. Students submit solutions to programming exercises, and the platform needs to execute them, check if they're correct, and provide feedback. Daytona makes this secure and scalable—each student's code runs in isolation, and you can track their progress over time using the execution history.
Build a learning platform where students can practice coding exercises:
export const submitExercise = api(
  { expose: true, method: "POST", path: "/learn/submit" },
  async (req: {
    studentId: string;
    exerciseId: string;
    solution: string;
    language: string;
  }) => {
    // Execute student's solution
    const result = await execute({
      code: req.solution,
      language: req.language as any,
      userId: req.studentId,
    });

    // Grade the solution based on output
    const passed = result.exitCode === 0 && result.output.includes("expected");

    return {
      passed,
      output: result.output,
      feedback: passed ? "Great job!" : "Try again",
    };
  }
);
This endpoint executes the student's solution and grades it based on the output. In a real educational platform, you'd have more sophisticated grading logic—comparing output against expected results, running multiple test cases, or even using unit tests. The execution history (stored via userId) lets you track each student's progress over time and identify common mistakes.
Frontend integration
Once your backend is running, you can build a frontend that lets users write and execute code. This example shows a simple React component with a textarea for code input and a button to run it. In a production app, you'd use a proper code editor library like Monaco Editor (VS Code's editor) or CodeMirror for syntax highlighting, line numbers, and autocomplete.
Here's a basic example to get you started:
// Example React component
import { useState } from "react";

function CodeEditor() {
  const [code, setCode] = useState('print("Hello, World!")');
  const [output, setOutput] = useState("");
  const [loading, setLoading] = useState(false);

  const runCode = async () => {
    setLoading(true);

    const response = await fetch("http://localhost:4000/execute", {
      method: "POST",
      headers: { "Content-Type": "application/json" },
      body: JSON.stringify({
        code,
        language: "python",
        userId: "user123",
      }),
    });

    const data = await response.json();
    setOutput(data.output || data.error || "");
    setLoading(false);
  };

  return (
    <div>
      <textarea
        value={code}
        onChange={(e) => setCode(e.target.value)}
        rows={10}
        cols={80}
      />
      <button onClick={runCode} disabled={loading}>
        {loading ? "Running..." : "Run Code"}
      </button>
      <pre>{output}</pre>
    </div>
  );
}
For complete frontend integration guides, see the frontend integration documentation.
Deployment
Self-hosting
See the self-hosting instructions for how to use encore build docker to create a Docker image and configure it.
Encore Cloud Platform
Deploy your application using git push encore:
git add -A .
git commit -m "Add Daytona code execution"
git push encore
Set your production secret:
encore secret set --prod DaytonaApiKey
Note: Encore Cloud is great for prototyping and development with fair use limits. For production workloads, you can connect your AWS or GCP account and Encore will provision infrastructure directly in your cloud account.
Next steps
AI & Observability:
- Add Langfuse for tracing and monitoring your AI agent's LLM calls
- Use Daytona's LangChain integration to add code execution to your AI pipelines
- Explore Daytona's MCP Server support for Claude and other AI assistants
Encore features:
- Add rate limiting to prevent abuse
- Implement user authentication to protect your API
- Set up monitoring for execution metrics
- Add Pub/Sub for async execution queues
Daytona features:
- Use Snapshots for instant sandbox startup with pre-installed dependencies
- Implement Volumes for persistent storage across executions
- Add PTY support for interactive terminal sessions
- Integrate Language Server Protocol for code intelligence
- Configure Network Limits to restrict external access
- Explore Computer Use for browser automation and GUI testing
If you found this tutorial helpful, consider starring Encore on GitHub to help others discover it.
Related Articles

 Ivan Cernja
 Ivan Cernja
 Ivan Cernja