Quickstart Guide
Build an app in 5 minutes with Encore
Let's build something small with a surprising amount of real infrastructure.
You'll create a PostgreSQL-backed URL shortener, with the database provisioned and every request traced automatically. Then grow it into a multi-service app by adding a second service, its own database, and a Pub/Sub topic in code, run it all locally, and deploy it to the cloud.
Before you start
You'll need:
- Node.js
- Docker. Make sure it's running before step 2 so Encore can provision PostgreSQL for you locally.
1. Install Encore and create your app
Install the Encore CLI and create an app from the URL shortener starter:
Windows: iwr https://encore.dev/install.ps1 | iex
Linux: curl -L https://encore.dev/install.sh | bash
If you're new to Encore, the CLI asks you to create a free account, which you'll need to deploy the app and manage secrets using Encore's cloud platform.
It then offers to install Encore's AI instructions, letting you complete the rest of this guide using simple prompts in your AI coding tool. Finally, choose a name for your app. The CLI creates a directory with that name.
Run encore app create without flags and choose a template. Hello World is the smallest option, but the rest of this guide uses the URL shortener.
2. Run your app
Make sure Docker is running, then start your app:
$ cd your-app-name # replace with the app name you picked$ encore run⠋ Building Encore application graph...
Encore automatically provisions the PostgreSQL database and runs its migrations.
Open the local dashboard
Open http://localhost:9400 in your browser.
The local dashboard includes an API explorer, generated documentation, a database explorer, and distributed tracing. Encore Flow gives you a live map of your service architecture.
3. Call your API
In the API Explorer, call url.shorten. Encore generates the request form from your code, so it's ready to use:
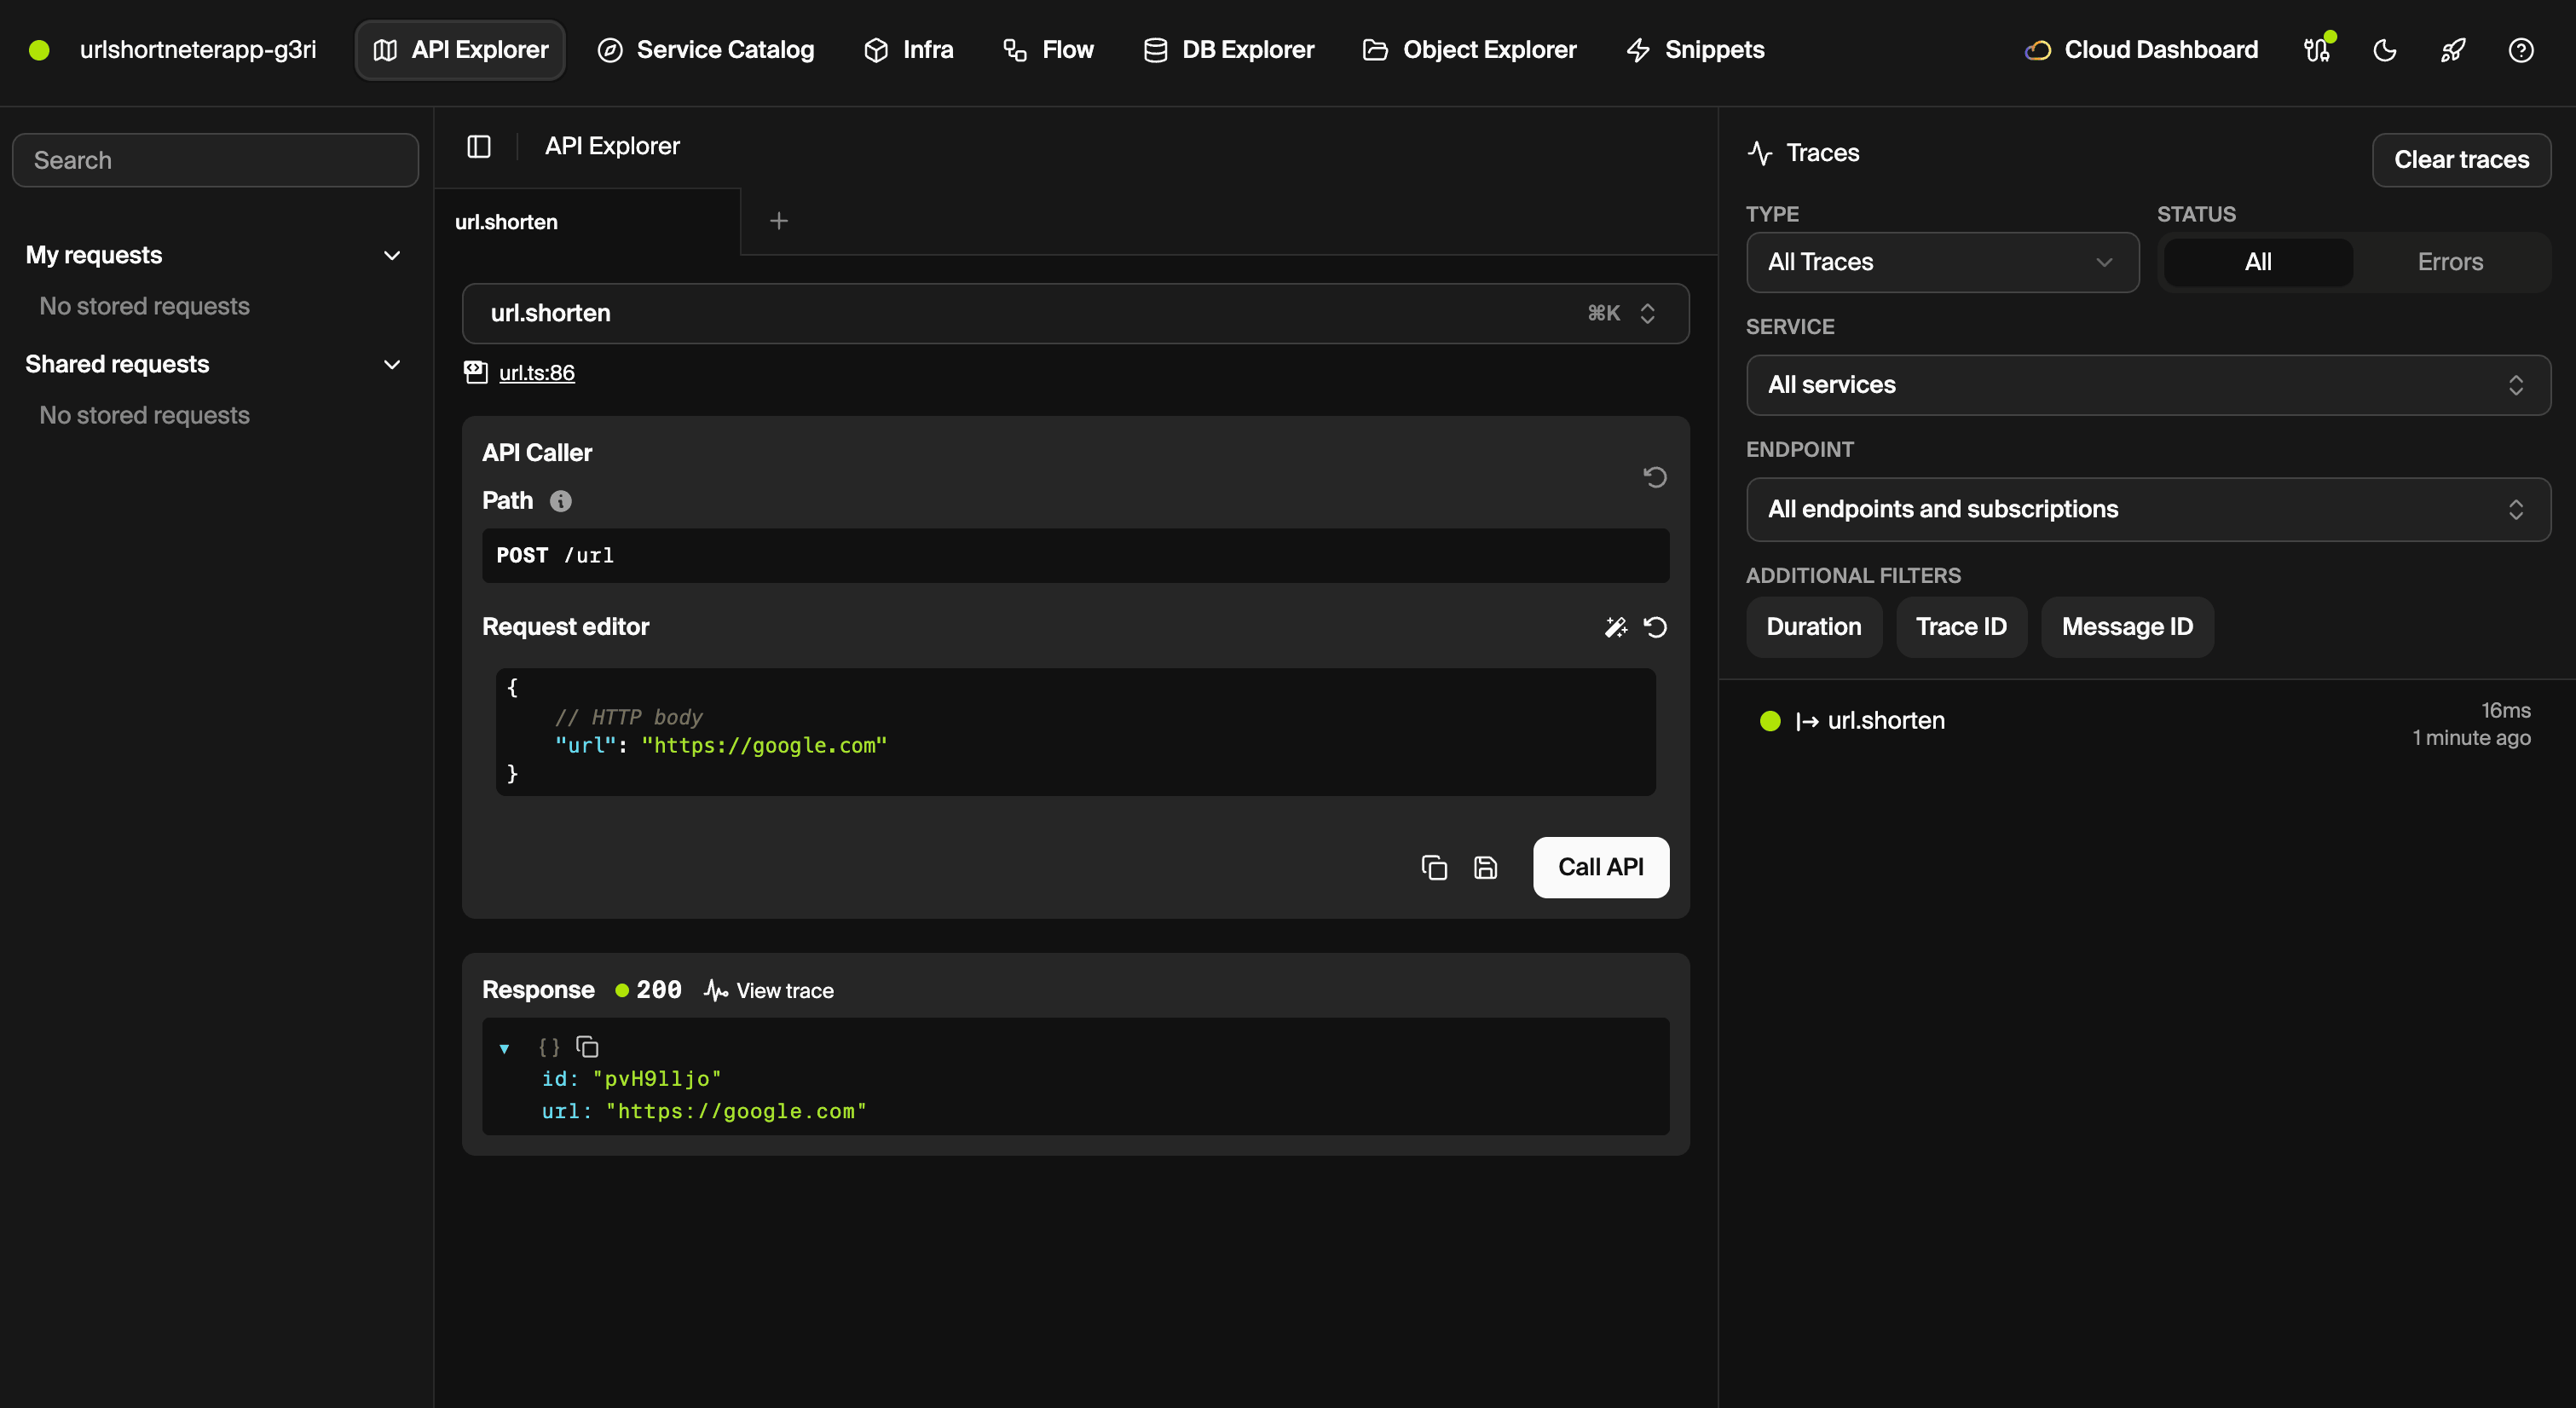
Each call appears in the Traces column on the right.
Call it a few more times with different URLs, each one adding another row to the database. Then call url.get with one of the returned ids to fetch a URL back.
4. Look at a trace
In the local dashboard, select a POST /url request from the right-hand column.
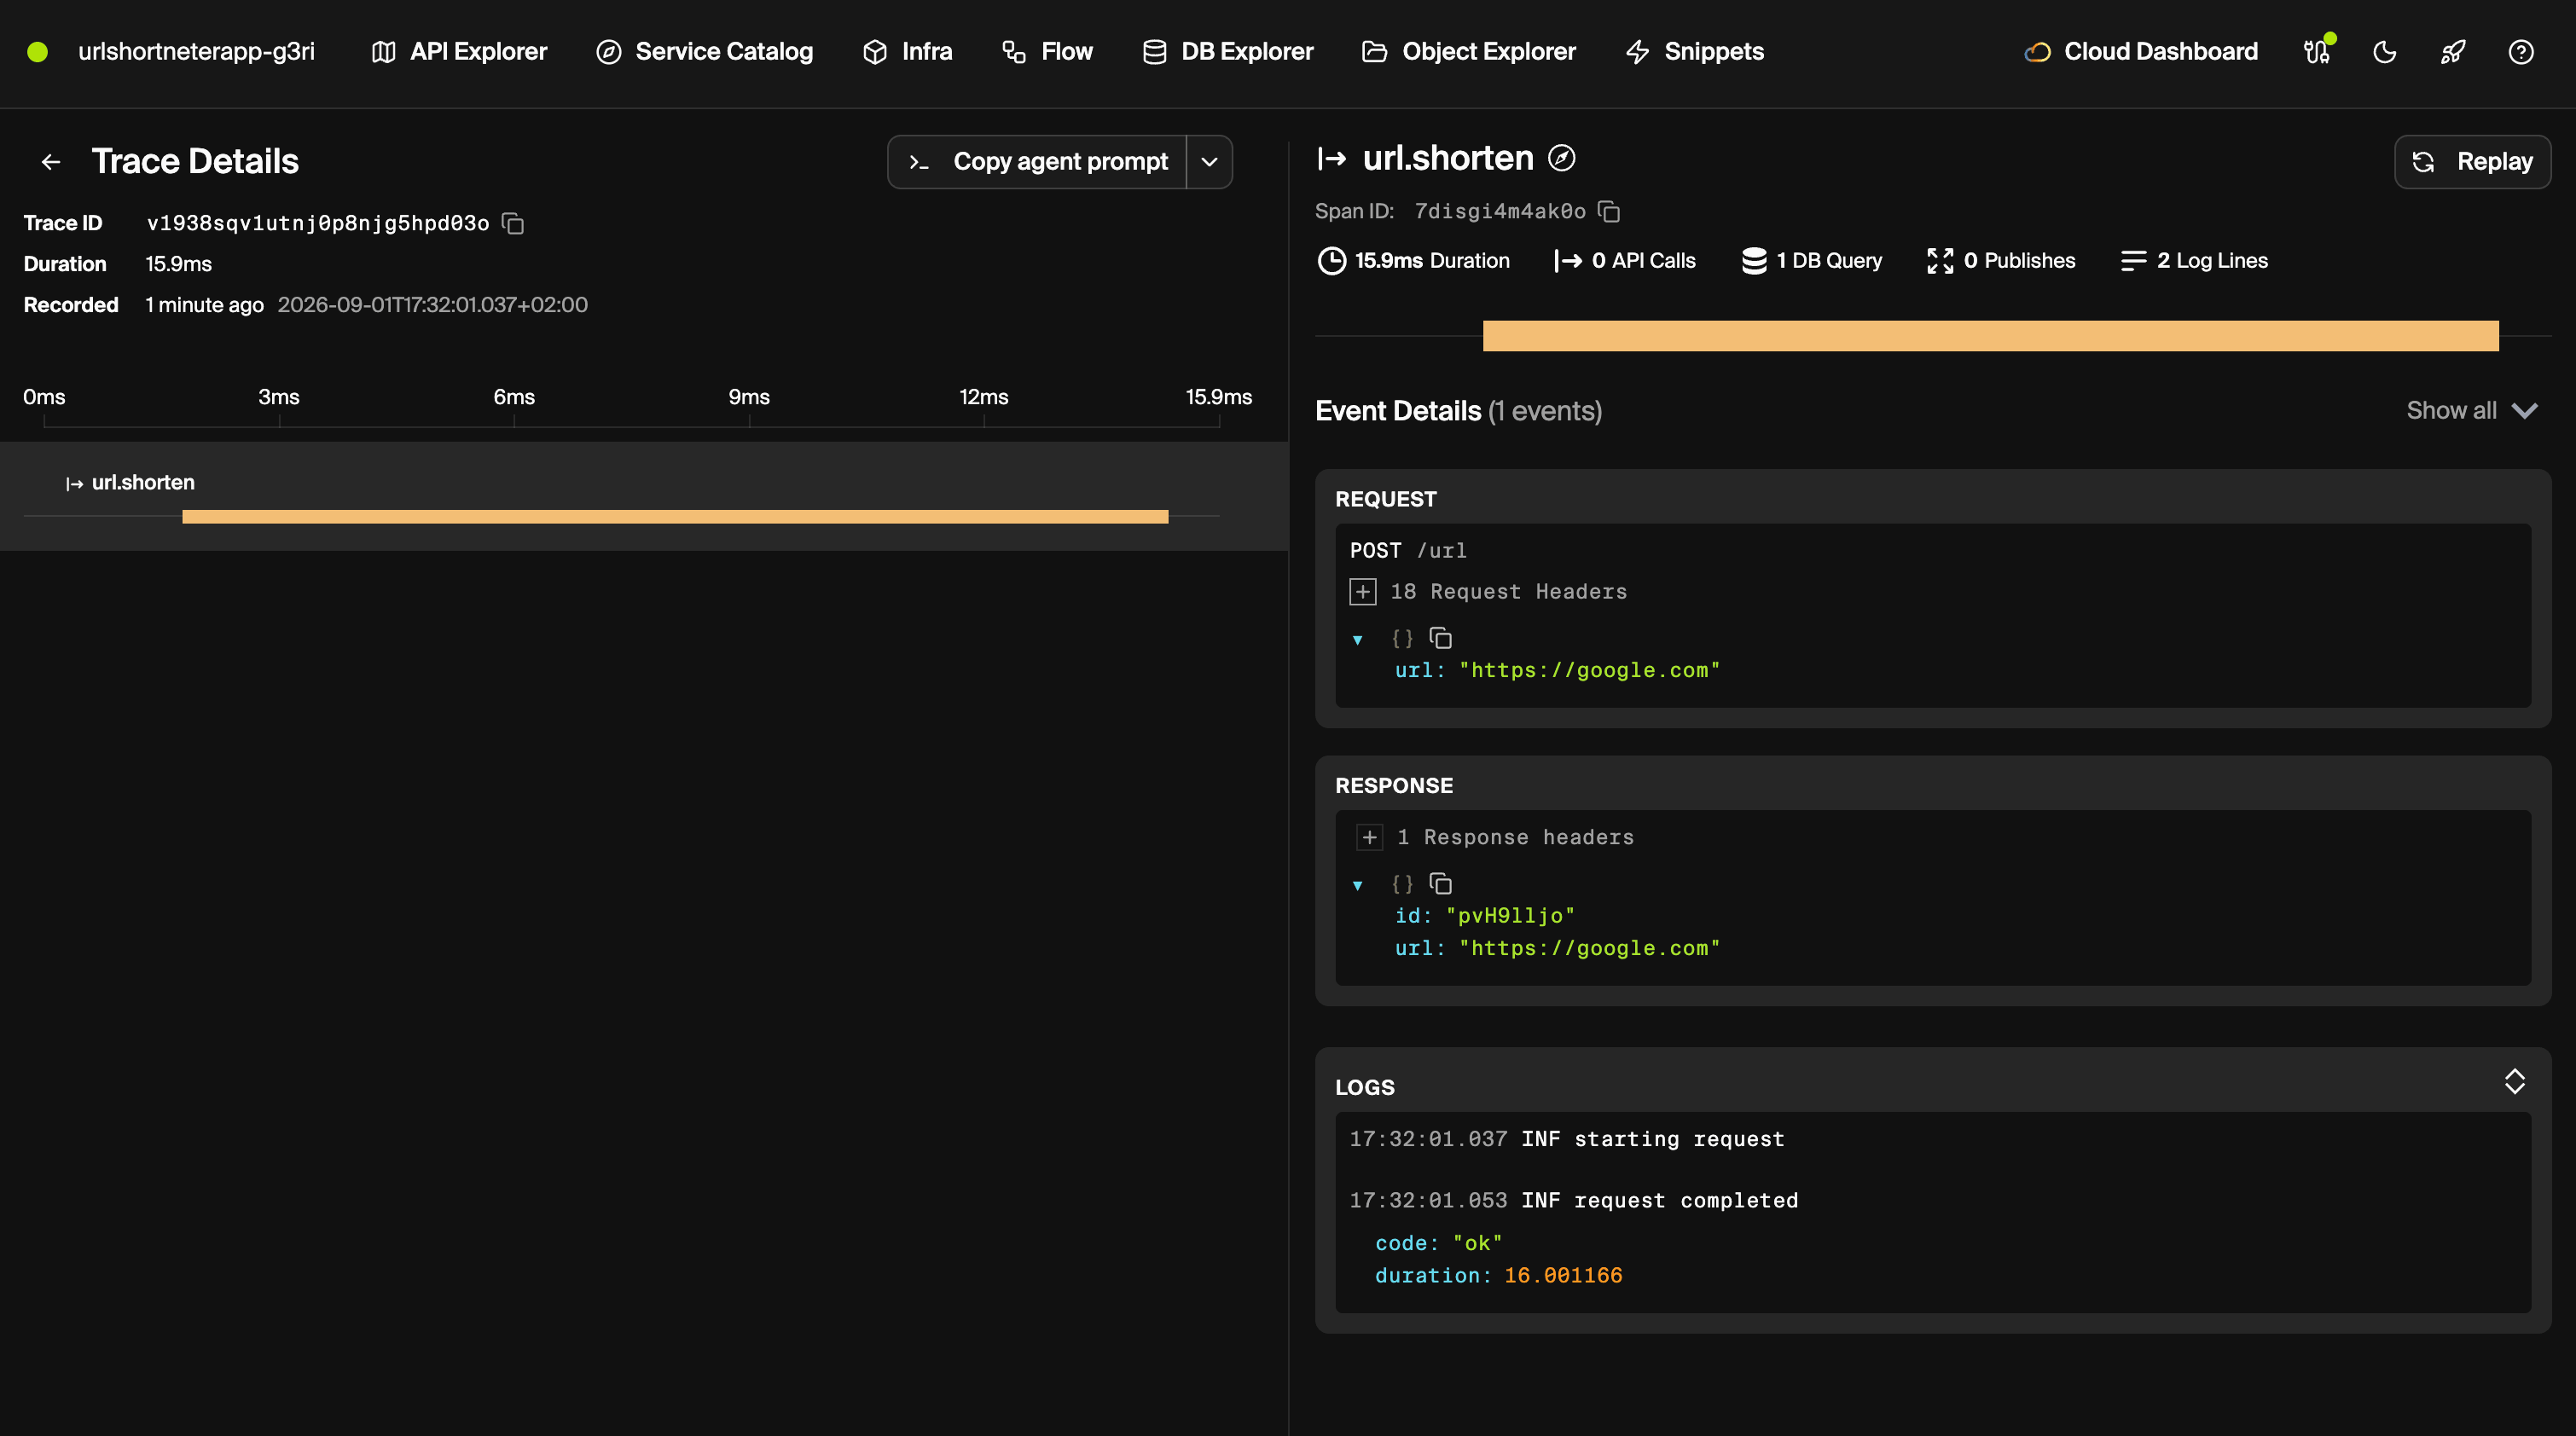
Encore captures a distributed trace for every request, with no logging or instrumentation code required. Each trace shows:
- Summary: duration, API calls, database queries, published messages, and logs.
- Payloads: the full request and response.
- Timeline: where the request spent its time.
- Logs: every log line correlated with that request.
Compare it with a GET /url/:id trace. The database operation is now a SELECT instead of an INSERT.
See a failure in a trace
Traces are most useful when something breaks. Call url.get with an id that doesn't exist, such as does-not-exist.
Open the failed request's trace. It shows the SELECT that returned no rows and the error returned by the endpoint.
The endpoint throws APIError.notFound. Encore returns a 404 and records the error in the trace.
Encore captures the same trace data in every environment. In a multi-service app, traces follow requests across services, Pub/Sub messages, and cron jobs. Learn more in the tracing documentation.
Inspect the database
Now look at the data written by the query.
Open DB Explorer in the local dashboard and select the url table. You'll see one row for each shortened URL, and from here you can browse and edit rows, add records, and run ad hoc SQL in the SQL console.
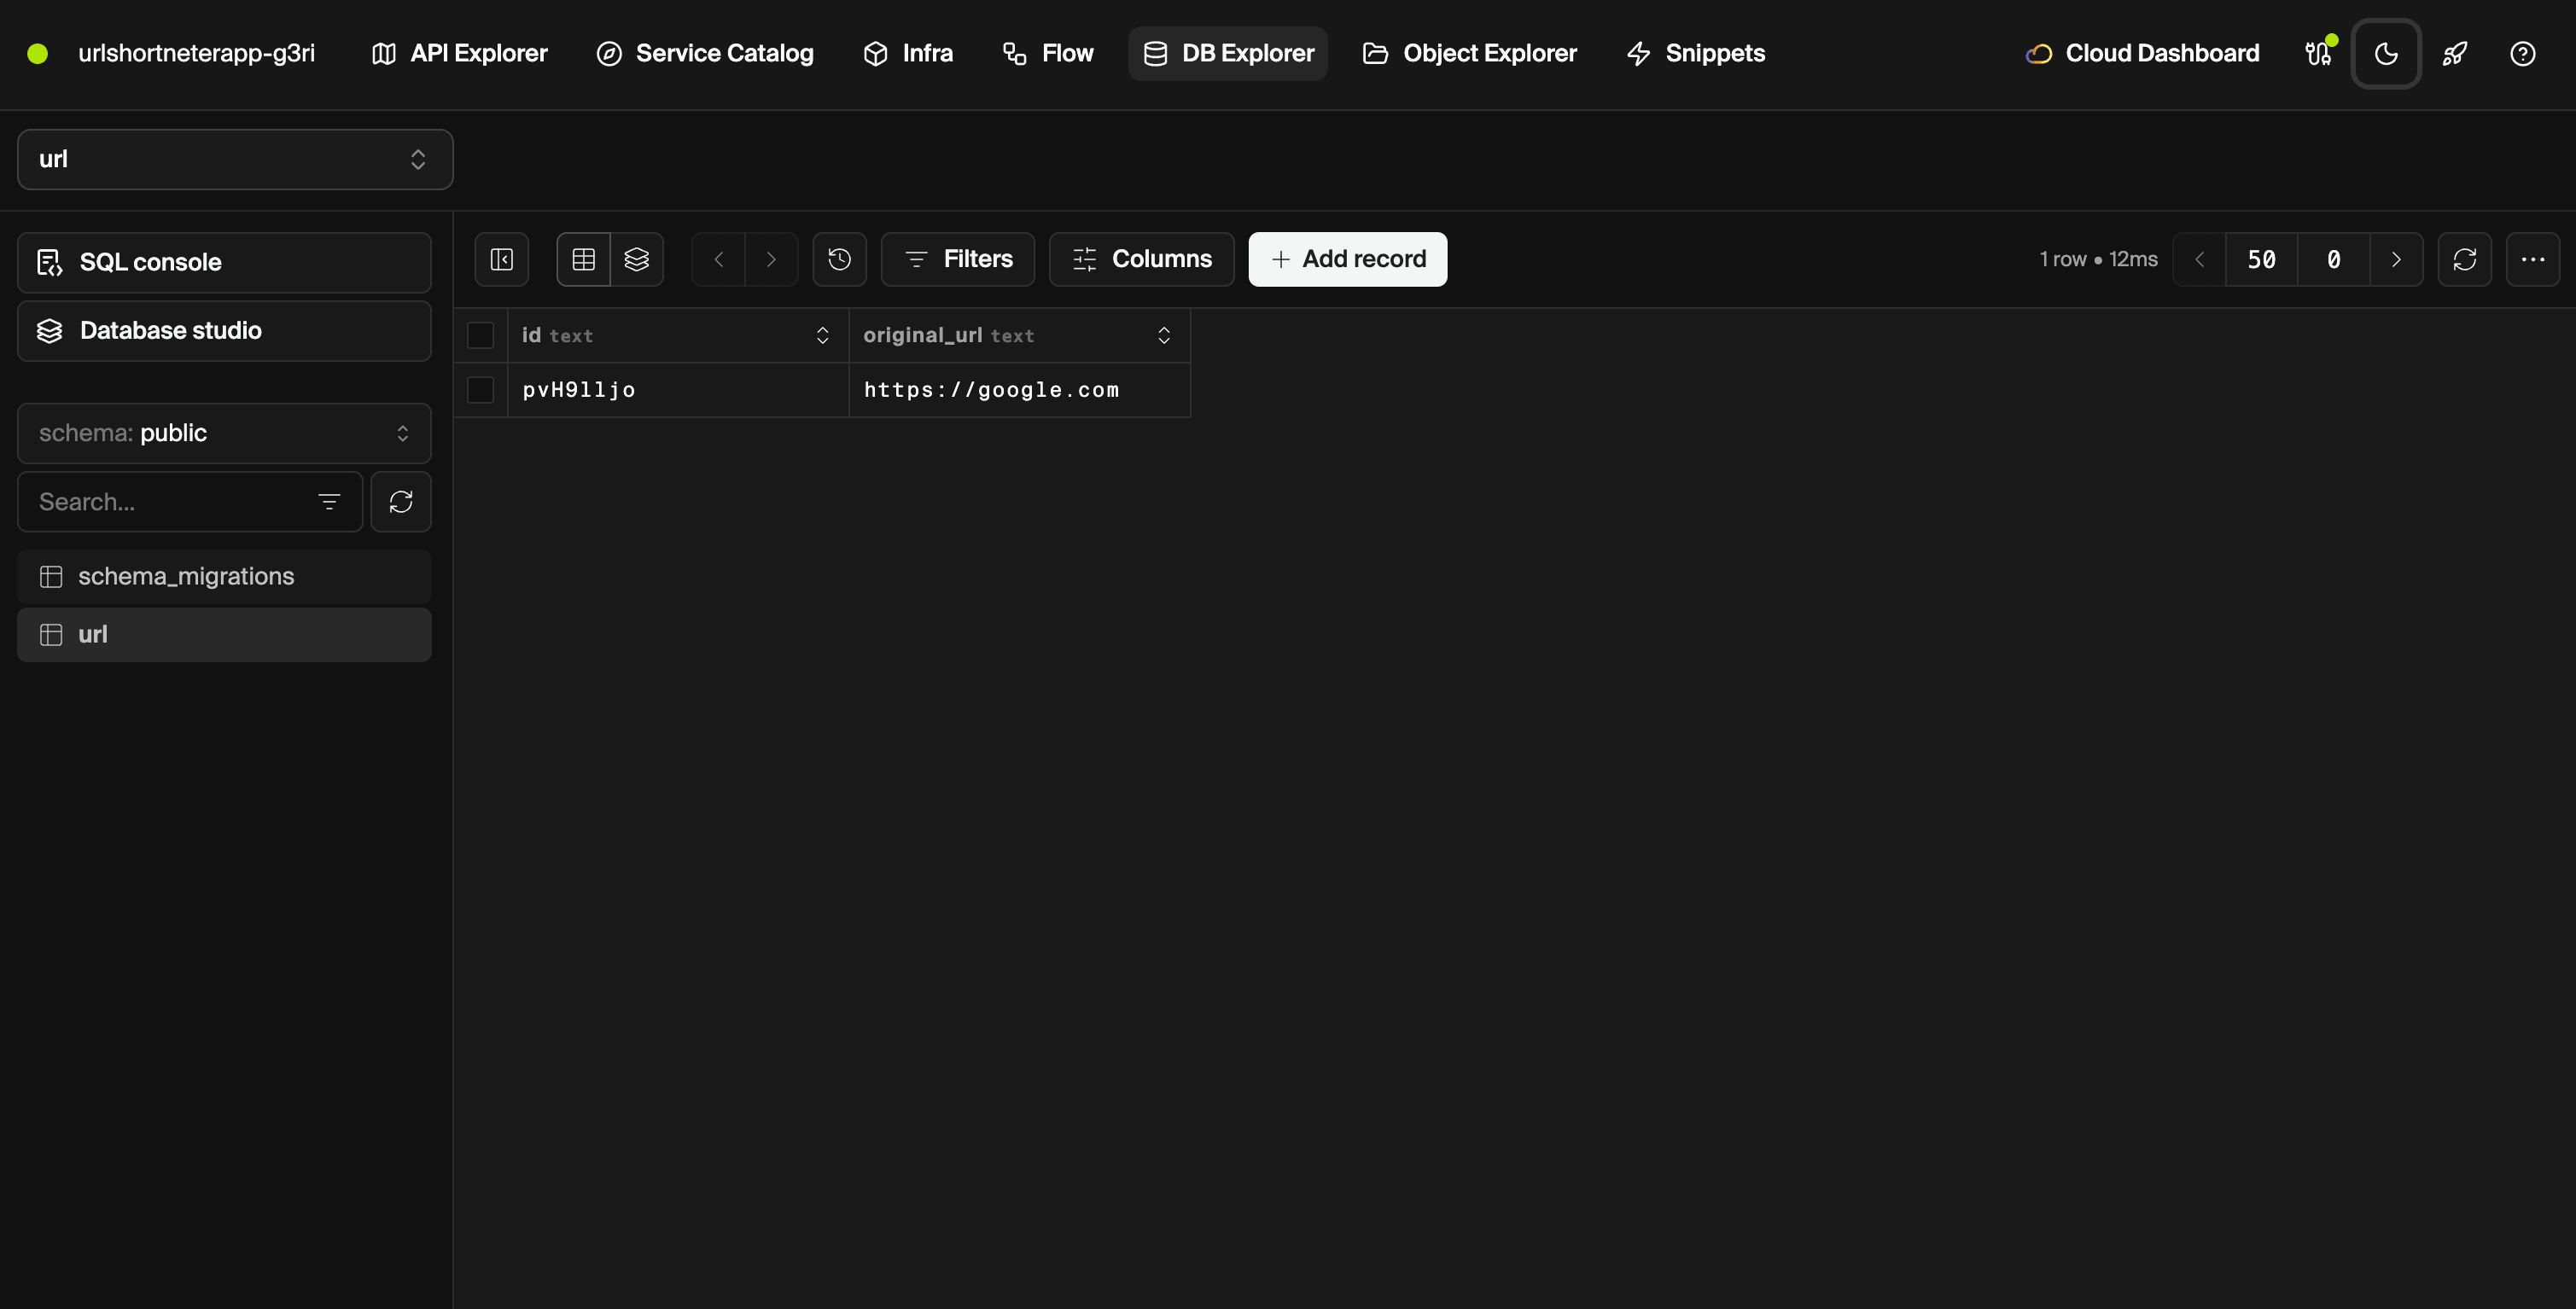
How Encore provisions your database
You didn't create the database or run its migrations yourself. The SQLDatabase declaration tells Encore to do both, locally and in every cloud environment:
- Locally, Encore runs PostgreSQL in Docker.
- In the cloud, deploying to your own account provisions Amazon RDS on AWS or Cloud SQL on GCP, with Neon supported on both.
There's no Terraform to write and no connection strings or credentials to manage, and the Cloud Dashboard gives you this same database explorer for your cloud environments.
5. Take a look at the code
Open url/url.ts. This is the endpoint you just traced:
url/url.tsimport { api } from "encore.dev/api";
import { SQLDatabase } from "encore.dev/storage/sqldb";
import { randomBytes } from "node:crypto";
// 'url' database is used to store the URLs that are being shortened.
const db = new SQLDatabase("url", { migrations: "./migrations" });
// shorten shortens a URL.
export const shorten = api(
{ expose: true, auth: false, method: "POST", path: "/url" },
async ({ url }: ShortenParams): Promise<URL> => {
const id = randomBytes(6).toString("base64url");
await db.exec`
INSERT INTO url (id, original_url)
VALUES (${id}, ${url})
`;
return { id, url };
}
);
This is standard TypeScript. Two declarations connect it to Encore:
apidefines a public endpoint. Encore handles routing, request validation, error handling, observability, and API documentation.new SQLDatabase(...)declares the database. Encore uses the declaration to provision PostgreSQL and include its queries in traces.
The shorten endpoint belongs to the url service, defined by encore.service.ts in the same folder:
url/encore.service.tsimport { Service } from "encore.dev/service";
export default new Service("url");
Everything under url/ belongs to the url service. To add another service, create a directory with an encore.service.ts that exports a new Service.
6. Add some infrastructure
The Encore.ts SDK lets you declare infrastructure directly in code, including Pub/Sub topics, object storage, and cron jobs.
The next three steps build on each other: add a second service, give it its own database, then connect the two with Pub/Sub.
Each step takes only a few lines of code. There's nothing else to install, configure, or wire up. Save your changes and Encore provisions the infrastructure and reloads your app.
Add a service
Splitting a backend into services usually means wiring up service discovery, clients, and inter-service authentication. With Encore, you create a directory and call the other service like a function. Tracing follows the request across both services automatically.
You'll add a stats service that reports how many URLs have been shortened, by calling the url service to count them.
A directory containing an encore.service.ts defines a service, so add stats/ next to the existing url/ directory:
/your-app-name
├── url // existing url service
│ ├── encore.service.ts
│ ├── migrations
│ └── url.ts
└── stats // new stats service
├── encore.service.ts
└── stats.ts
Create stats/encore.service.ts:
stats/encore.service.tsimport { Service } from "encore.dev/service";
export default new Service("stats");
Next, create stats/stats.ts. Importing from ~encore/clients lets you call the url service like a local function:
stats/stats.tsimport { api } from "encore.dev/api";
import { url } from "~encore/clients";
export const count = api(
{ expose: true, method: "GET", path: "/stats" },
async (): Promise<{ total: number }> => {
const { urls } = await url.list();
return { total: urls.length };
}
);
In the API Explorer, call stats.count, then open its trace. You'll see a single request spanning two services, including the call to url.list and its database query.
Open Flow in the local dashboard to see the new dependency between stats and url.
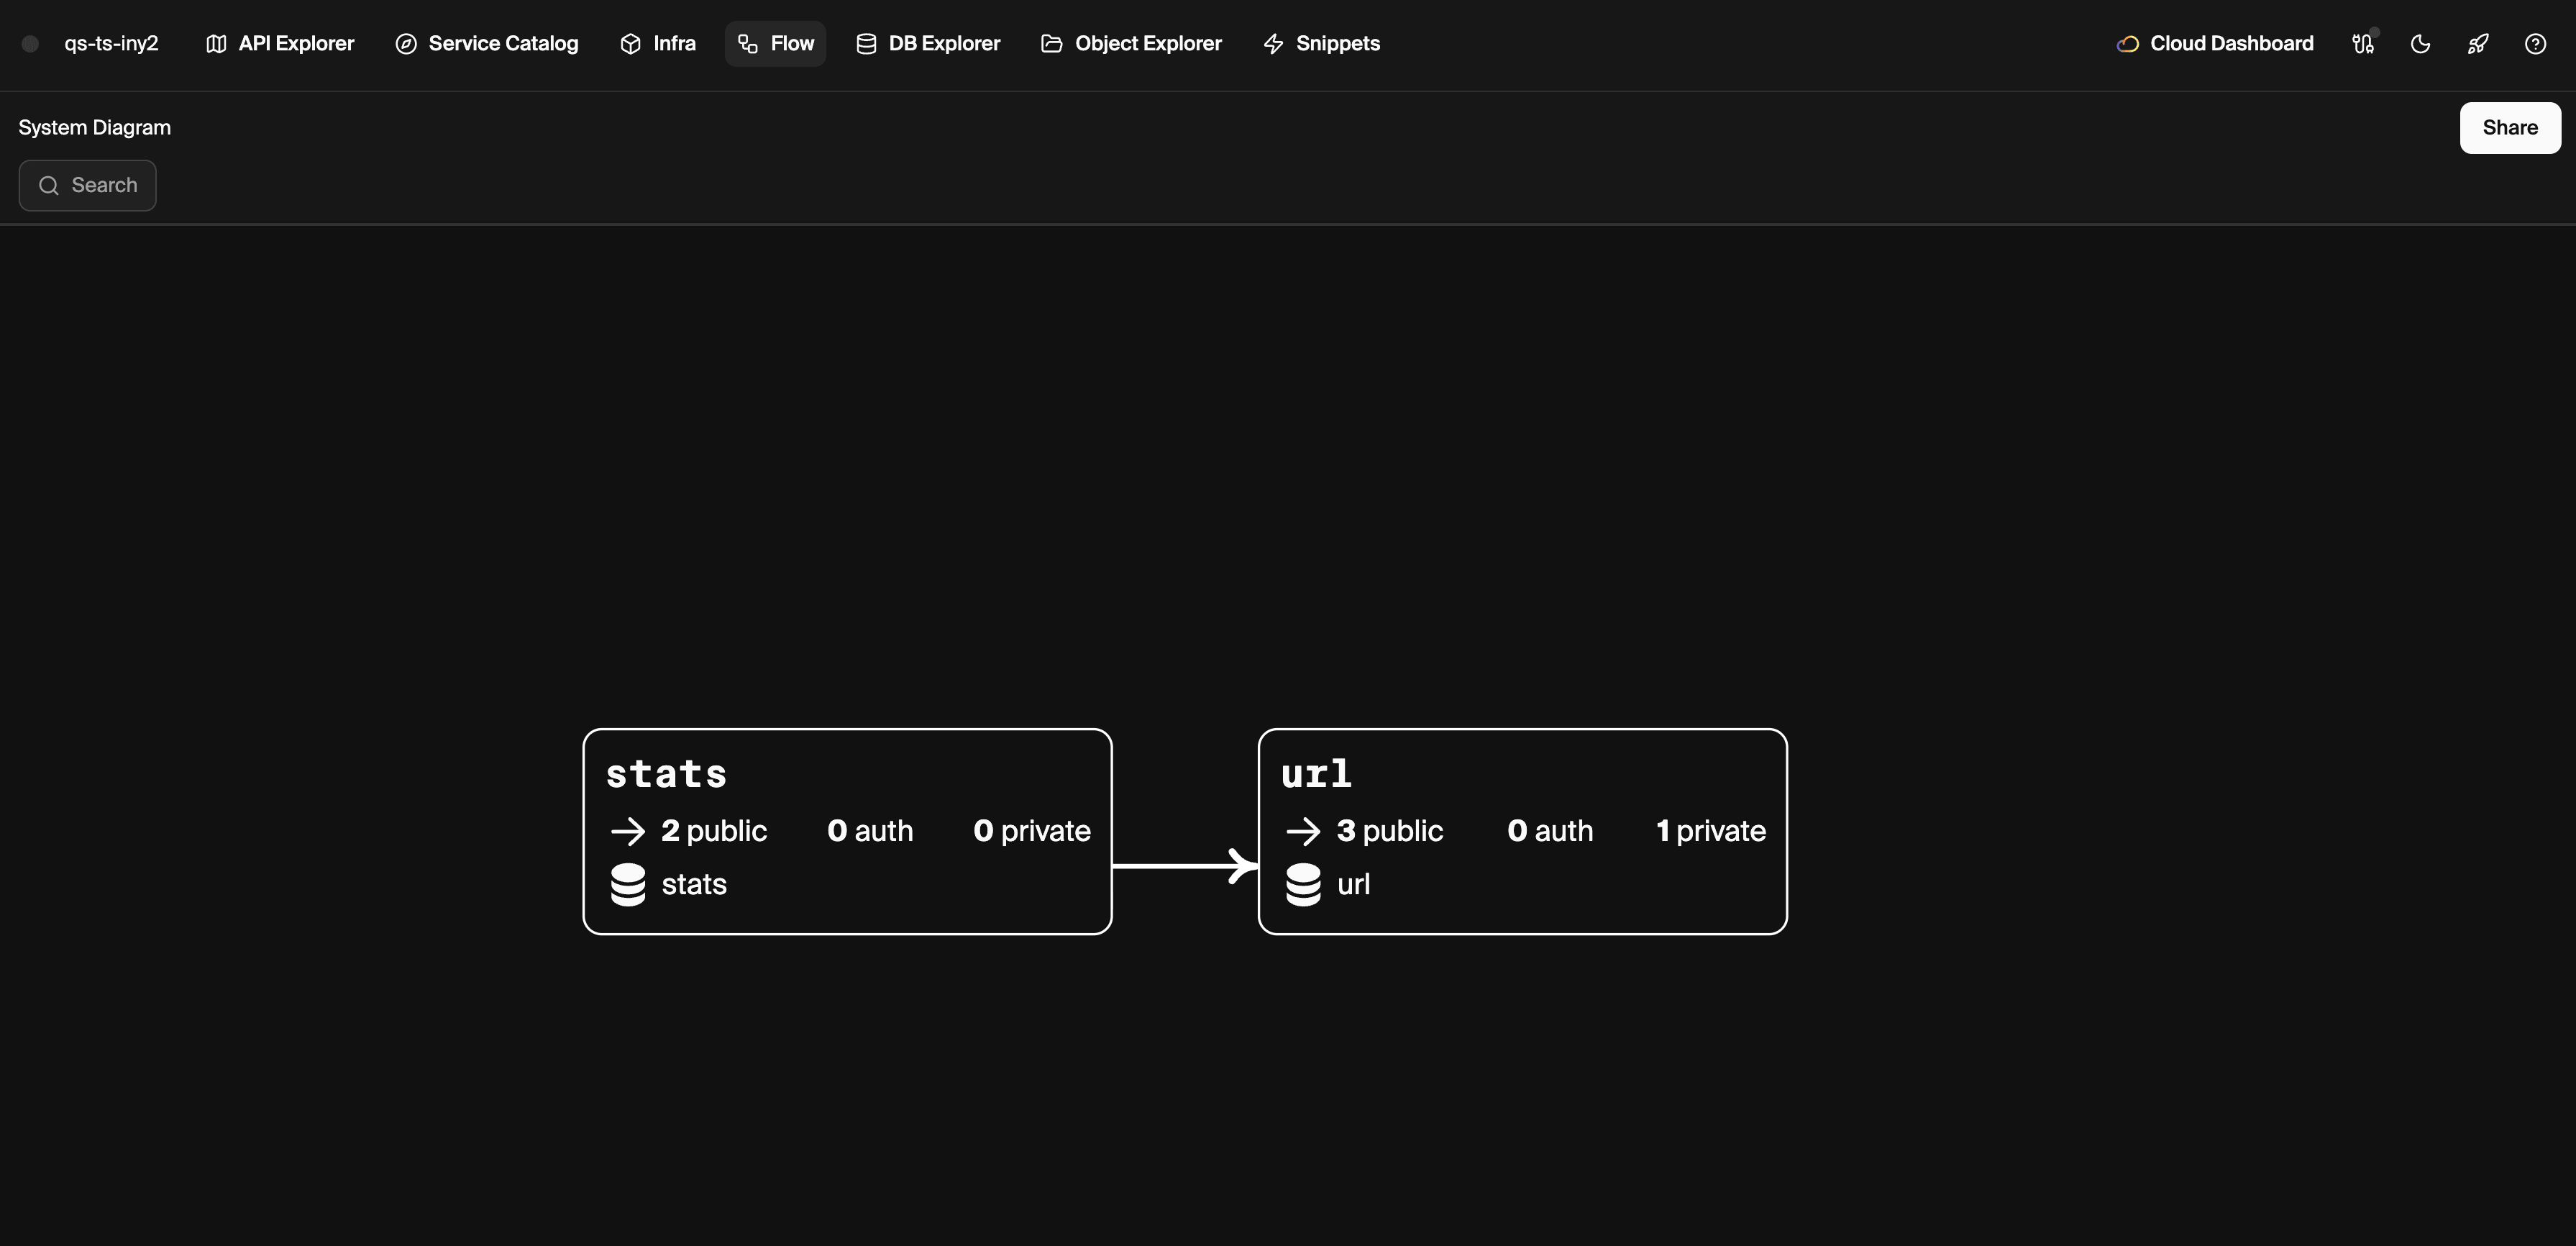
Add a database
Now give stats its own database. Databases are declared in code the same way services are, with no cluster to provision or connection string to manage, and queries to every database appear in your traces.
You'll give stats a table to track how many times each URL has been shortened. For now you'll write to it from an endpoint you call by hand; in the next step, Pub/Sub will fill it in automatically.
Create the migration that defines its schema:
stats/migrations/1_create_clicks.up.sqlCREATE TABLE clicks (
id TEXT PRIMARY KEY,
clicks BIGINT NOT NULL DEFAULT 0
);
Declare the database and an endpoint to record clicks in stats/stats.ts:
stats/stats.tsimport { api } from "encore.dev/api";
import { url } from "~encore/clients";
import { SQLDatabase } from "encore.dev/storage/sqldb";
export const db = new SQLDatabase("stats", { migrations: "./migrations" });
export const record = api(
{ expose: true, method: "POST", path: "/stats/:id" },
async ({ id }: { id: string }): Promise<void> => {
await db.exec`
INSERT INTO clicks (id, clicks) VALUES (${id}, 1)
ON CONFLICT (id) DO UPDATE SET clicks = clicks.clicks + 1
`;
}
);
export const count = api(
{ expose: true, method: "GET", path: "/stats" },
async (): Promise<{ total: number }> => {
const { urls } = await url.list();
return { total: urls.length };
}
);
Encore provisions new databases at startup, not on hot reload, so restart the app:
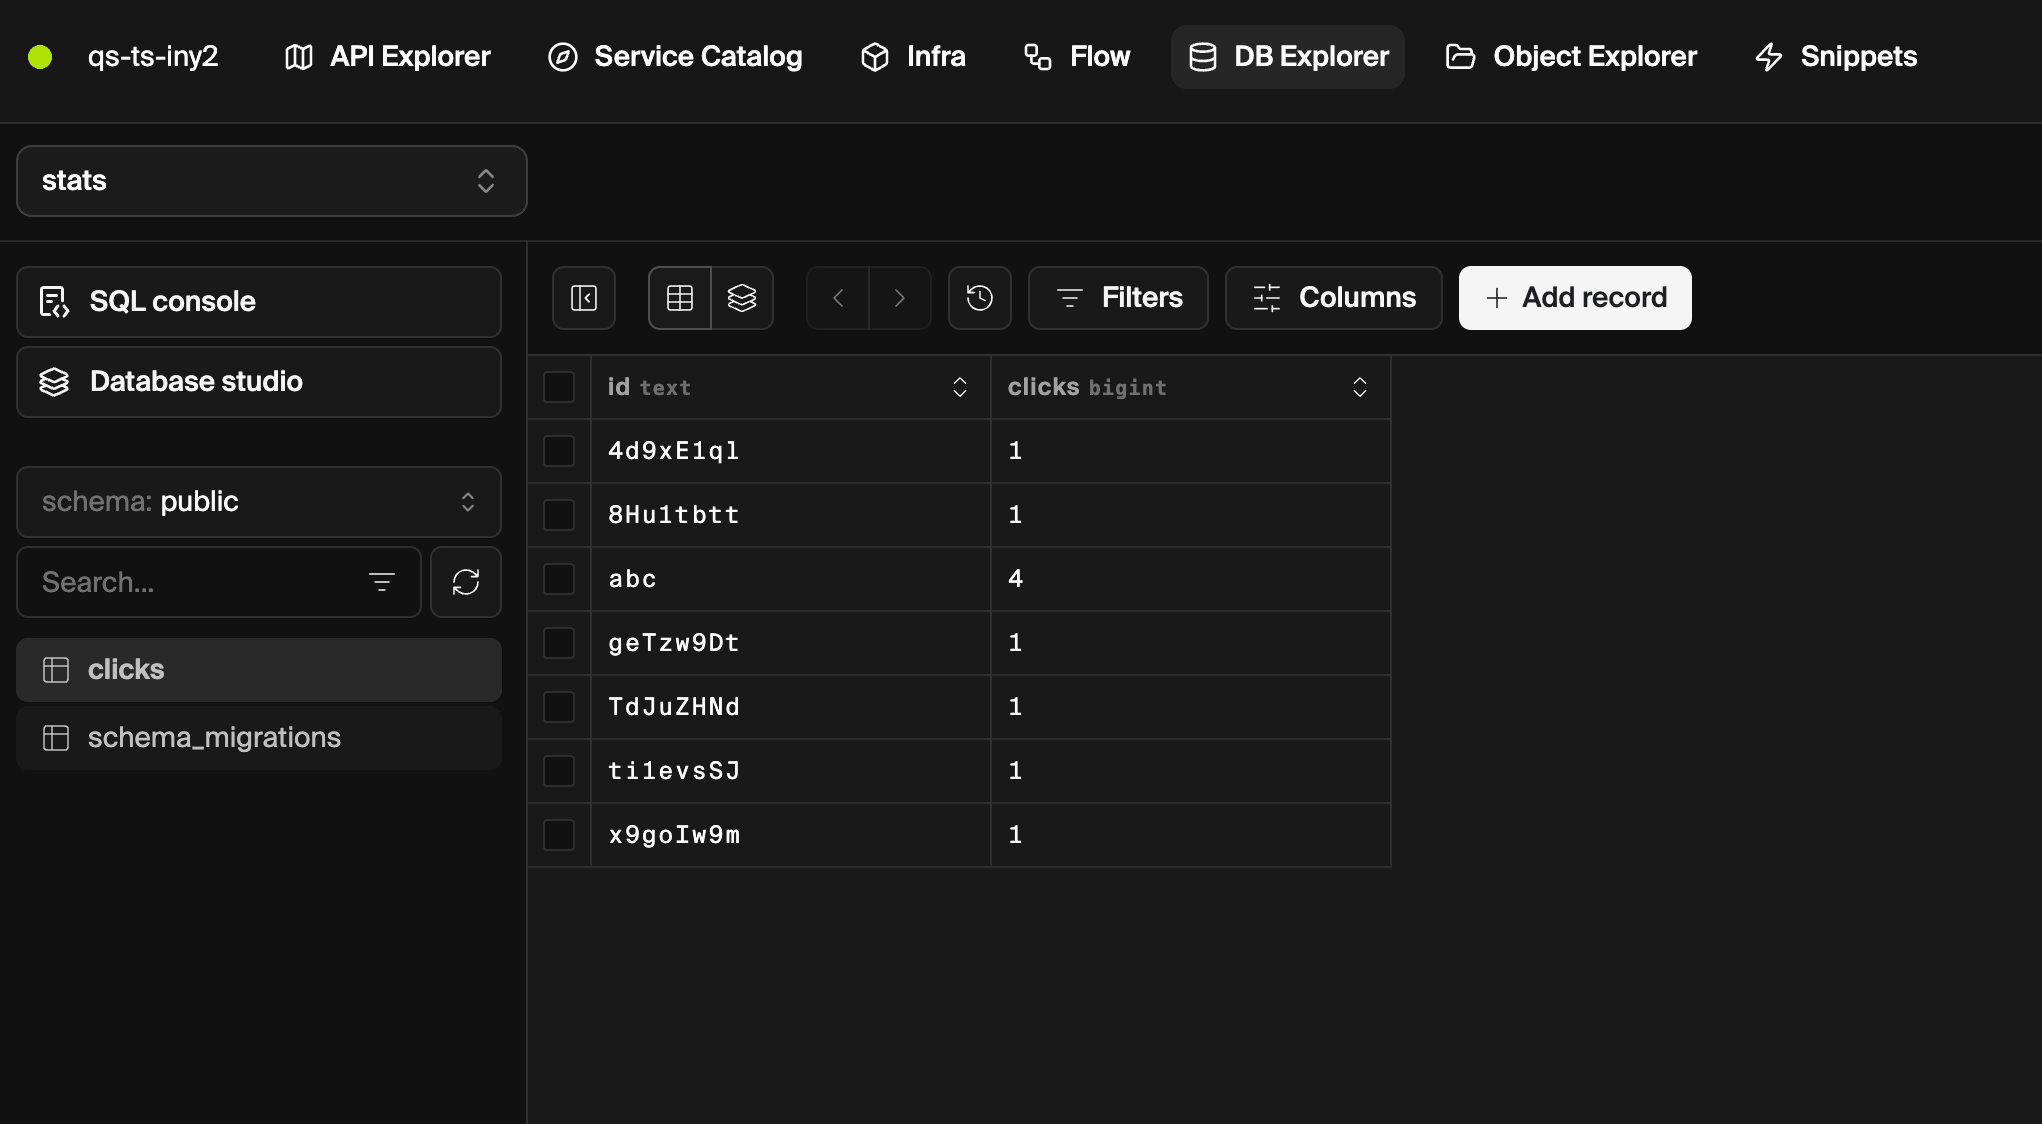
In the API Explorer, call stats.record with any id, a few times over. Open DB Explorer, switch to the stats database, and select the clicks table to see the count increase.
Add Pub/Sub
Move work out of the request path so slower tasks don't block the response. Declare a Pub/Sub topic in code and Encore runs it locally. When you deploy, Encore provisions GCP Pub/Sub or Amazon SNS/SQS, with no broker to configure or credentials to connect.
You'll publish an event whenever a URL is shortened, and have stats subscribe to it. The url service no longer needs to know that stats exists, and the counting happens outside the request.
First, add the Pub/Sub import to url/url.ts:
url/url.tsimport { Topic } from "encore.dev/pubsub";
Then declare the topic alongside the existing database:
url/url.tsconst db = new SQLDatabase("url", { migrations: "./migrations" });
export interface ShortenedEvent {
id: string;
url: string;
}
export const shortened = new Topic<ShortenedEvent>("shortened", {
deliveryGuarantee: "at-least-once",
});
Then publish an event from shorten, immediately after the INSERT:
url/url.tsexport const shorten = api(
{ expose: true, auth: false, method: "POST", path: "/url" },
async ({ url }: ShortenParams): Promise<URL> => {
const id = randomBytes(6).toString("base64url");
await db.exec`
INSERT INTO url (id, original_url)
VALUES (${id}, ${url})
`;
await shortened.publish({ id, url });
return { id, url };
}
);
Finally, create stats/subscriptions.ts to subscribe from the stats service:
stats/subscriptions.tsimport { Subscription } from "encore.dev/pubsub";
import { shortened } from "../url/url";
import { db } from "./stats";
const _ = new Subscription(shortened, "count-shortened", {
handler: async (event) => {
await db.exec`
INSERT INTO clicks (id, clicks) VALUES (${event.id}, 1)
ON CONFLICT (id) DO UPDATE SET clicks = clicks.clicks + 1
`;
},
});
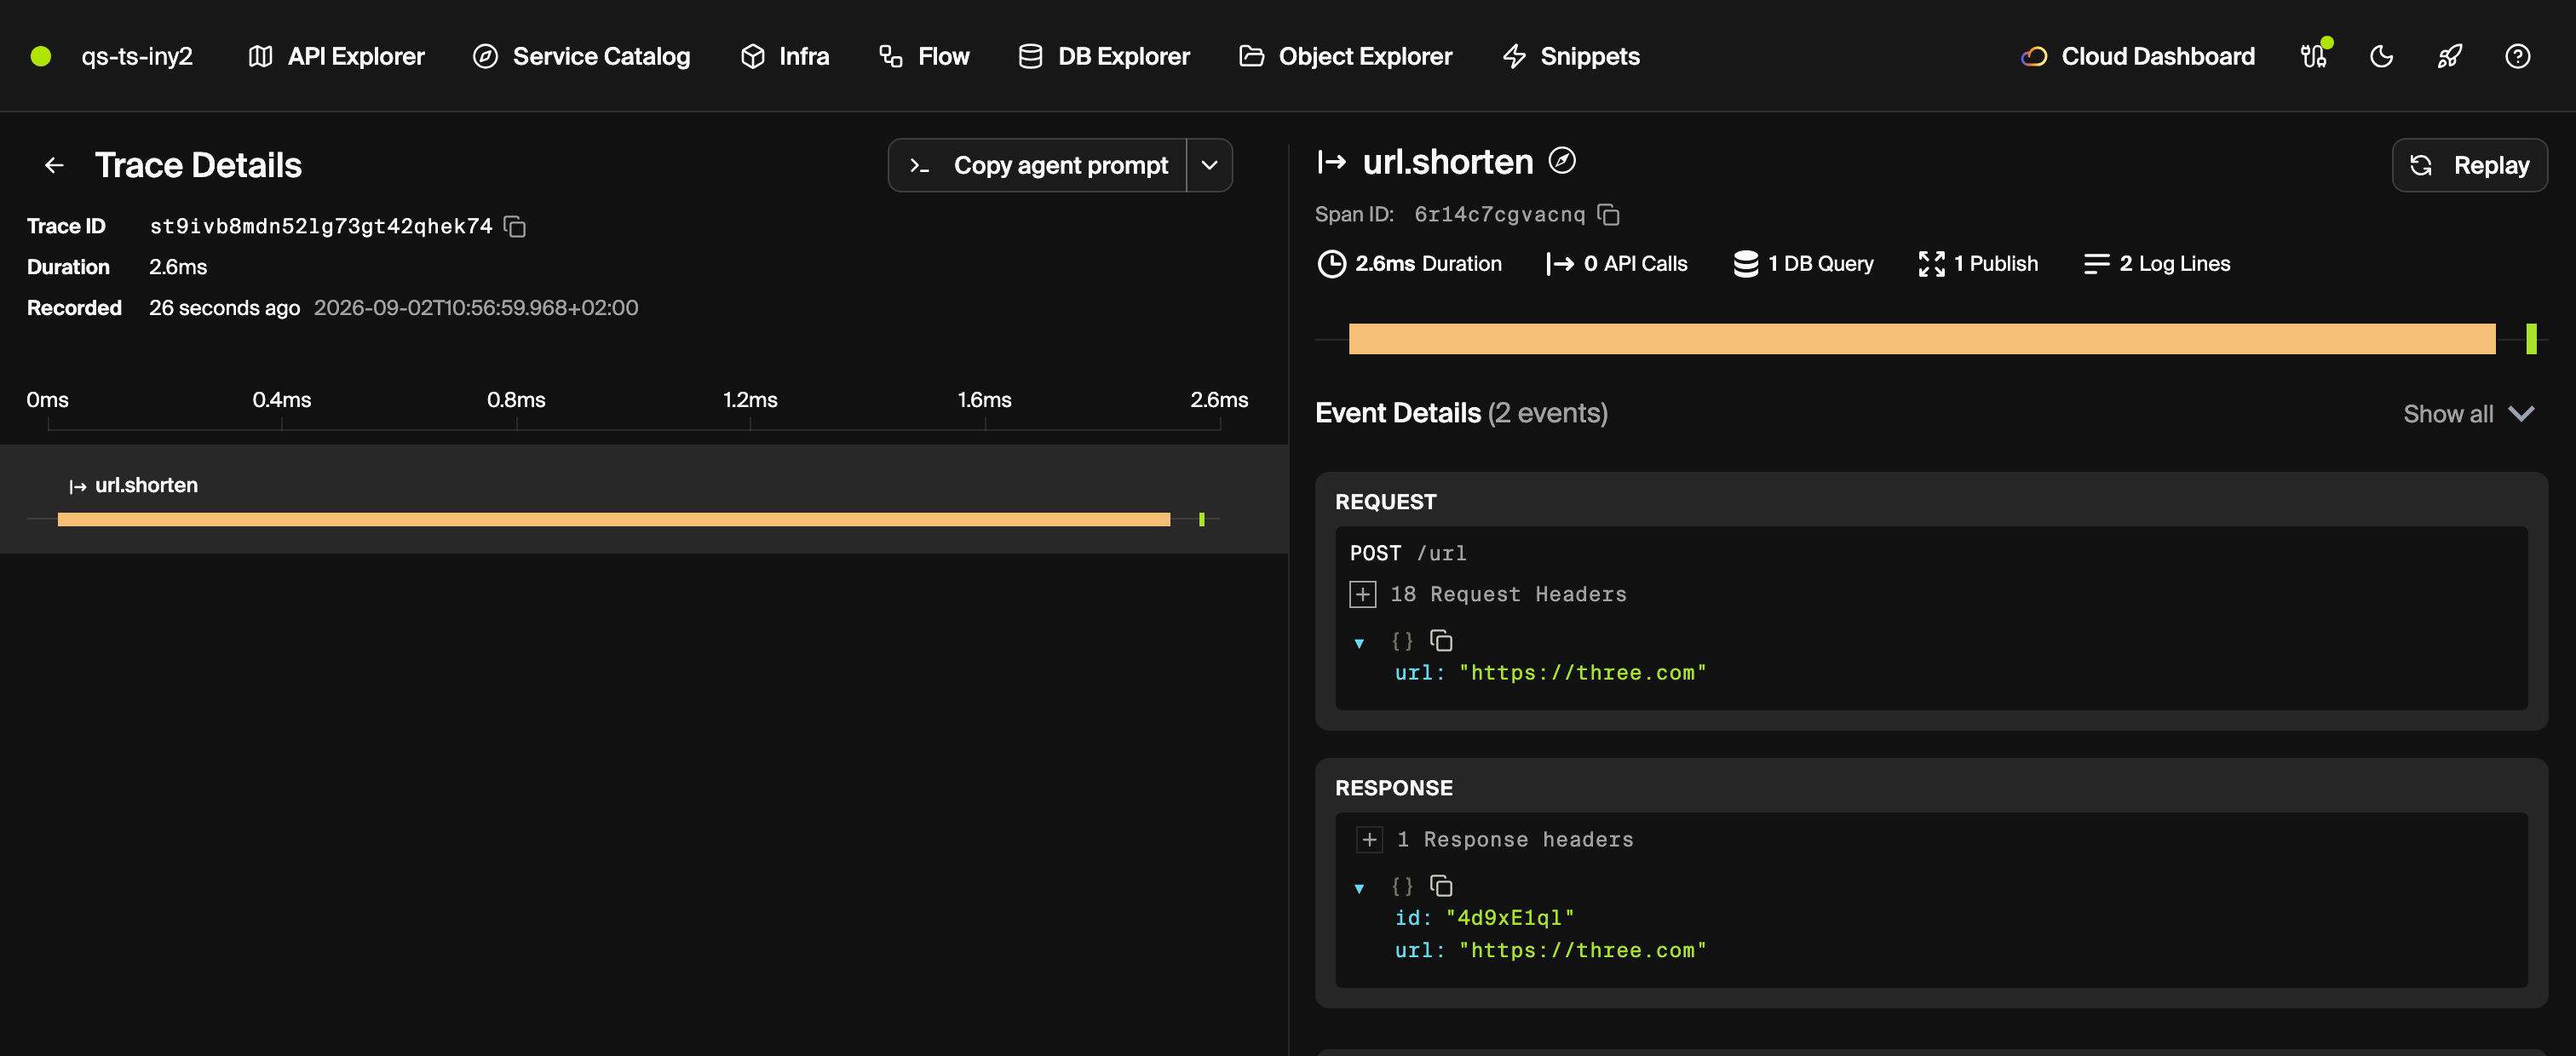
In the API Explorer, call url.shorten a few times, then open one of the traces. The publish appears in the request trace, and the subscription runs in a separate trace linked to it.
Check the clicks table in the DB Explorer again. The rows are now written by the subscriber, without url.shorten waiting for it.
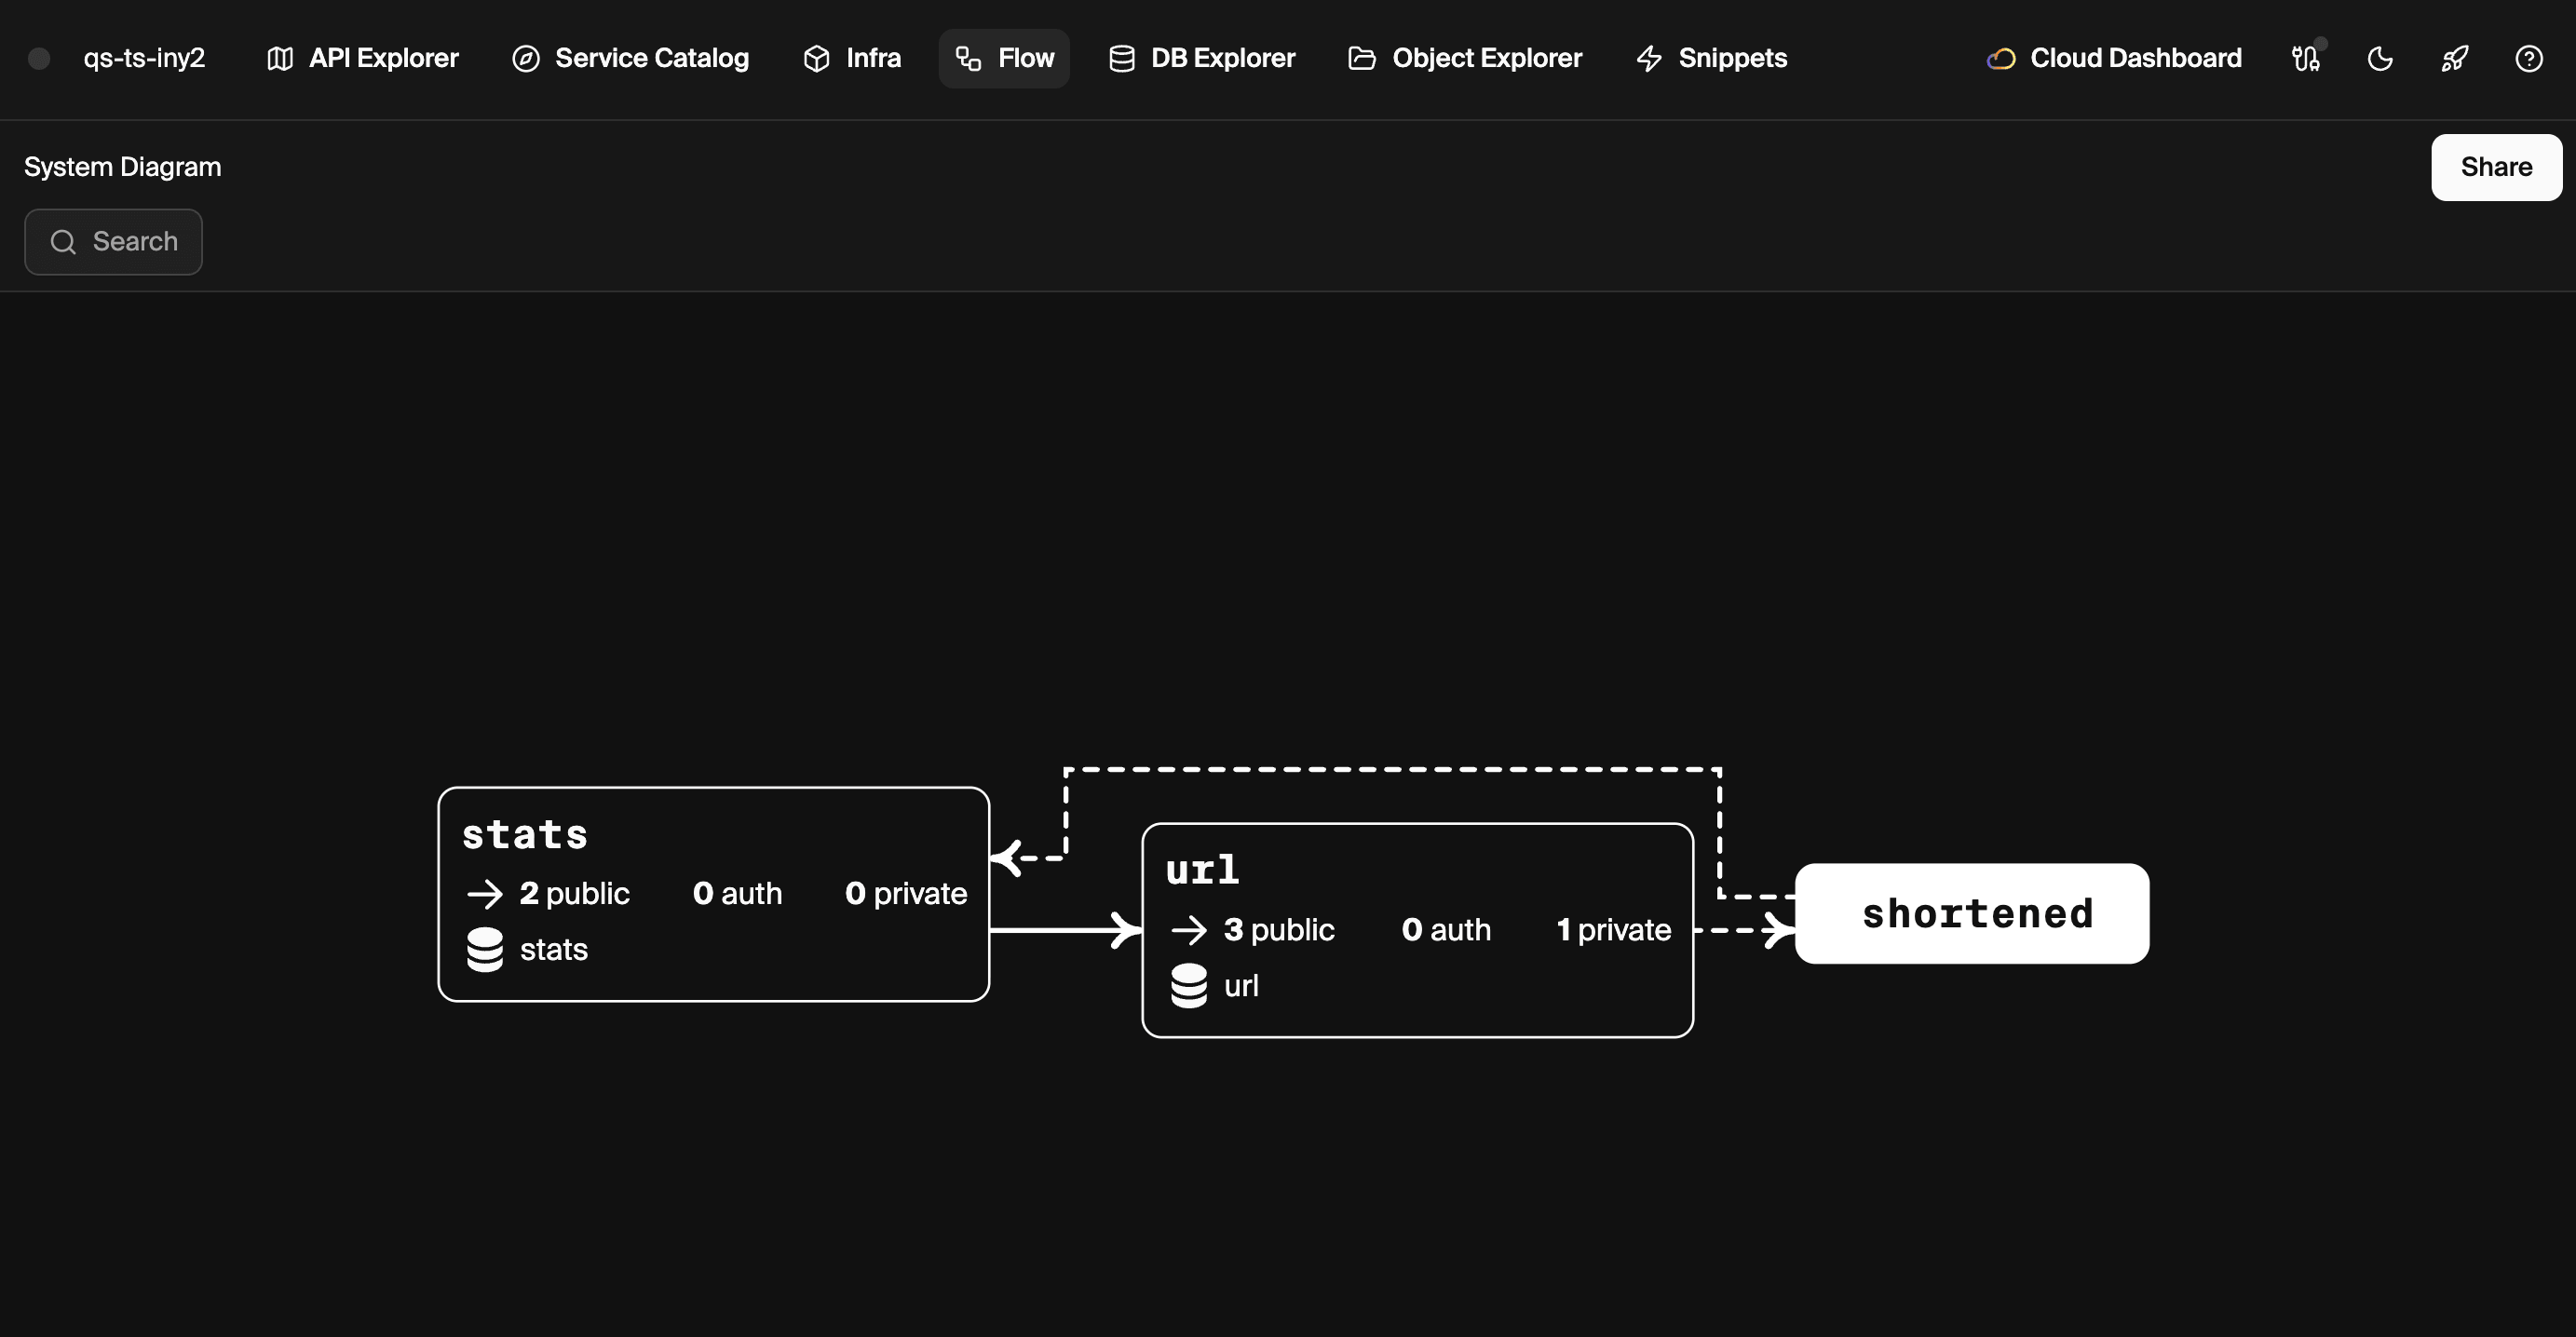
Open Flow in the local dashboard to see the topic and subscription alongside your services.
7. Deploy your app
Encore's cloud platform includes free development hosting. For production, it can deploy to your own AWS or GCP account.
Build a Docker image for your app:
This compiles your app and produces an image you can deploy anywhere. See the self-host docs.
If you skipped account creation in step 1, first link your local app to Encore.
Push your changes to deploy:
$ git add -A .$ git commit -m 'Initial commit'$ git push encoreEncore's cloud platform builds and tests your app, provisions the PostgreSQL database, and deploys everything to a staging environment. The command returns a deployment URL like https://app.encore.dev/$APP_ID/deploys/....
Open the URL to follow the deployment in the Cloud Dashboard.
Once the deployment finishes, call the API using its cloud URL and inspect the trace in the Cloud Dashboard. The tracing works just as it did locally, but the app now runs against cloud infrastructure.
From the Cloud Dashboard you can also connect your cloud account and integrate with GitHub.
What's next?
- Explore the Encore.ts primitives to declare Pub/Sub, object storage, cron jobs, secrets, and more.
- Build with your AI coding tool. With Encore's AI instructions installed, your agent knows how to declare infrastructure in code, so a prompt like "Add a cron job that deletes URLs older than 30 days and logs how many it removed" is enough. See AI tools integration.
- Follow the Uptime Monitor tutorial to build a multi-service, event-driven system.
- Join the Encore community on Discord to ask questions and meet other developers.