
Building a SaaS product means dealing with subscriptions, usage tracking, overage billing, and credit systems. Implementing this with Stripe directly requires hundreds of lines of webhook handling, usage tracking, and state management. Autumn handles all of this complexity with a simple API.
In this tutorial, we'll add usage-based pricing to a backend using Autumn. You'll learn how to set up pricing plans, track feature usage, enforce limits, and manage customer subscriptions without writing webhook handlers.
What is Autumn?
Autumn is a billing platform that sits on top of Stripe and simplifies usage-based pricing. It provides:
- Usage tracking - Track usage and bill for overages automatically
- Feature limits - Enforce usage limits per pricing tier
- Credits system - Prepaid credits with automatic deductions
- No webhooks - Simple API without complex webhook handling
- Flexible plans - Usage limits, tiers, add-ons, and custom pricing
Autumn handles the complexity of usage-based billing so you can focus on your product.
What is Encore?
Encore is an Open Source backend framework for TypeScript and Go. It lets you define type-safe APIs, databases, buckets, cron jobs, Pub/Sub, etc. as native objects in your code and it automatically handles infrastructure provisioning and DevOps.
Key features include:
- Type-safe APIs - Define endpoints with full TypeScript type checking
- Declarative infrastructure - Databases, queues, and cron jobs defined in code
- Local development - Run your entire backend locally with
encore run - Built-in observability - Distributed tracing and logging out of the box
- Cloud deployment - Deploy to AWS/GCP with Encore Cloud or self-host
What we're building
We'll create a SaaS backend with an AI chatbot pricing model:
- Free plan - 5 chat messages per month
- Pro plan - 100 chat messages per month for $20/month
- Feature gating - Check if users can send messages
- Usage tracking - Record message usage
- Checkout flow - Generate Stripe checkout URLs
- Customer portal - Let users manage subscriptions
The backend will handle all billing logic without writing Stripe webhook handlers.
Prefer to skip the setup? Use encore app create --example=ts/autumn to start with a complete working example. This tutorial walks through building it from scratch to understand each component.
Getting started
First, install Encore if you haven't already:
# macOS
brew install encoredev/tap/encore

# Linux
curl -L https://encore.dev/install.sh | bash

# Windows
iwr https://encore.dev/install.ps1 | iex
Create a new Encore application:
encore app create autumn-app --example=ts/hello-world
cd autumn-app
Setting up Autumn
Creating your Autumn account
- Go to useautumn.com and sign up
- Connect your Stripe account
- Navigate to Settings and copy your Secret Key
Autumn is free until $8K monthly revenue.
Installing the SDK
Install the Autumn SDK:
npm install autumn-js
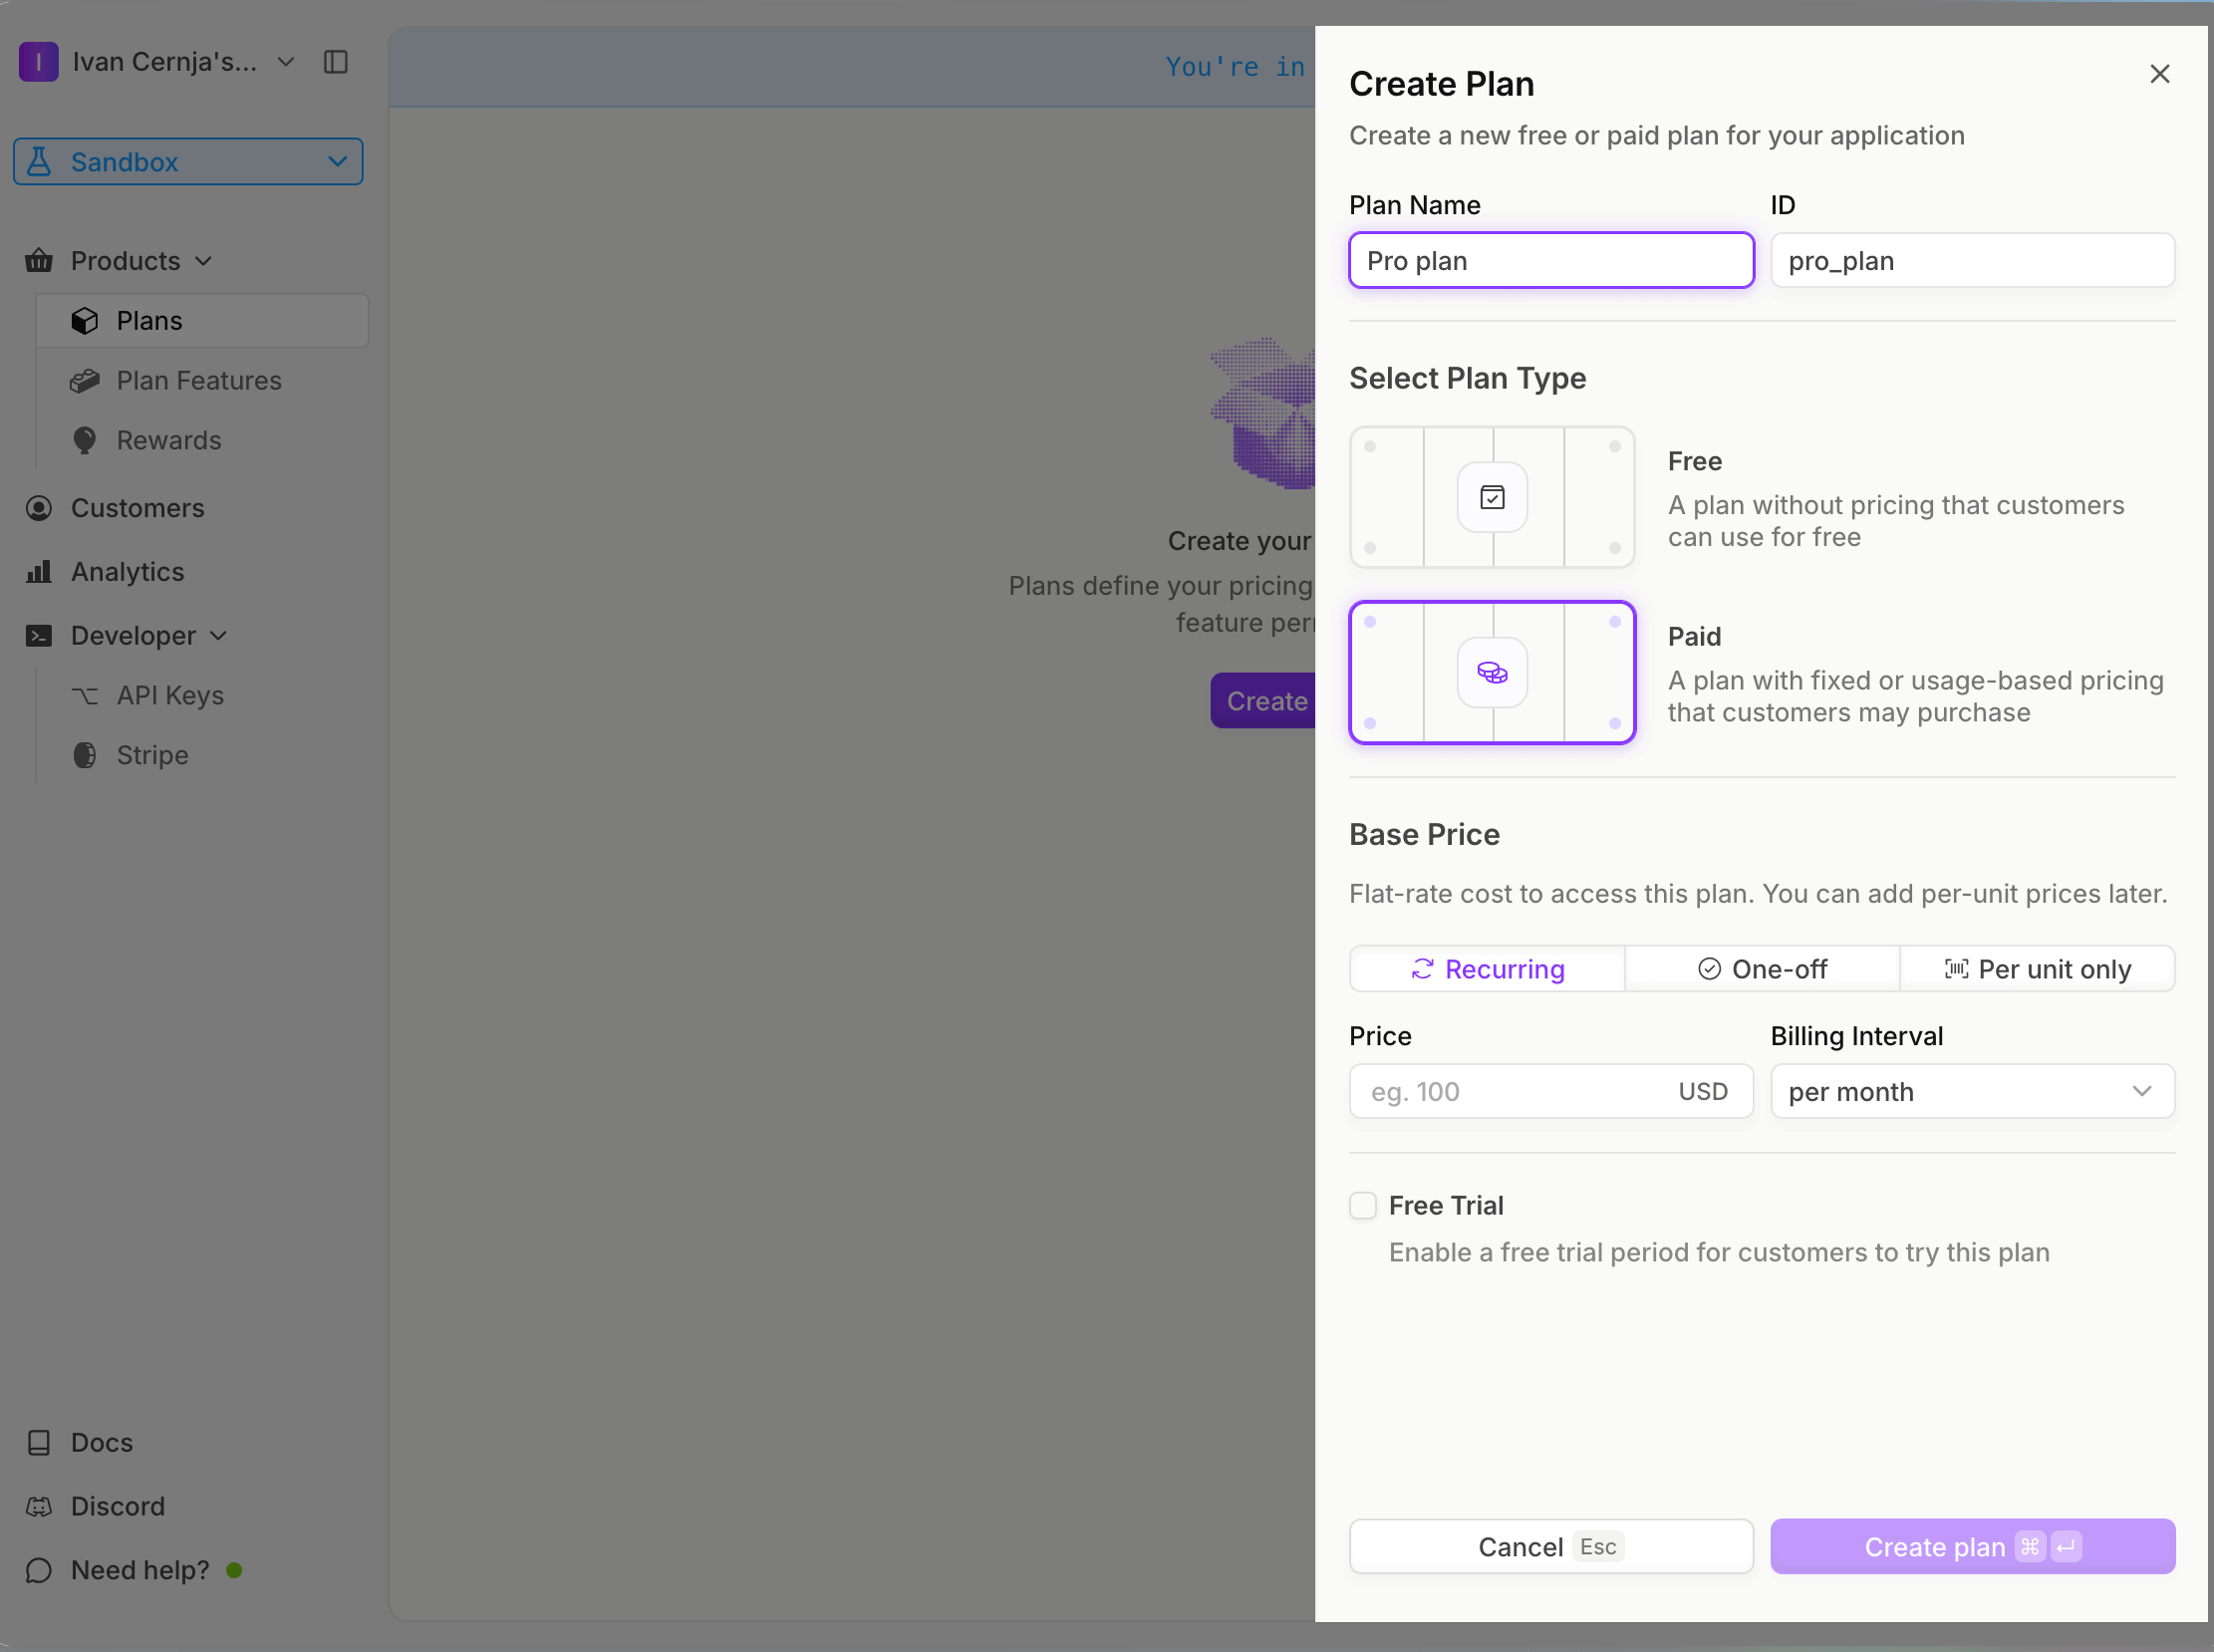
Creating your pricing plans
Create your pricing plans in the Autumn dashboard:
Free Plan:
- Go to the Plans page and click Create Plan
- Name it "Free" and select plan type Free
- Toggle the auto-enable flag so the plan is assigned when customers are created
- Click Add Feature to Plan and create a Metered, Consumable feature called "messages"
- Set it to grant 5 messages per month
- Click Save
Pro Plan:
- Click Create Plan again
- Name it "Pro", select Paid, Recurring, and set the price to $20 per month
- Click Add Feature to Plan and select the "messages" feature you created
- Set it to grant 100 messages per month
- Click Save
Backend implementation
Creating the billing service
Create a billing service with Encore:
// billing/encore.service.ts
import { Service } from "encore.dev/service";

export default new Service("billing");
Configuring Autumn
Store your API key securely using Encore's built-in secrets management:
// billing/autumn.ts
import { Autumn } from "autumn-js";
import { secret } from "encore.dev/config";

const autumnSecretKey = secret("AutumnSecretKey");

export const autumn = new Autumn({
  secretKey: autumnSecretKey(),
});
Set your secret key:
encore secret set --dev AutumnSecretKey
encore secret set --prod AutumnSecretKey
Creating customers
When a user signs up, create an Autumn customer. Autumn uses your own user ID directly, so there's no need to store a separate Autumn customer ID:
// billing/customers.ts
import { api } from "encore.dev/api";
import { autumn } from "./autumn";
import log from "encore.dev/log";

interface CreateCustomerRequest {
  userId: string;
  email: string;
  name?: string;
}

interface CreateCustomerResponse {
  customerId: string;
}

export const createCustomer = api(
  { expose: true, method: "POST", path: "/billing/customers" },
  async (req: CreateCustomerRequest): Promise<CreateCustomerResponse> => {
    log.info("Creating Autumn customer", { userId: req.userId, email: req.email });

    // Create customer in Autumn using your own user ID
    const { data, error } = await autumn.customers.create({
      id: req.userId,
      name: req.name,
      email: req.email,
    });

    if (error) {
      throw new Error(`Failed to create customer: ${error.message}`);
    }

    log.info("Customer created", { customerId: req.userId });

    return {
      customerId: req.userId,
    };
  }
);
Autumn automatically enables the Free plan for new customers since it has no price.
Checkout flow
Autumn uses a two-step checkout process:
checkout- Returns a Stripe checkout URL or upgrade preview dataattach- Charges the saved payment method (only needed if no URL is returned)
// billing/checkout.ts
import { api, APIError } from "encore.dev/api";
import { getAuthData } from "~encore/auth";
import { autumn } from "./autumn";

interface CheckoutRequest {
  productId: string;
  successUrl?: string;
}

interface CheckoutResponse {
  checkoutUrl?: string;
  requiresConfirmation: boolean;
  previewData?: {
    total: number;
    currency: string;
  };
}

export const createCheckout = api(
  { expose: true, method: "POST", path: "/billing/checkout", auth: true },
  async (req: CheckoutRequest): Promise<CheckoutResponse> => {
    const auth = getAuthData()!;

    const { data, error } = await autumn.checkout({
      customer_id: auth.userId,
      product_id: req.productId,
      success_url: req.successUrl,
    });

    if (error) {
      throw APIError.internal(`Checkout failed: ${error.message}`);
    }

    // If URL exists, customer needs to complete Stripe checkout
    if (data.url) {
      return {
        checkoutUrl: data.url,
        requiresConfirmation: false,
      };
    }

    // No URL means payment details are on file
    // Return preview data for user confirmation
    return {
      requiresConfirmation: true,
      previewData: {
        total: data.total,
        currency: data.currency,
      },
    };
  }
);

// Confirm and attach a plan (when payment details are already on file)
interface AttachRequest {
  productId: string;
}

interface AttachResponse {
  success: boolean;
}

export const attachProduct = api(
  { expose: true, method: "POST", path: "/billing/attach", auth: true },
  async (req: AttachRequest): Promise<AttachResponse> => {
    const auth = getAuthData()!;

    const { data, error } = await autumn.attach({
      customer_id: auth.userId,
      product_id: req.productId,
    });

    if (error) {
      throw APIError.internal(`Attach failed: ${error.message}`);
    }

    return { success: true };
  }
);
Use Stripe's test card 4242 4242 4242 4242 to test payments in sandbox mode.
Tracking usage
After a user successfully uses a feature (like sending a chat message), record the usage with track:
// billing/usage.ts
import { api, APIError } from "encore.dev/api";
import { getAuthData } from "~encore/auth";
import { autumn } from "./autumn";
import log from "encore.dev/log";

interface TrackUsageRequest {
  featureId: string;
  value?: number;
}

interface TrackUsageResponse {
  success: boolean;
}

export const trackUsage = api(
  { expose: true, method: "POST", path: "/billing/usage", auth: true },
  async (req: TrackUsageRequest): Promise<TrackUsageResponse> => {
    const auth = getAuthData()!;

    const { error } = await autumn.track({
      customer_id: auth.userId,
      feature_id: req.featureId,
      value: req.value ?? 1,
    });

    if (error) {
      throw APIError.internal(`Failed to track usage: ${error.message}`);
    }

    log.info("Usage tracked", {
      customerId: auth.userId,
      featureId: req.featureId,
      value: req.value ?? 1,
    });

    return { success: true };
  }
);
You can verify usage events in the Autumn dashboard on the customer detail page.
Getting customer data
Retrieve customer subscription and usage data:
// billing/customers.ts (continued)
import { api, APIError } from "encore.dev/api";
import { getAuthData } from "~encore/auth";
import { autumn } from "./autumn";

interface CustomerDataResponse {
  products: Array<{
    id: string;
    name: string;
    status: string;
  }>;
  features: Record<string, {
    balance: number;
    includedUsage: number;
  }>;
}

export const getCustomerData = api(
  { expose: true, method: "GET", path: "/billing/customer", auth: true },
  async (): Promise<CustomerDataResponse> => {
    const auth = getAuthData()!;

    const { data, error } = await autumn.customers.get(auth.userId);

    if (error) {
      throw APIError.notFound("Customer not found");
    }

    return {
      products: data.products.map((p: any) => ({
        id: p.id,
        name: p.name,
        status: p.status,
      })),
      features: Object.fromEntries(
        Object.entries(data.features).map(([id, f]: [string, any]) => [
          id,
          { balance: f.balance, includedUsage: f.included_usage },
        ])
      ),
    };
  }
);
Cancelling subscriptions
// billing/subscriptions.ts
import { api, APIError } from "encore.dev/api";
import { getAuthData } from "~encore/auth";
import { autumn } from "./autumn";

interface CancelRequest {
  productId: string;
  cancelImmediately?: boolean;
}

interface CancelResponse {
  success: boolean;
}

export const cancelSubscription = api(
  { expose: true, method: "POST", path: "/billing/cancel", auth: true },
  async (req: CancelRequest): Promise<CancelResponse> => {
    const auth = getAuthData()!;

    const { error } = await autumn.cancel({
      customer_id: auth.userId,
      product_id: req.productId,
      cancel_immediately: req.cancelImmediately ?? false,
    });

    if (error) {
      throw APIError.internal(`Cancel failed: ${error.message}`);
    }

    return { success: true };
  }
);
Cancelling schedules the cancellation for the end of the billing cycle. Pass cancelImmediately: true to cancel right away.
Testing locally
Start your backend:
encore run
Open the local development dashboard to explore and test your API.
Create a customer
curl -X POST http://localhost:4000/billing/customers \
  -H "Content-Type: application/json" \
  -d '{
    "userId": "user123",
    "email": "[email protected]",
    "name": "John Doe"
  }'
Start checkout flow
curl -X POST http://localhost:4000/billing/checkout \
  -H "Content-Type: application/json" \
  -d '{
    "productId": "pro",
    "successUrl": "https://yourapp.com/success"
  }'
Track usage
curl -X POST http://localhost:4000/billing/usage \
  -H "Content-Type: application/json" \
  -d '{
    "featureId": "messages",
    "value": 1
  }'
Get customer data
curl http://localhost:4000/billing/customer
Exploring the local dashboard
The local development dashboard at http://localhost:9400 provides:
- API Explorer - Test billing endpoints interactively
- Service Catalog - Auto-generated API documentation
- Distributed Tracing - See the full flow including Autumn API calls
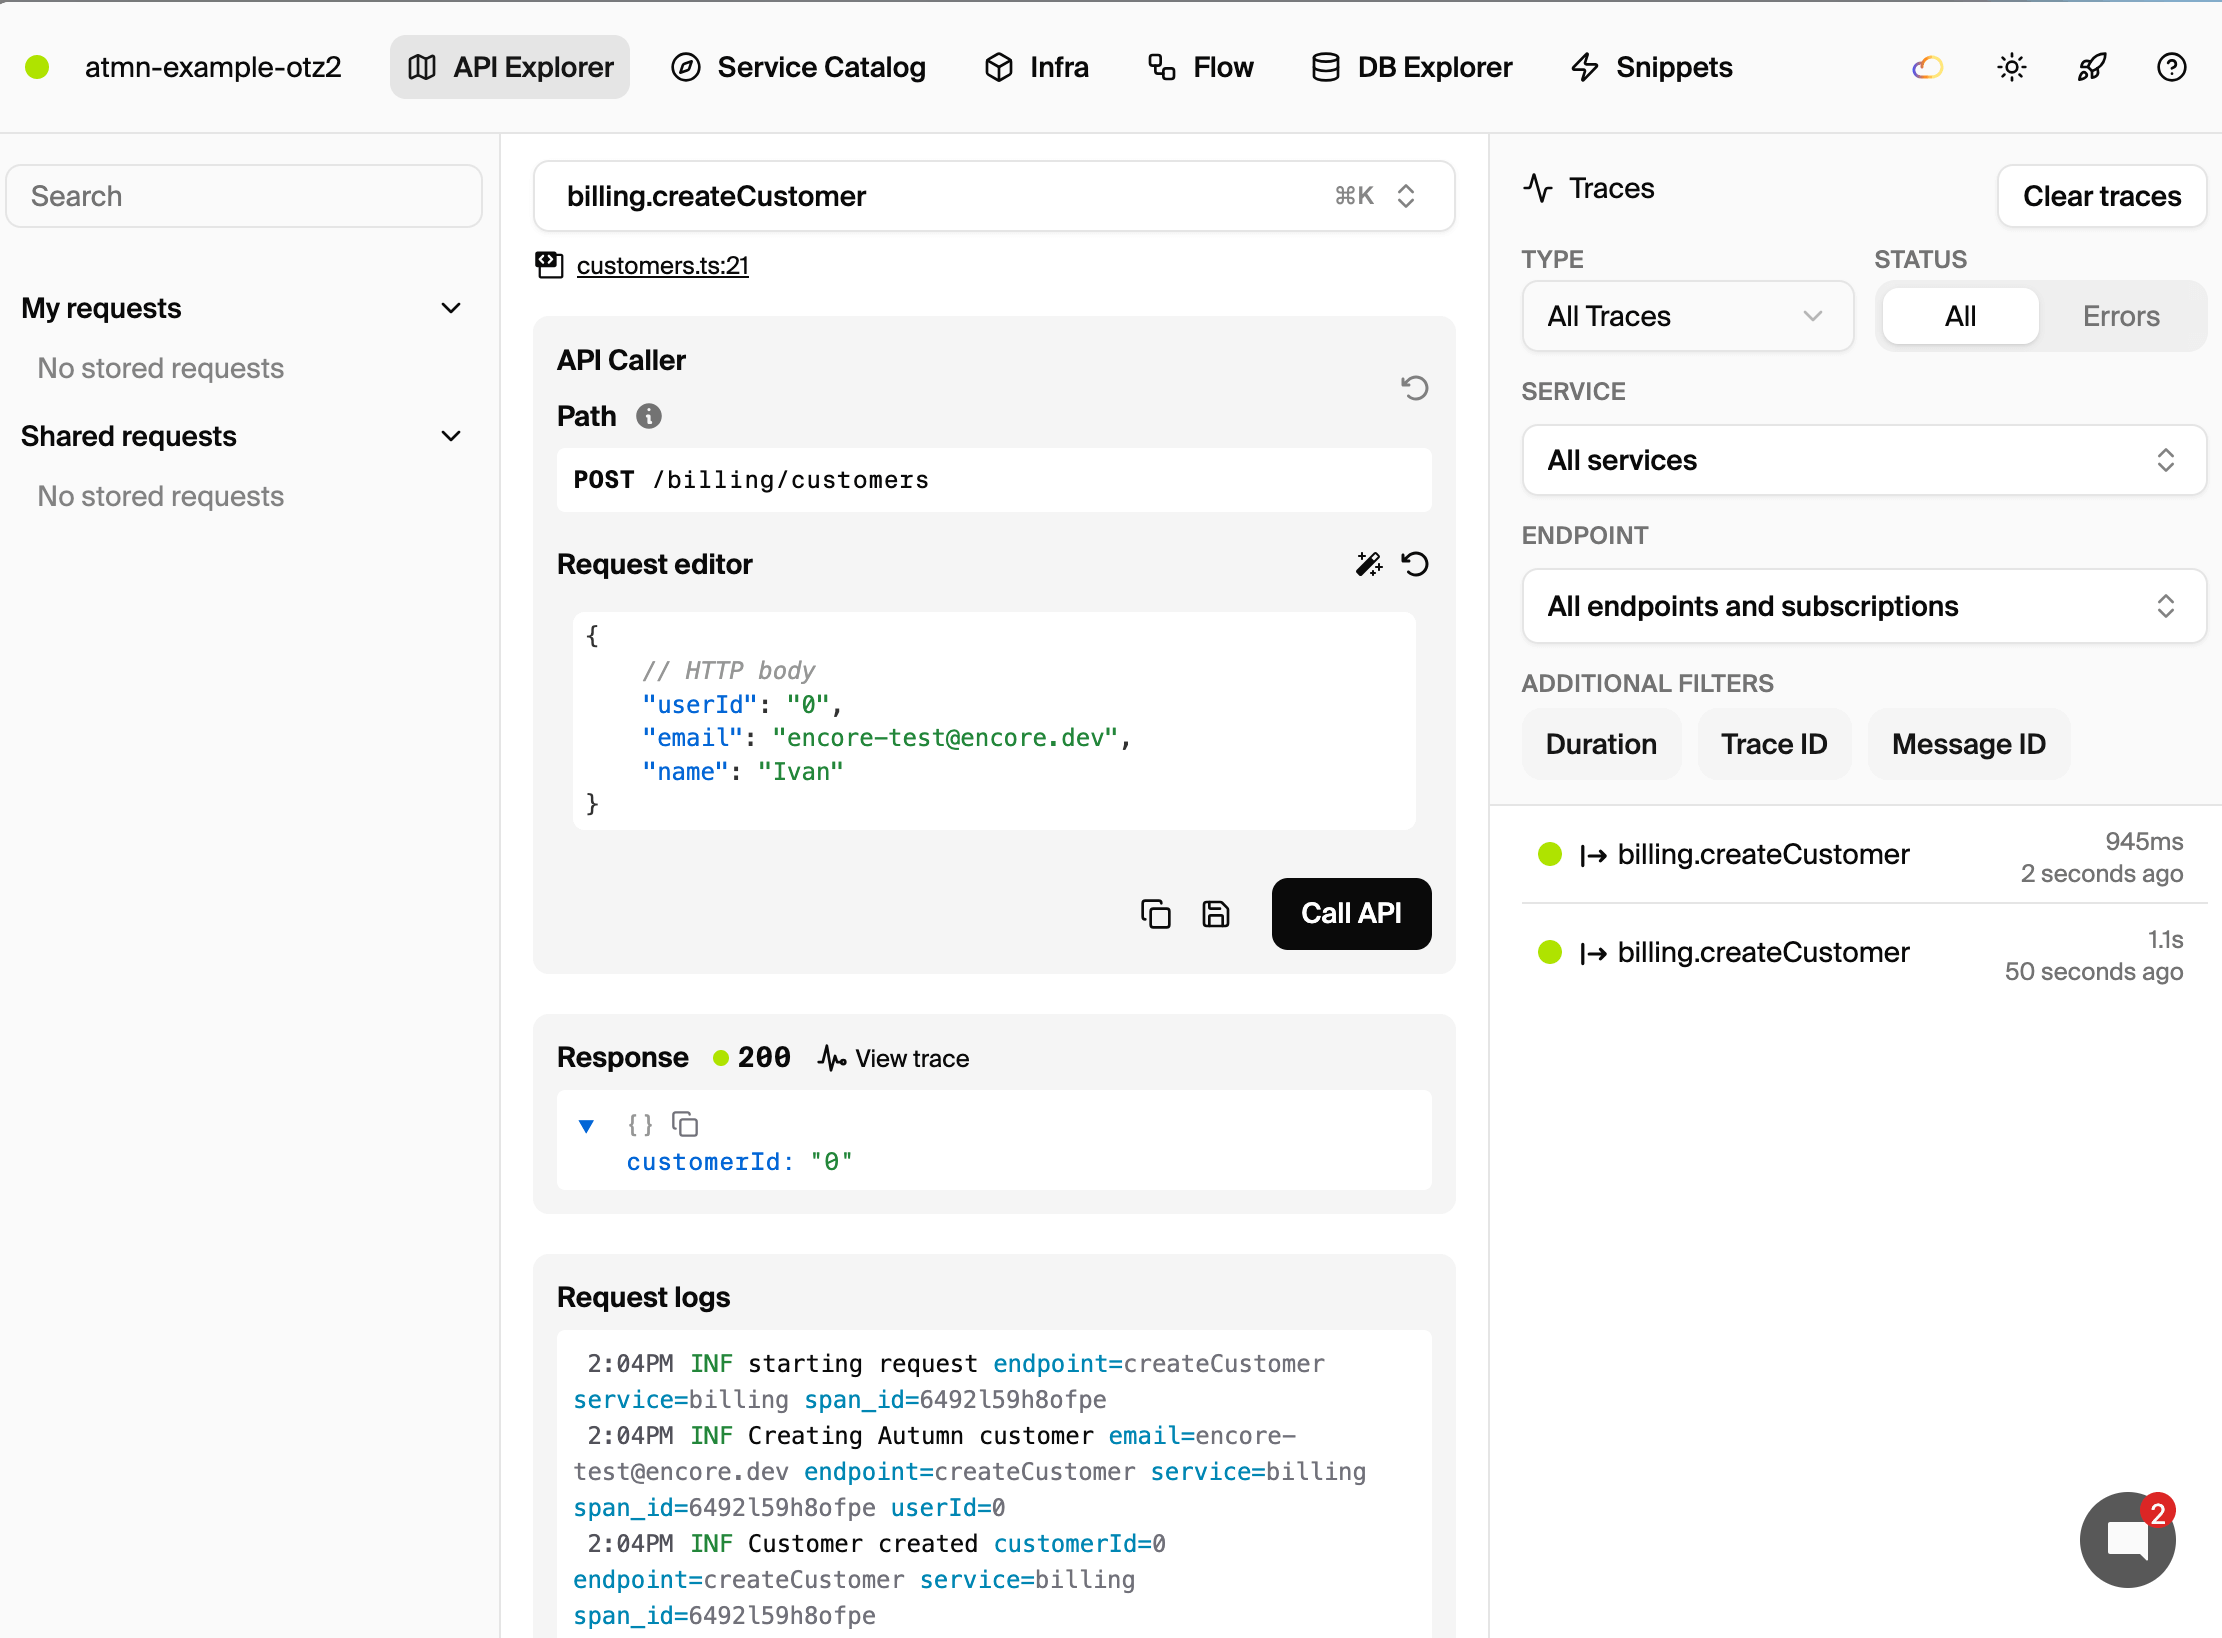
The distributed tracing shows the complete request flow, including calls to Autumn's API:

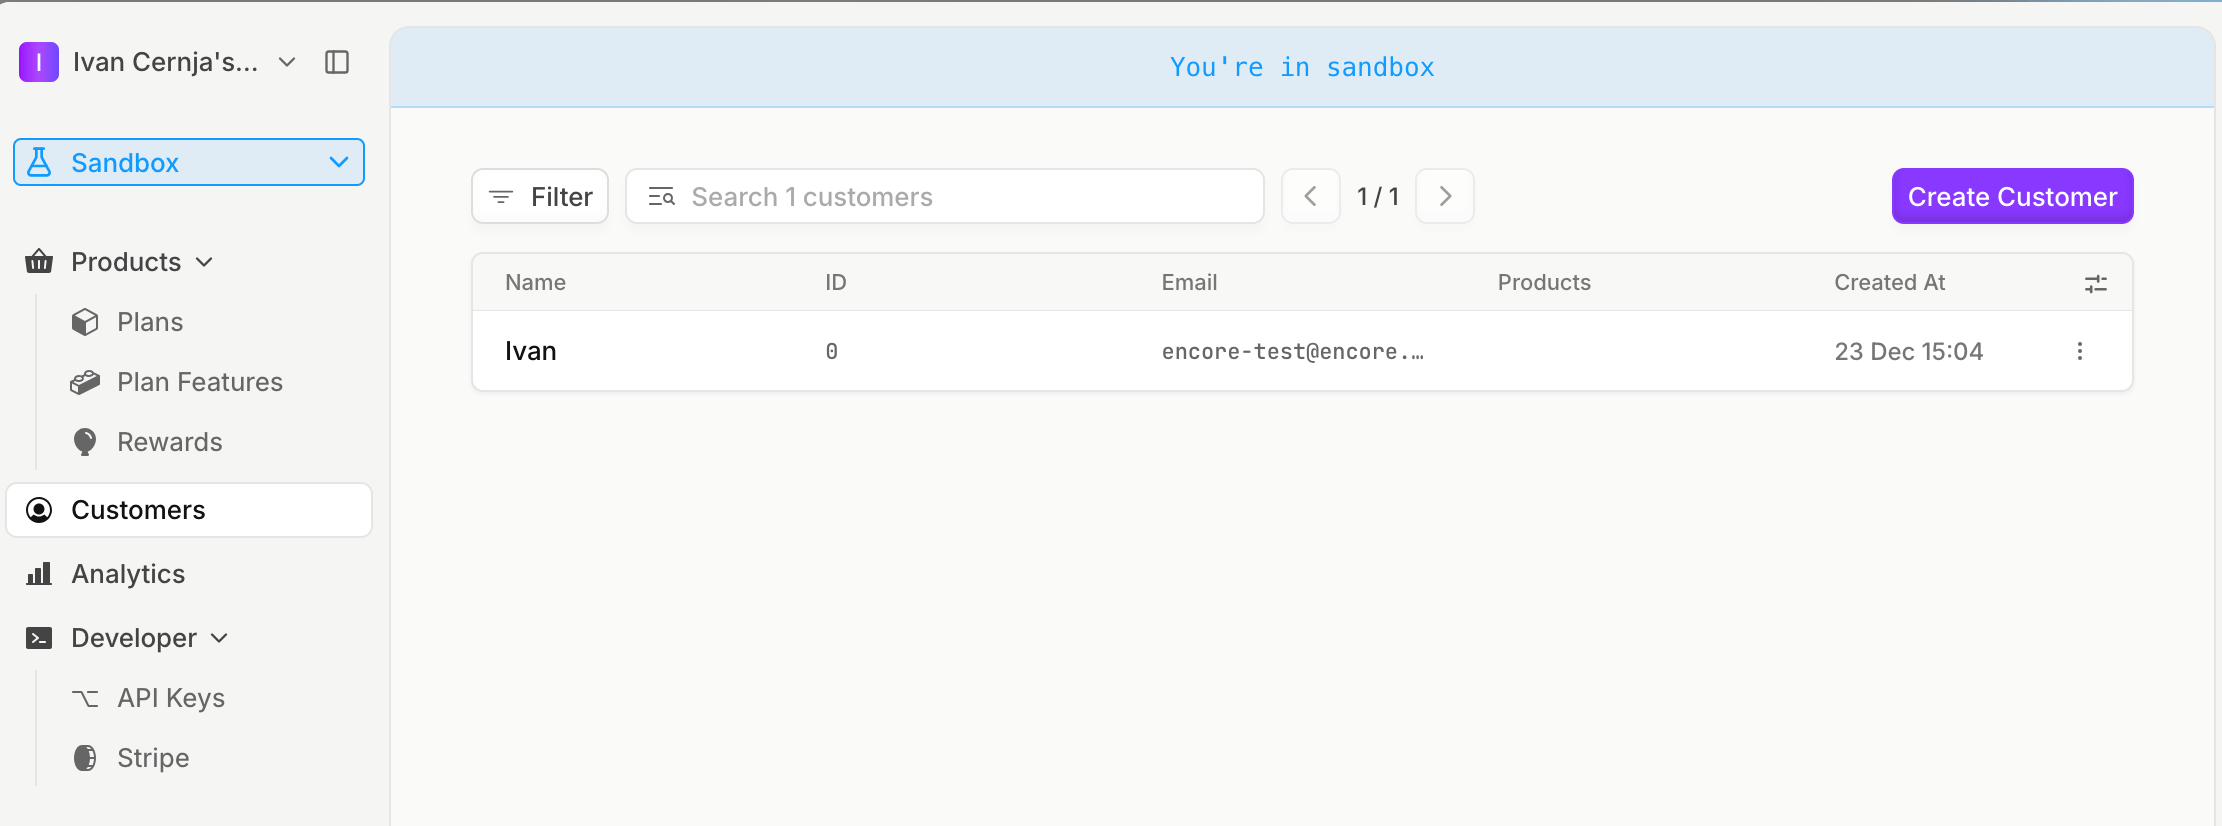
You can also verify customers and their usage in the Autumn dashboard:
Use case: AI chatbot with usage limits
Here's how to build a chatbot endpoint that tracks message usage:
// chat/api.ts
import { api, APIError } from "encore.dev/api";
import { getAuthData } from "~encore/auth";
import { autumn } from "../billing/autumn";

interface ChatRequest {
  message: string;
}

interface ChatResponse {
  reply: string;
}

export const sendMessage = api(
  { expose: true, method: "POST", path: "/chat", auth: true },
  async (req: ChatRequest): Promise<ChatResponse> => {
    const auth = getAuthData()!;

    // Generate AI response
    const reply = await generateAIResponse(req.message);

    // Track usage after successful response
    await autumn.track({
      customer_id: auth.userId,
      feature_id: "messages",
      value: 1,
    });

    return { reply };
  }
);

async function generateAIResponse(message: string): Promise<string> {
  // Your AI implementation here
  return `You said: ${message}`;
}
Frontend integration
Autumn provides React hooks for frontend integration:
import { useCustomer, CheckoutDialog } from "autumn-js/react";

function UpgradeButton() {
  const { checkout } = useCustomer();

  return (
    <button
      onClick={() => checkout({
        productId: "pro",
        dialog: CheckoutDialog,
      })}
    >
      Upgrade to Pro
    </button>
  );
}
Display usage balances:
import { useCustomer } from "autumn-js/react";

function UsageDisplay() {
  const { customer } = useCustomer();
  const messages = customer?.features.messages;

  return (
    <div>
      {messages?.balance} / {messages?.included_usage} messages remaining
    </div>
  );
}
Open the Stripe billing portal:
import { useCustomer } from "autumn-js/react";

function BillingButton() {
  const { openBillingPortal } = useCustomer();

  return (
    <button onClick={() => openBillingPortal({
      returnUrl: "https://yourapp.com/billing"
    })}>
      Manage Billing
    </button>
  );
}
See Autumn's React documentation for full setup instructions.
Deployment
Deploy your application with Encore Cloud:
git add -A .
git commit -m "Add Autumn usage-based billing"
git push encore
Set your production secret:
encore secret set --prod AutumnSecretKey
For self-hosting, see the self-hosting documentation.
Next steps
- Browse Autumn's documentation for credit systems, top-ups, and other pricing models
- Use Autumn's React hooks for frontend integration
- Learn about checking access to gate features before usage
Related Articles

 Ivan Cernja
 Ivan Cernja
 Ivan Cernja