Build an email sending service with Resend & Encore.ts
Create a powerful email sending application with Resend integration and beautiful email management interface
Building an Email Management App with Resend Integration
In this tutorial, we'll build a comprehensive email management application that integrates with Resend to provide reliable email delivery, tracking, and management capabilities. The app will allow you to compose and send emails with both HTML and plain text content, track email delivery status, and manage your email history.
Resend is a modern email API service that makes sending emails simple and reliable. It provides features like email templates, delivery tracking, bounce handling, and detailed analytics - essentially making email delivery production-ready without you having to manage SMTP servers or deal with deliverability issues.
Want to build this faster? Try using Leap to generate this entire application with a simple prompt like "Build an email management app with Resend integration for sending and tracking emails." Leap can scaffold the complete backend and frontend code, letting you focus on customization rather than boilerplate.
This is what the end result should look like:
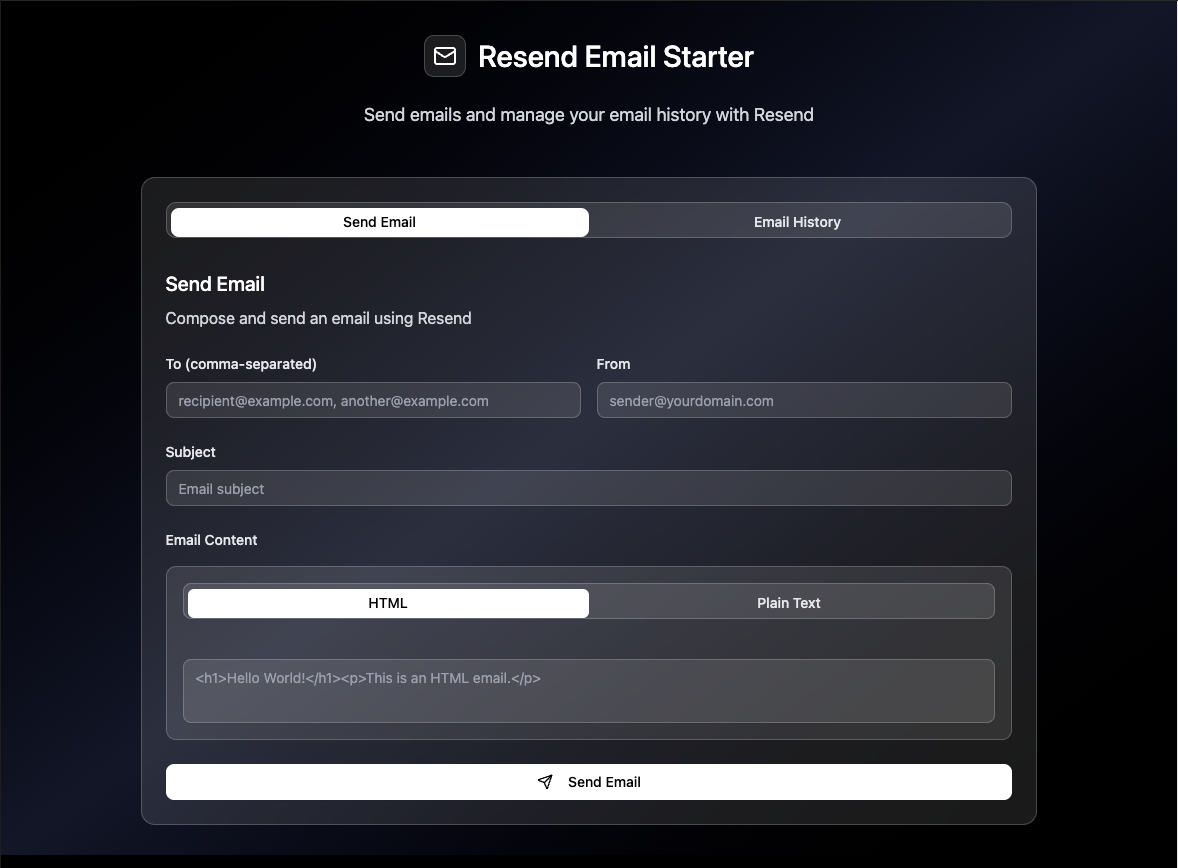
A modern email management dashboard featuring:
- Clean, Vercel-inspired dark theme with glassmorphism elements
- Email composition with HTML and plain text support
- Email history and tracking with delivery status
- Responsive design that works on all devices
- Integration with Resend's powerful email infrastructure
Want to jump straight to a running app? Clone this starter and deploy it to your own cloud.
Getting Started
To get started, you'll need Encore installed on your machine:
$ brew install encoredev/tap/encoreOnce that's ready, we can create our project:
encore app create email-manager --example=hello-world
Backend Implementation
We'll structure our email management application as a single service that handles all email operations. In Encore, a service is a logical grouping of related functionality—in our case, everything related to email sending, tracking, and management.
1. Setting Up the Email Service
Let's create a dedicated email service that will be responsible for:
- Sending emails with HTML and plain text content
- Tracking email delivery status
- Retrieving email details and history
- Managing email templates (optional)
First, create the service directory:
mkdir backend/email
Now define the service by creating backend/email/encore.service.ts:
import { Service } from "encore.dev/service";

export default new Service("email");
This tells Encore that the email directory contains a service called "email". Encore will automatically discover all APIs and other resources we define within this service.
2. Setting Up Resend Integration
Resend provides a comprehensive SDK for managing email delivery. We'll create a client that handles all interactions with their service.
Create backend/email/send.ts for the main email sending functionality:
import { api } from "encore.dev/api";
import { secret } from "encore.dev/config";
import { Resend } from "resend";

const resendApiKey = secret("ResendApiKey");
const resend = new Resend(resendApiKey());

export interface SendEmailRequest {
  to: string[];
  from: string;
  subject: string;
  html?: string;
  text?: string;
}

export interface SendEmailResponse {
  id: string;
  success: boolean;
}

// Sends an email using Resend.
export const send = api<SendEmailRequest, SendEmailResponse>(
  { expose: true, method: "POST", path: "/email/send" },
  async (req) => {
    const result = await resend.emails.send({
      to: req.to,
      from: req.from,
      subject: req.subject,
      html: req.html,
      text: req.text,
    });

    if (result.error) {
      throw new Error(`Failed to send email: ${result.error.message}`);
    }

    return {
      id: result.data!.id,
      success: true,
    };
  }
);
3. Email Retrieval and Tracking
Create backend/email/get-email.ts for retrieving email details:
import { api, APIError } from "encore.dev/api";
import { secret } from "encore.dev/config";
import { Resend } from "resend";

const resendApiKey = secret("ResendApiKey");
const resend = new Resend(resendApiKey());

export interface GetEmailRequest {
  id: string;
}

export interface EmailDetails {
  id: string;
  to: string[];
  from: string;
  subject: string;
  html?: string;
  text?: string;
  created_at: string;
  last_event: string;
}

// Retrieves email details by ID.
export const getEmail = api<GetEmailRequest, EmailDetails>(
  { expose: true, method: "GET", path: "/email/:id" },
  async (req) => {
    const result = await resend.emails.get(req.id);

    if (result.error) {
      if (result.error.message.includes("not found")) {
        throw APIError.notFound("Email not found");
      }
      throw new Error(`Failed to get email: ${result.error.message}`);
    }

    return {
      id: result.data!.id,
      to: result.data!.to,
      from: result.data!.from,
      subject: result.data!.subject,
      html: result.data!.html,
      text: result.data!.text,
      created_at: result.data!.created_at,
      last_event: result.data!.last_event,
    };
  }
);
4. Template Email Support (Optional)
Create backend/email/send-template.ts for template-based emails:
import { api } from "encore.dev/api";
import { secret } from "encore.dev/config";
import { Resend } from "resend";

const resendApiKey = secret("ResendApiKey");
const resend = new Resend(resendApiKey());

export interface SendTemplateEmailRequest {
  to: string[];
  from: string;
  subject: string;
  template: string;
  data?: Record<string, any>;
}

export interface SendTemplateEmailResponse {
  id: string;
  success: boolean;
}

// Sends an email using a Resend template.
export const sendTemplate = api<SendTemplateEmailRequest, SendTemplateEmailResponse>(
  { expose: true, method: "POST", path: "/email/send-template" },
  async (req) => {
    const result = await resend.emails.send({
      to: req.to,
      from: req.from,
      subject: req.subject,
      react: req.template as any,
      ...(req.data && { react: req.data }),
    });

    if (result.error) {
      throw new Error(`Failed to send template email: ${result.error.message}`);
    }

    return {
      id: result.data!.id,
      success: true,
    };
  }
);
Setting Up Resend Integration
1. Getting Your Resend API Key
- Go to Resend and create a free account
- Complete the email verification process
- Once logged in, navigate to API Keys in the dashboard
- Create a new API key or copy your existing one
- The API key will look like
re_...
2. Domain Setup (Important)
For production use, you'll need to verify your domain with Resend:
- In your Resend dashboard, go to Domains
- Click Add Domain and enter your domain (e.g.,
yourdomain.com) - Follow the DNS verification steps provided by Resend
- Once verified, you can send emails from
[email protected]or any address on your domain
For testing, you can use the default Resend domain, but emails will have limitations.
3. Configuring Secrets
Set your Resend API key in Encore:
encore secret set ResendApiKey
# Paste your Resend API key when prompted
Testing the Backend
Now let's test our backend implementation before building the frontend.
1. Start Your Application
encore run
Navigate to http://localhost:9400 to see the Encore developer dashboard.
2. Test Email Sending
Using the API explorer in the Encore dashboard or curl:
curl -X POST http://localhost:4000/email/send \
  -H "Content-Type: application/json" \
  -d '{
    "to": ["[email protected]"],
    "from": "[email protected]",
    "subject": "Test Email",
    "html": "<h1>Hello World!</h1><p>This is a test email.</p>",
    "text": "Hello World! This is a test email."
  }'
You should get a response like:
{
  "id": "re_abc123...",
  "success": true
}
3. Verify Email Delivery
- Check your Resend dashboard
- You should see the email in your Emails list
- Check the recipient's inbox for the delivered email
4. Test Email Retrieval
Get details for the email you just sent:
curl http://localhost:4000/email/re_abc123...
You should get a response with the email details:
{
  "id": "re_abc123...",
  "to": ["[email protected]"],
  "from": "[email protected]",
  "subject": "Test Email",
  "html": "<h1>Hello World!</h1><p>This is a test email.</p>",
  "text": "Hello World! This is a test email.",
  "created_at": "2024-12-19T10:30:00Z",
  "last_event": "delivered"
}
Frontend Implementation
The frontend is built with React and provides a clean, modern interface for managing emails. It features a Vercel-inspired dark theme with glassmorphism elements for a professional look.
1. Main Application Component
Create frontend/App.tsx:
import { useState } from "react";
import { Toaster } from "@/components/ui/toaster";
import { EmailForm } from "./components/EmailForm";
import { EmailHistory } from "./components/EmailHistory";
import { Tabs, TabsContent, TabsList, TabsTrigger } from "@/components/ui/tabs";
import { Mail } from "lucide-react";

export default function App() {
  const [refreshHistory, setRefreshHistory] = useState(0);

  const handleEmailSent = () => {
    setRefreshHistory(prev => prev + 1);
  };

  return (
    <div className="min-h-screen bg-black text-white">
      <div className="absolute inset-0 bg-linear-to-br from-black via-gray-900 to-black"></div>
      <div className="absolute inset-0 bg-[radial-gradient(ellipse_at_top,var(--tw-gradient-stops))] from-gray-800/30 via-transparent to-transparent"></div>

      <div className="relative z-10 container mx-auto px-4 py-12">
        <div className="max-w-4xl mx-auto">
          <div className="text-center mb-12">
            <div className="inline-flex items-center gap-3 mb-6">
              <div className="p-2 rounded-lg bg-white/10 border border-white/20">
                <Mail className="h-6 w-6 text-white" />
              </div>
              <h1 className="text-3xl font-medium text-white">
                Resend Email Starter
              </h1>
            </div>
            <p className="text-gray-300 text-lg max-w-2xl mx-auto">
              Send emails and manage your email history with Resend
            </p>
          </div>

          <div className="bg-white/10 backdrop-blur-sm border border-white/20 rounded-xl p-6">
            <Tabs defaultValue="send" className="w-full">
              <TabsList className="grid w-full grid-cols-2 bg-white/10 border border-white/20 p-1 rounded-lg">
                <TabsTrigger
                  value="send"
                  className="data-[state=active]:bg-white data-[state=active]:text-black text-gray-200 font-medium rounded-md transition-all duration-200"
                >
                  Send Email
                </TabsTrigger>
                <TabsTrigger
                  value="history"
                  className="data-[state=active]:bg-white data-[state=active]:text-black text-gray-200 font-medium rounded-md transition-all duration-200"
                >
                  Email History
                </TabsTrigger>
              </TabsList>

              <TabsContent value="send" className="mt-6">
                <EmailForm onEmailSent={handleEmailSent} />
              </TabsContent>

              <TabsContent value="history" className="mt-6">
                <EmailHistory key={refreshHistory} />
              </TabsContent>
            </Tabs>
          </div>
        </div>
      </div>
      <Toaster />
    </div>
  );
}
2. Email Composition Component
Create frontend/components/EmailForm.tsx:
import { useState } from "react";
import { Button } from "@/components/ui/button";
import { Input } from "@/components/ui/input";
import { Label } from "@/components/ui/label";
import { Textarea } from "@/components/ui/textarea";
import { Tabs, TabsContent, TabsList, TabsTrigger } from "@/components/ui/tabs";
import { toast } from "@/components/ui/use-toast";
import { Send, Loader2 } from "lucide-react";
import backend from "~backend/client";

interface EmailFormProps {
  onEmailSent: () => void;
}

export function EmailForm({ onEmailSent }: EmailFormProps) {
  const [isLoading, setIsLoading] = useState(false);
  const [emailType, setEmailType] = useState<"html" | "text">("html");

  const [formData, setFormData] = useState({
    to: "",
    from: "",
    subject: "",
    html: "",
    text: "",
  });

  const handleSubmit = async (e: React.FormEvent) => {
    e.preventDefault();
    setIsLoading(true);

    try {
      const toEmails = formData.to.split(",").map(email => email.trim()).filter(Boolean);

      if (toEmails.length === 0) {
        toast({
          title: "Error",
          description: "Please enter at least one recipient email address",
          variant: "destructive",
        });
        return;
      }

      const emailData = {
        to: toEmails,
        from: formData.from,
        subject: formData.subject,
        ...(emailType === "html" ? { html: formData.html } : { text: formData.text }),
      };

      const result = await backend.email.send(emailData);

      toast({
        title: "Email sent successfully!",
        description: `Email ID: ${result.id}`,
      });

      // Reset form
      setFormData({
        to: "",
        from: "",
        subject: "",
        html: "",
        text: "",
      });

      onEmailSent();
    } catch (error) {
      console.error("Failed to send email:", error);
      toast({
        title: "Failed to send email",
        description: error instanceof Error ? error.message : "An unexpected error occurred",
        variant: "destructive",
      });
    } finally {
      setIsLoading(false);
    }
  };

  return (
    <div className="space-y-6">
      <div>
        <h2 className="text-xl font-medium text-white mb-2">Send Email</h2>
        <p className="text-gray-300">
          Compose and send an email using Resend
        </p>
      </div>

      <form onSubmit={handleSubmit} className="space-y-6">
        <div className="grid grid-cols-1 md:grid-cols-2 gap-4">
          <div className="space-y-2">
            <Label htmlFor="to" className="text-sm font-medium text-gray-200">
              To (comma-separated)
            </Label>
            <Input
              id="to"
              type="email"
              placeholder="[email protected], [email protected]"
              value={formData.to}
              onChange={(e) => setFormData({ ...formData, to: e.target.value })}
              required
              className="bg-white/10 border-white/20 text-white placeholder:text-gray-400 focus:bg-white/15 focus:border-white/30 transition-all duration-200"
            />
          </div>
          <div className="space-y-2">
            <Label htmlFor="from" className="text-sm font-medium text-gray-200">
              From
            </Label>
            <Input
              id="from"
              type="email"
              placeholder="[email protected]"
              value={formData.from}
              onChange={(e) => setFormData({ ...formData, from: e.target.value })}
              required
              className="bg-white/10 border-white/20 text-white placeholder:text-gray-400 focus:bg-white/15 focus:border-white/30 transition-all duration-200"
            />
          </div>
        </div>

        <div className="space-y-2">
          <Label htmlFor="subject" className="text-sm font-medium text-gray-200">
            Subject
          </Label>
          <Input
            id="subject"
            placeholder="Email subject"
            value={formData.subject}
            onChange={(e) => setFormData({ ...formData, subject: e.target.value })}
            required
            className="bg-white/10 border-white/20 text-white placeholder:text-gray-400 focus:bg-white/15 focus:border-white/30 transition-all duration-200"
          />
        </div>

        <div className="space-y-4">
          <Label className="text-sm font-medium text-gray-200">Email Content</Label>
          <div className="bg-white/10 border border-white/20 rounded-lg p-4">
            <Tabs value={emailType} onValueChange={(value) => setEmailType(value as "html" | "text")}>
              <TabsList className="grid w-full grid-cols-2 bg-white/10 border border-white/20 p-1 mb-4 rounded-md">
                <TabsTrigger
                  value="html"
                  className="data-[state=active]:bg-white data-[state=active]:text-black text-gray-200 font-medium rounded-sm transition-all duration-200"
                >
                  HTML
                </TabsTrigger>
                <TabsTrigger
                  value="text"
                  className="data-[state=active]:bg-white data-[state=active]:text-black text-gray-200 font-medium rounded-sm transition-all duration-200"
                >
                  Plain Text
                </TabsTrigger>
              </TabsList>

              <TabsContent value="html" className="mt-4">
                <Textarea
                  placeholder="<h1>Hello World!</h1><p>This is an HTML email.</p>"
                  value={formData.html}
                  onChange={(e) => setFormData({ ...formData, html: e.target.value })}
                  rows={8}
                  required={emailType === "html"}
                  className="bg-white/10 border-white/20 text-white placeholder:text-gray-400 focus:bg-white/15 focus:border-white/30 transition-all duration-200 resize-none"
                />
              </TabsContent>

              <TabsContent value="text" className="mt-4">
                <Textarea
                  placeholder="Hello World! This is a plain text email."
                  value={formData.text}
                  onChange={(e) => setFormData({ ...formData, text: e.target.value })}
                  rows={8}
                  required={emailType === "text"}
                  className="bg-white/10 border-white/20 text-white placeholder:text-gray-400 focus:bg-white/15 focus:border-white/30 transition-all duration-200 resize-none"
                />
              </TabsContent>
            </Tabs>
          </div>
        </div>

        <Button
          type="submit"
          disabled={isLoading}
          className="w-full bg-white text-black hover:bg-gray-100 font-medium py-2.5 transition-all duration-200 disabled:opacity-50 disabled:cursor-not-allowed"
        >
          {isLoading ? (
            <>
              <Loader2 className="mr-2 h-4 w-4 animate-spin" />
              Sending...
            </>
          ) : (
            <>
              <Send className="mr-2 h-4 w-4" />
              Send Email
            </>
          )}
        </Button>
      </form>
    </div>
  );
}
3. Email History Component
Create frontend/components/EmailHistory.tsx:
import { useState } from "react";
import { Badge } from "@/components/ui/badge";
import { Button } from "@/components/ui/button";
import { toast } from "@/components/ui/use-toast";
import { Mail, Eye, Calendar, User, ArrowRight } from "lucide-react";
import backend from "~backend/client";
import type { EmailDetails } from "~backend/email/get-email";

export function EmailHistory() {
  const [emails, setEmails] = useState<EmailDetails[]>([]);
  const [selectedEmail, setSelectedEmail] = useState<EmailDetails | null>(null);
  const [isLoading, setIsLoading] = useState(false);

  const fetchEmailDetails = async (emailId: string) => {
    setIsLoading(true);
    try {
      const email = await backend.email.getEmail({ id: emailId });
      setEmails(prev => {
        const exists = prev.find(e => e.id === email.id);
        if (exists) return prev;
        return [email, ...prev];
      });
    } catch (error) {
      console.error("Failed to fetch email details:", error);
      toast({
        title: "Failed to fetch email",
        description: error instanceof Error ? error.message : "An unexpected error occurred",
        variant: "destructive",
      });
    } finally {
      setIsLoading(false);
    }
  };

  const handleViewEmail = (email: EmailDetails) => {
    setSelectedEmail(email);
  };

  const formatDate = (dateString: string) => {
    return new Date(dateString).toLocaleString();
  };

  const getStatusColor = (status: string) => {
    switch (status.toLowerCase()) {
      case "delivered":
        return "bg-green-500/30 text-green-300 border-green-500/50";
      case "sent":
        return "bg-blue-500/30 text-blue-300 border-blue-500/50";
      case "bounced":
        return "bg-red-500/30 text-red-300 border-red-500/50";
      case "complained":
        return "bg-yellow-500/30 text-yellow-300 border-yellow-500/50";
      default:
        return "bg-gray-500/30 text-gray-300 border-gray-500/50";
    }
  };

  if (selectedEmail) {
    return (
      <div className="space-y-6">
        <div className="flex items-center justify-between">
          <div>
            <h2 className="text-xl font-medium text-white mb-2 flex items-center gap-3">
              <Mail className="h-5 w-5 text-gray-300" />
              Email Details
            </h2>
            <p className="text-gray-300 text-sm">ID: {selectedEmail.id}</p>
          </div>
          <Button
            variant="outline"
            onClick={() => setSelectedEmail(null)}
            className="bg-white/10 border-white/20 text-white hover:bg-white/15 hover:border-white/30 transition-all duration-200"
          >
            Back to History
          </Button>
        </div>

        <div className="space-y-6">
          <div className="grid grid-cols-1 md:grid-cols-2 gap-6">
            <div className="bg-white/10 border border-white/20 rounded-lg p-4 space-y-3">
              <div className="flex items-center gap-3 text-sm">
                <User className="h-4 w-4 text-gray-300" />
                <span className="font-medium text-gray-200">From:</span>
                <span className="text-white">{selectedEmail.from}</span>
              </div>
              <div className="flex items-center gap-3 text-sm">
                <ArrowRight className="h-4 w-4 text-gray-300" />
                <span className="font-medium text-gray-200">To:</span>
                <span className="text-white">{selectedEmail.to.join(", ")}</span>
              </div>
              <div className="flex items-center gap-3 text-sm">
                <Calendar className="h-4 w-4 text-gray-300" />
                <span className="font-medium text-gray-200">Sent:</span>
                <span className="text-white">{formatDate(selectedEmail.created_at)}</span>
              </div>
            </div>

            <div className="bg-white/10 border border-white/20 rounded-lg p-4 space-y-3">
              <div>
                <span className="font-medium text-gray-200 text-sm">Subject:</span>
                <p className="text-white mt-1">{selectedEmail.subject}</p>
              </div>
              <div className="flex items-center gap-3">
                <span className="font-medium text-gray-200 text-sm">Status:</span>
                <Badge className={`font-medium border text-xs ${getStatusColor(selectedEmail.last_event)}`}>
                  {selectedEmail.last_event}
                </Badge>
              </div>
            </div>
          </div>

          {selectedEmail.html && (
            <div className="bg-white/10 border border-white/20 rounded-lg p-4">
              <span className="font-medium text-gray-200 text-sm block mb-3">HTML Content:</span>
              <div className="bg-black/60 border border-white/20 rounded-lg p-4 max-h-96 overflow-auto">
                <div dangerouslySetInnerHTML={{ __html: selectedEmail.html }} />
              </div>
            </div>
          )}

          {selectedEmail.text && (
            <div className="bg-white/10 border border-white/20 rounded-lg p-4">
              <span className="font-medium text-gray-200 text-sm block mb-3">Text Content:</span>
              <div className="bg-black/60 border border-white/20 rounded-lg p-4 max-h-96 overflow-auto">
                <pre className="whitespace-pre-wrap font-mono text-gray-200 text-sm">{selectedEmail.text}</pre>
              </div>
            </div>
          )}
        </div>
      </div>
    );
  }

  return (
    <div className="space-y-6">
      <div>
        <h2 className="text-xl font-medium text-white mb-2">Email History</h2>
        <p className="text-gray-300">
          View details of sent emails. Enter an email ID to fetch its details.
        </p>
      </div>

      <div className="space-y-6">
        <div className="bg-white/10 border border-white/20 rounded-lg p-4">
          <div className="flex gap-3">
            <input
              type="text"
              placeholder="Enter email ID to fetch details..."
              className="flex-1 px-3 py-2 bg-white/10 border border-white/20 rounded-md text-white placeholder:text-gray-400 focus:bg-white/15 focus:border-white/30 focus:outline-none transition-all duration-200"
              onKeyDown={(e) => {
                if (e.key === "Enter") {
                  const target = e.target as HTMLInputElement;
                  if (target.value.trim()) {
                    fetchEmailDetails(target.value.trim());
                    target.value = "";
                  }
                }
              }}
            />
            <Button
              onClick={() => {
                const input = document.querySelector('input[placeholder*="Enter email ID"]') as HTMLInputElement;
                if (input?.value.trim()) {
                  fetchEmailDetails(input.value.trim());
                  input.value = "";
                }
              }}
              disabled={isLoading}
              className="bg-white text-black hover:bg-gray-100 font-medium px-4 transition-all duration-200 disabled:opacity-50 disabled:cursor-not-allowed"
            >
              Fetch
            </Button>
          </div>
        </div>

        {emails.length === 0 ? (
          <div className="text-center py-12 bg-white/10 border border-white/20 rounded-lg">
            <Mail className="h-12 w-12 mx-auto mb-4 text-gray-400" />
            <p className="text-gray-200 mb-2">No emails fetched yet.</p>
            <p className="text-gray-400 text-sm">Enter an email ID above to view its details.</p>
          </div>
        ) : (
          <div className="space-y-3">
            {emails.map((email) => (
              <div
                key={email.id}
                className="bg-white/10 border border-white/20 rounded-lg p-4 hover:bg-white/15 hover:border-white/30 transition-all duration-200"
              >
                <div className="flex items-center justify-between">
                  <div className="flex-1">
                    <div className="flex items-center gap-3 mb-3">
                      <h3 className="font-medium text-white">{email.subject}</h3>
                      <Badge className={`font-medium border text-xs ${getStatusColor(email.last_event)}`}>
                        {email.last_event}
                      </Badge>
                    </div>
                    <div className="text-gray-300 space-y-1 text-sm">
                      <p>From: {email.from}</p>
                      <p>To: {email.to.join(", ")}</p>
                      <p>Sent: {formatDate(email.created_at)}</p>
                    </div>
                  </div>
                  <Button
                    variant="outline"
                    size="sm"
                    onClick={() => handleViewEmail(email)}
                    className="bg-white/10 border-white/20 text-white hover:bg-white/15 hover:border-white/30 transition-all duration-200"
                  >
                    <Eye className="h-4 w-4 mr-2" />
                    View
                  </Button>
                </div>
              </div>
            ))}
          </div>
        )}
      </div>
    </div>
  );
}
Running the Application
Now that we've built both the backend and frontend, let's bring everything together and see our email management application in action.
Starting the Development Environment
Launch your Encore application with a single command:
encore run
This starts both your backend services and the local development environment. Encore automatically handles:
- Service discovery: All your APIs are automatically registered and made available
- Hot reloading: Changes to your backend code will automatically restart the affected services
- Request routing: Incoming requests are routed to the correct service endpoints
- Secret management: Your Resend API key is securely loaded from the environment
Accessing Your Application
Once the server is running, your email management application will be available at multiple endpoints:
- Application: http://localhost:4000 - Your full-stack application with the React frontend
- Development Dashboard: http://localhost:9400 - Encore's powerful development dashboard
The development dashboard provides you with:
- API Explorer: Test your endpoints directly in the browser
- Request Tracing: See detailed traces of every API call
- Logs: Real-time logs from all your services
- Architecture Diagram: Visual representation of your application structure
Testing Your Email Application
Here's how to verify everything is working:
- Navigate to the application at http://localhost:4000
- Send a test email:
- Fill in the "To" field with your email address
- Enter a "From" address (use your verified domain if you have one)
- Add a subject and compose your message in HTML or plain text
- Click "Send Email"
- Track the email:
- Note the Email ID from the success message
- Go to the "Email History" tab
- Enter the Email ID and click "Fetch" to see delivery details
- Check your inbox for the delivered email
- Monitor in Resend dashboard at resend.com/emails for delivery analytics
Deployment
Once your application is working locally, you can deploy it to production.
Deploying to Encore Cloud
Deploy your application using Git:
git add .
git commit -m "Initial email management application"
git push encore
This triggers an automatic deployment that:
- Builds your application in Encore's cloud infrastructure
- Provisions resources including compute instances and networking
- Deploys your services with automatic scaling and load balancing
- Sets up monitoring with distributed tracing and metrics
- Provides a production URL for your live application
Managing Secrets in Production
Your Resend API key needs to be set in the production environment:
# Set secrets for your production environment
encore secret set --env=production ResendApiKey
Next Steps
Your email management application is now live! Here are some ideas for extending it:
- Email templates: Create reusable templates for common email types
- Contact management: Build a contact list and segmentation system
- Scheduled sending: Add the ability to schedule emails for later delivery
- Analytics dashboard: Track open rates, click rates, and delivery metrics
- Webhook integration: Receive real-time notifications about email events
- Bulk email sending: Support for sending emails to multiple recipients efficiently
Congratulations! You've built a production-ready email management application that can send both HTML and plain text emails, track delivery status, and provide a beautiful interface for managing your email communications.
Related Articles

 Ivan Cernja
 Ivan Cernja
 Ivan Cernja