Event-Driven Architecture Starter
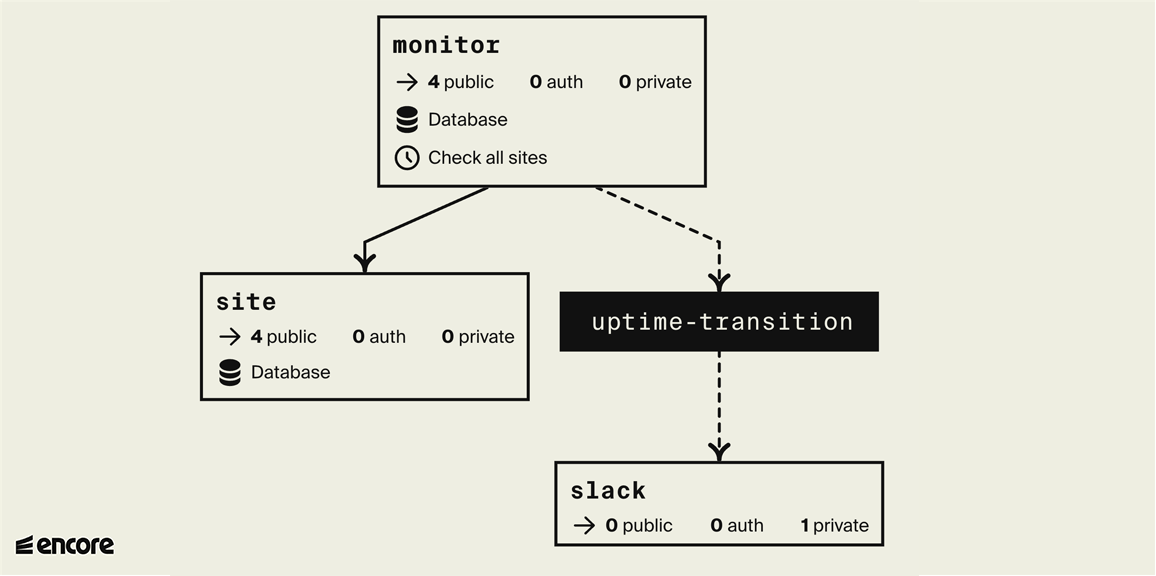
This is an event-driven microservices application using Pub/Sub for asynchronous communication between services.
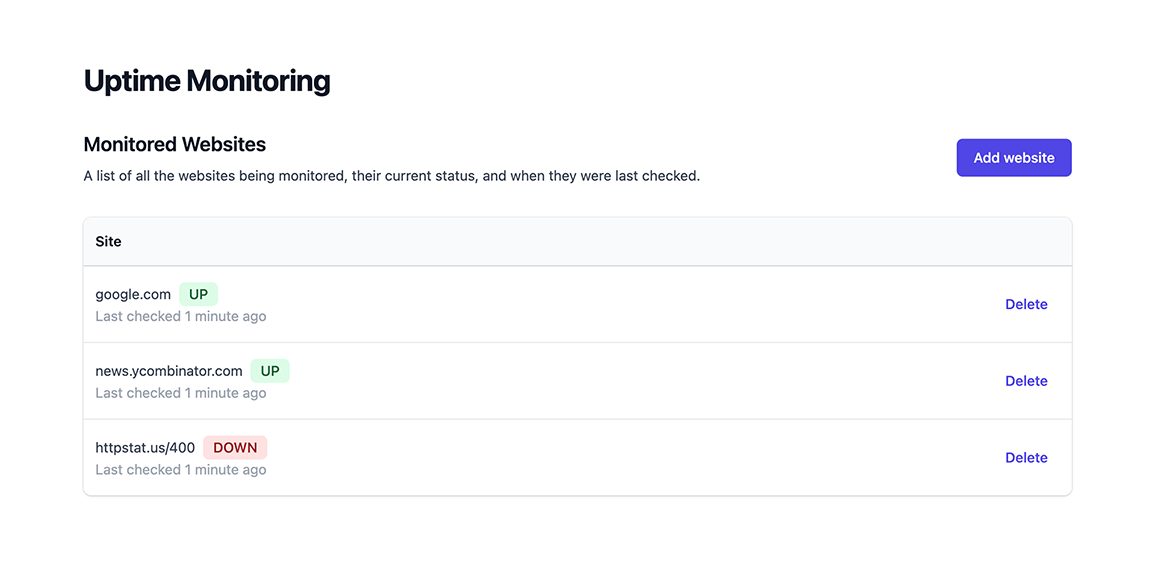
The example in this starter is an Uptime Monitoring System that continuously monitors the uptime of a list of websites.
When it detects a website is down, it posts a Slack message notifying that the website is down, and another message when the website is back up again.
It has a React frontend built with Vite and shadcn/ui, served by the Encore app itself. You can try a demo version here.

Build from scratch with a tutorial
If you prefer, check out the tutorial to learn how to build this application from scratch.
Prerequisites
Install Encore:
- macOS:
brew install encoredev/tap/encore - Linux:
curl -L https://encore.dev/install.sh | bash - Windows:
iwr https://encore.dev/install.ps1 | iex
Docker:
- Install Docker
- Start Docker
Create app
Create a local app from this template:
encore app create my-app-name --example=uptime
Run app locally
Before running your application, make sure you have Docker installed and running. Then run this command from your application's root folder:
encore run
Then open http://localhost:4000/ to use the uptime monitor.
To use the Slack integration, set the Slack Webhook URL (see tutorial above):
encore secret set --type local,dev,pr,prod SlackWebhookURL
Note: Cron Jobs do not execute when running locally.
Frontend
The React app lives in frontend/. Its production build in frontend/dist is committed and embedded into the frontend service with go:embed, so encore run serves it without needing Node.js.
To work on the frontend with hot reloading, keep encore run running and start Vite's dev server:
cd frontend
npm install
npm run dev
Open http://localhost:5173/. The dev server calls the API on localhost:4000. When you're done, run npm run build to update frontend/dist, and commit it.
The frontend talks to the backend using a type-safe client generated by Encore. Regenerate it after changing an API:
npm run gen
Run the frontend tests with npm test.
Using the API
Check if a given site is up (defaults to 'https://' if left out):
curl 'http://localhost:4000/ping/google.com'
Add a site to be automatically pinged every 1 hour:
curl 'http://localhost:4000/site' -d '{"url":"google.com"}'
Check all tracked sites immediately:
curl -X POST 'http://localhost:4000/check-all'
Get the current status of all tracked sites:
curl 'http://localhost:4000/status'
Local Development Dashboard
While encore run is running, open http://localhost:9400/ to access Encore's local developer dashboard.
Here you can see traces for all requests you've made, see the application architecture diagram, and see API documentation in the Service Catalog.
Connecting to databases
You can connect to your databases via psql shell:
encore db shell <database-name> --env=local --superuser
Learn more in the CLI docs.
Deployment
Self-hosting
See the self-hosting instructions for how to use encore build docker to create a Docker image and configure it.
Encore Cloud Platform
Deploy your application to a free staging environment in Encore's development cloud using git push encore:
git add -A .
git commit -m 'Commit message'
git push encore
You can also open your app in the Cloud Dashboard to integrate with GitHub, or connect your AWS/GCP account, enabling Encore to automatically handle cloud deployments for you.
Link to GitHub
Follow these steps to link your app to GitHub:
- Create a GitHub repo, commit and push the app.
- Open your app in the Cloud Dashboard.
- Go to Settings ➔ GitHub and click on Link app to GitHub to link your app to GitHub and select the repo you just created.
- To configure Encore to automatically trigger deploys when you push to a specific branch name, go to the Overview page for your intended environment. Click on Settings and then in the section Branch Push configure the Branch name and hit Save.
- Commit and push a change to GitHub to trigger a deploy.
Testing
encore test ./...
Event-Driven Architecture Starter
This is an event-driven microservices application using Pub/Sub for asynchronous communication between services.
The example in this starter is an Uptime Monitoring System that continuously monitors the uptime of a list of websites.
When it detects a website is down, it posts a Slack message notifying that the website is down, and another message when the website is back up again.
It has a React frontend built with Vite, served by the Encore app itself. You can try a demo version here.
Build from scratch with a tutorial
If you prefer, check out the tutorial to learn how to build this application from scratch.
Prerequisites
Install Encore:
- macOS:
brew install encoredev/tap/encore - Linux:
curl -L https://encore.dev/install.sh | bash - Windows:
iwr https://encore.dev/install.ps1 | iex
Docker:
- Install Docker
- Start Docker
Create app
Create a local app from this template:
encore app create uptime-example --example=ts/uptime
Run app locally
Before running your application, make sure you have Docker installed and running. Then run this command from your application's root folder:
encore run
This starts the backend and the frontend together. Open http://localhost:4000/ to use the uptime monitor.
To use the Slack integration, set the Slack Webhook URL (see tutorial above):
encore secret set --type local,dev,pr,prod SlackWebhookURL
Note: Cron Jobs do not execute when running locally.
Frontend
The React app lives in frontend/, uses shadcn/ui components (in frontend/src/components/ui), and is served by the frontend service, so there's no separate dev server to start:
- Locally,
encore runalso starts a Vite dev server with hot reloading. Page loads go through Encore, while Vite serves source files and hot updates on port 4400. - In the cloud, Encore runs
npm run buildbefore building the app (seebuild.hooksinencore.app), and thefrontendservice serves the built files fromfrontend/distusing Encore's static file serving.
npm install also builds the frontend (postinstall), because Encore checks that frontend/dist exists when it starts the app. If you delete it, run npm run build.
The frontend talks to the backend using a type-safe client generated by Encore, in frontend/src/lib/client.ts. Regenerate it after creating your app, so it uses your app's ID (the committed client was generated for a different app), and after changing an API:
npm run gen
Using the API
Check if a given site is up (defaults to 'https://' if left out):
curl 'http://localhost:4000/ping/google.com'
Add a site to be automatically pinged every 1 hour:
curl 'http://localhost:4000/site' -d '{"url":"google.com"}'
Check all tracked sites immediately:
curl -X POST 'http://localhost:4000/check-all'
Get the current status of all tracked sites:
curl 'http://localhost:4000/status'
Local Development Dashboard
While encore run is running, open http://localhost:9400/ to access Encore's local developer dashboard.
Here you can see traces for all requests that you made while using the frontend, see your architecture diagram, and view API documentation in the Service Catalog.
Connecting to databases
You can connect to your databases via psql shell:
encore db shell <database-name> --env=local --superuser
Learn more in the CLI docs.
Deployment
Self-hosting
See the self-hosting instructions for how to use encore build docker to create a Docker image and configure it.
Encore Cloud Platform
Deploy your application to a free staging environment in Encore's development cloud using git push encore:
git add -A .
git commit -m 'Commit message'
git push encore
You can also open your app in the Cloud Dashboard to integrate with GitHub, or connect your AWS/GCP account, enabling Encore to automatically handle cloud deployments for you.
Link to GitHub
Follow these steps to link your app to GitHub:
- Create a GitHub repo, commit and push the app.
- Open your app in the Cloud Dashboard.
- Go to Settings ➔ GitHub and click on Link app to GitHub to link your app to GitHub and select the repo you just created.
- To configure Encore to automatically trigger deploys when you push to a specific branch name, go to the Overview page for your intended environment. Click on Settings and then in the section Branch Push configure the Branch name and hit Save.
- Commit and push a change to GitHub to trigger a deploy.
Testing
To run tests, configure the test command in your package.json to the test runner of your choice, and then use the command encore test from the CLI. The encore test command sets up all the necessary infrastructure in test mode before handing over to the test runner. Learn more
encore test