# Quick Start Guide
> Build your first Encore app in 5 minutes
This guide demonstrates how to build a REST API service with Encore, run it locally with tracing and generated API docs, and deploy it to the cloud.
You'll need **Encore.ts:**
[Node.js](https://nodejs.org/en/download)**Encore.go:**
[Go](https://go.dev/dl/) installed.
## 1. Install Encore and create your app
The Encore CLI provisions your local environment and runs your local development dashboard.
**Install the Encore CLI** (pick the line for your OS):
```shell
# macOS
brew install encoredev/tap/encore
# Windows
iwr https://encore.dev/install.ps1 | iex
# Linux
curl -L https://encore.dev/install.sh | bash
```
Then scaffold an app:
```shell
encore app create
```
The CLI then prompts you to:
1. **Create a free account**, if you're new to Encore. It's needed for the deployment step at the end of this guide, and for managing secrets.
2. **Select your app's language**: `TypeScript` or `Go`.
3. **Choose a starter template**. Pick `Hello World` and continue.
4. **Install AI instructions** for agents like Cursor and Claude Code. Pick the one you use, or skip it. See [AI Tools Integration](/docs/ai-integration) for details.
5. **Pick a name** for your app.
Encore creates your app in a folder named after it.
## 2. Run your app
Start your app locally:
```shell
$ cd your-app-name # replace with the app name you picked
$ encore run
```
Your local environment is running. Encore sets up the infrastructure your app needs, including databases and Pub/Sub.
### Open the Local Development Dashboard
Open [http://localhost:9400](http://localhost:9400) in your browser.
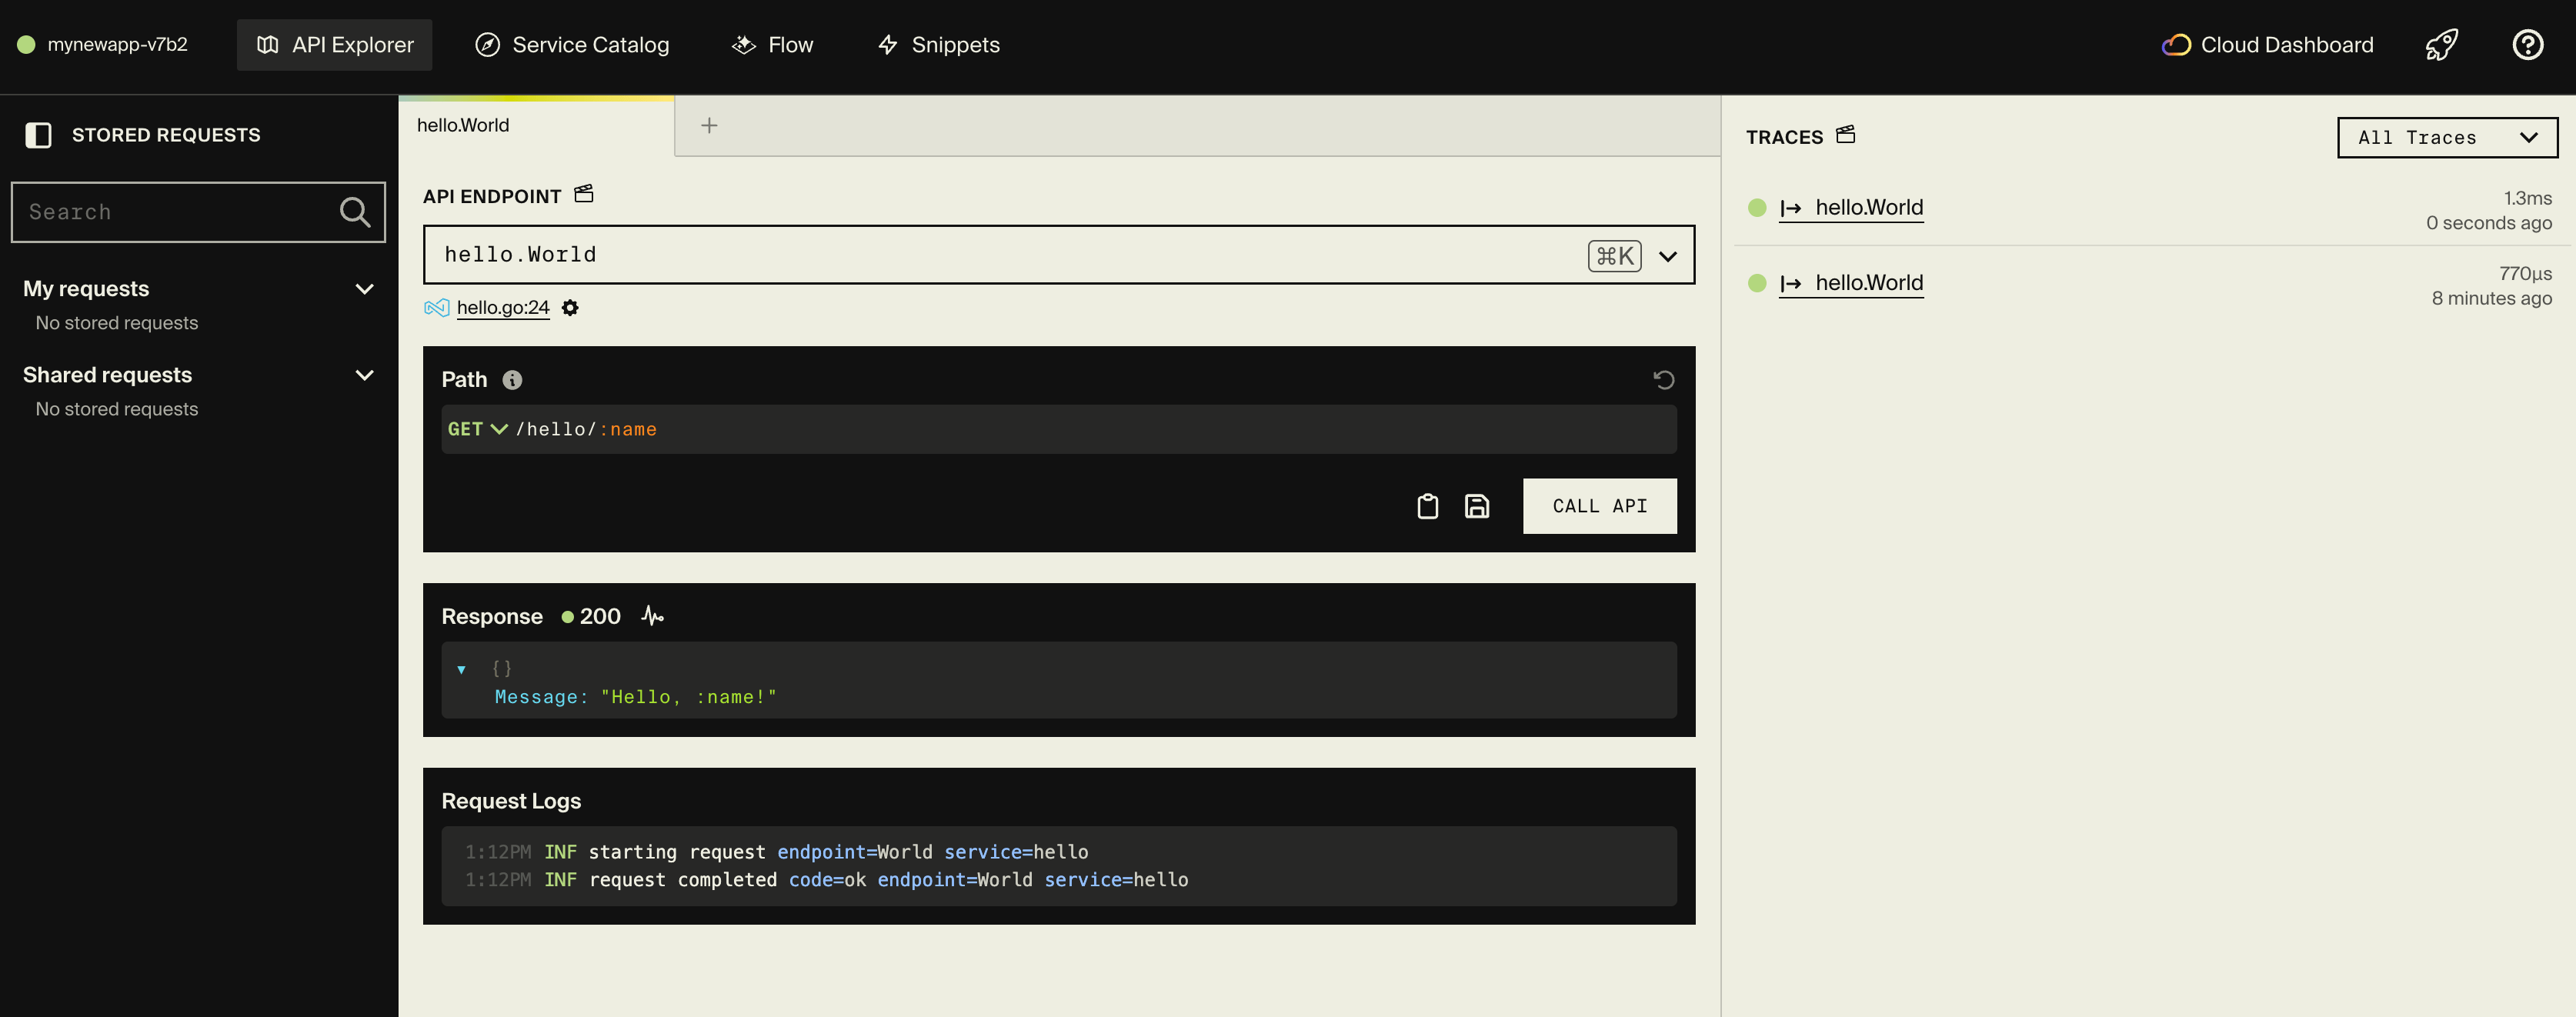
The [Local Development Dashboard](/docs/dev-dash) gives you an API explorer, a Service Catalog with generated documentation, and [distributed tracing](/docs/tracing). It also includes [Encore Flow](/docs/ts/observability/encore-flow), a live visual map of your microservice architecture.
### Call your API
Leave the app running and call your API from the API Explorer:
Or call it from a separate terminal:
```shell
$ curl http://localhost:4000/hello/world
{"Message": "Hello, world!"}
```
That response means your first Encore API call worked.
### Review a trace of the request
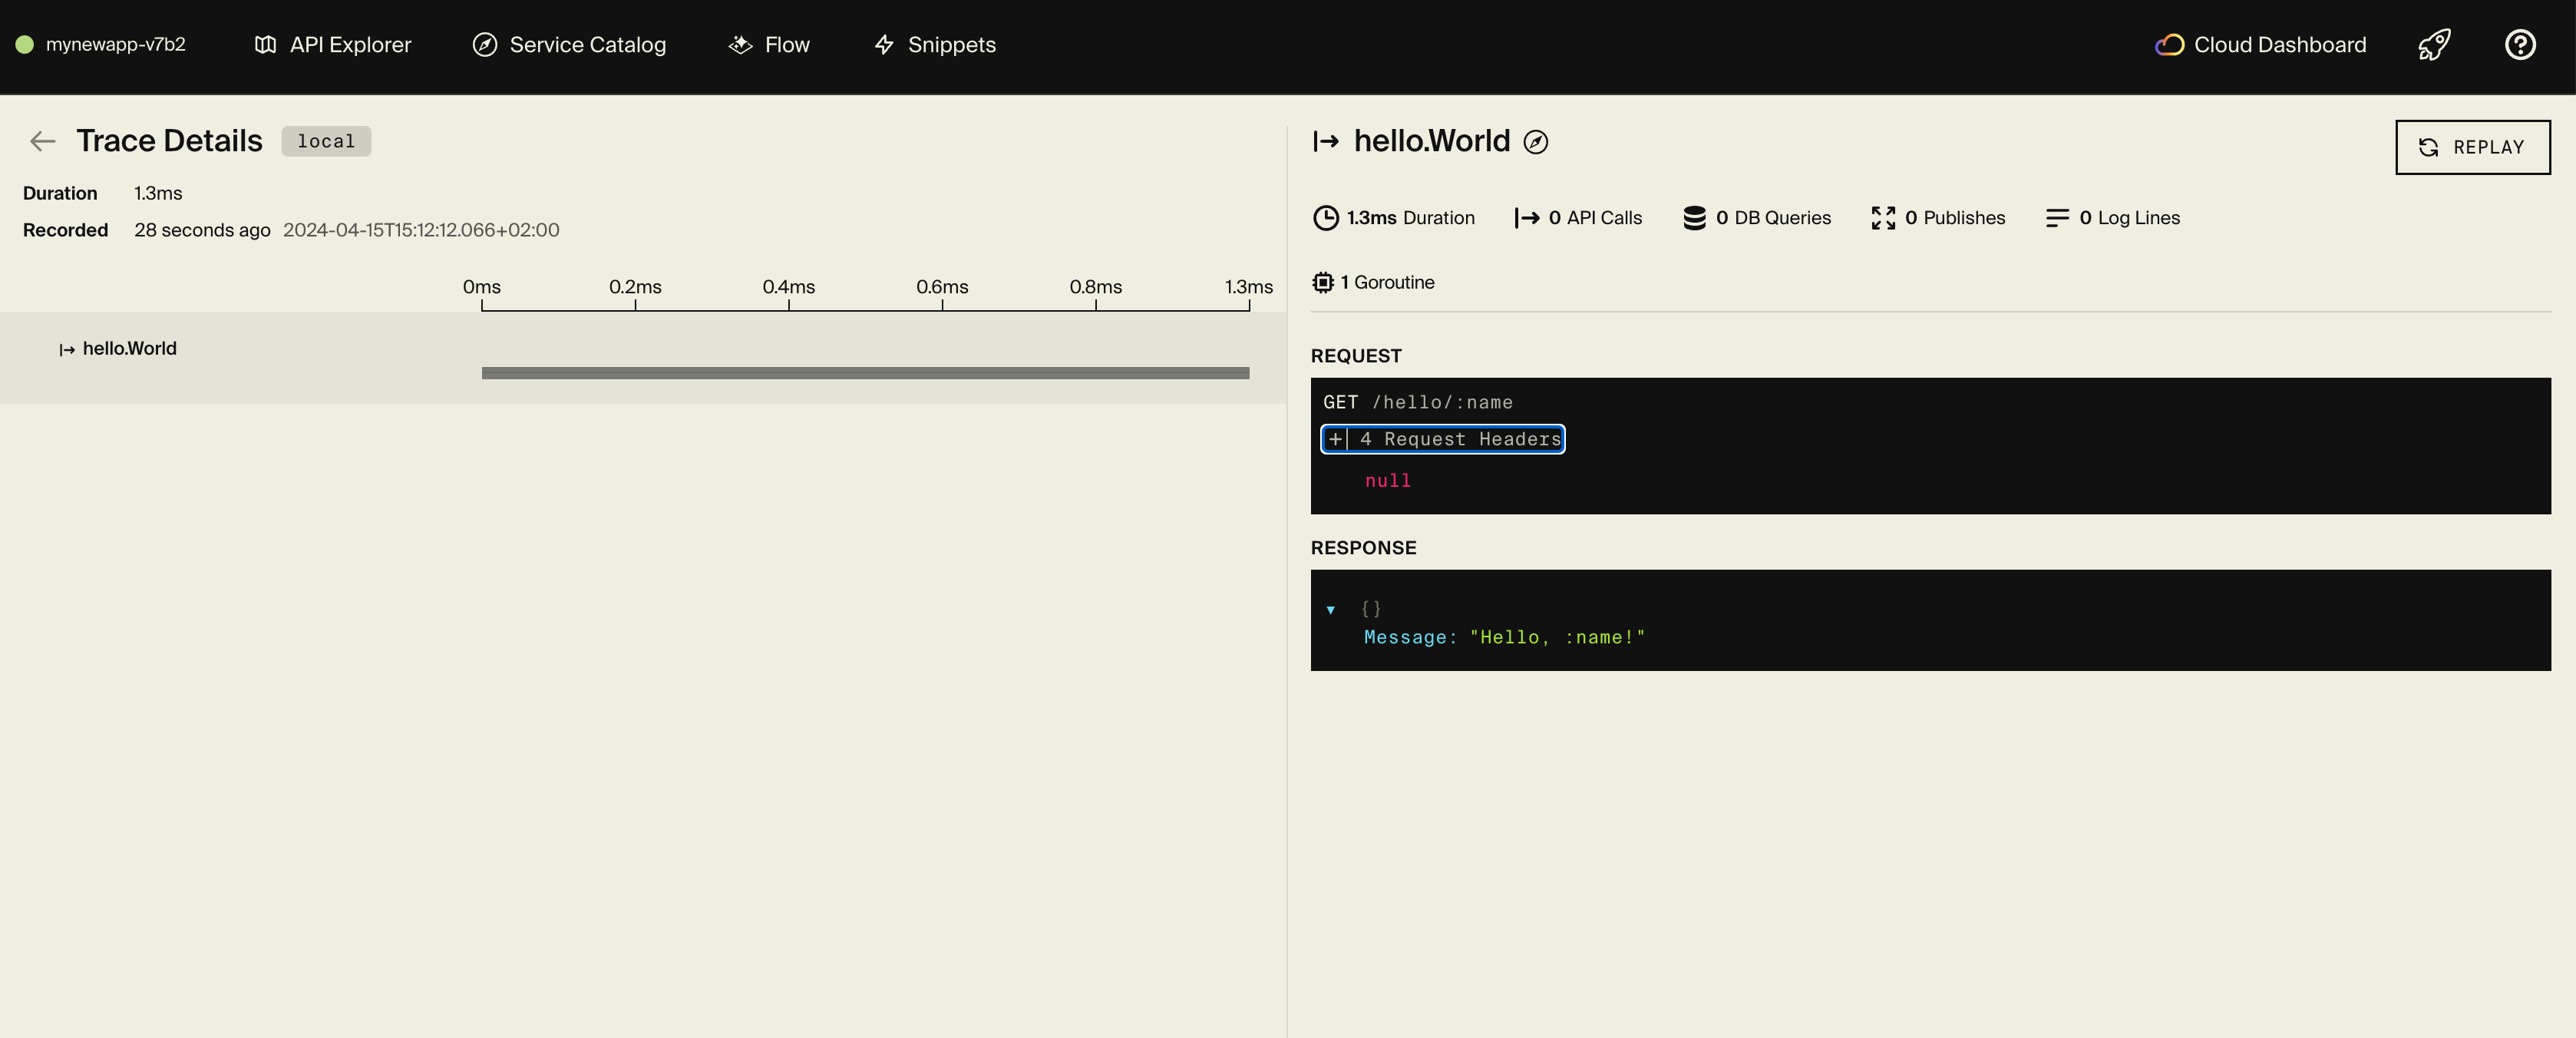
Click the request in the right column of the local dashboard to see its trace.
There's not much to see for a single request and response. But in a real system, Encore automatically traces every request, showing which services, database queries, and Pub/Sub messages it touched, where time was spent, and where failures occurred, without any manual logging. See the [tracing docs](/docs/tracing).
## 3. Take a look at the code
**Encore.ts:**
Open `hello/hello.ts` in your editor:
```ts
-- hello/hello.ts --
import { api } from "encore.dev/api";
export const world = api(
{ method: "GET", path: "/hello/:name", expose: true },
async ({ name }: { name: string }): Promise => {
return { message: `Hello ${name}!` };
}
);
interface Response {
message: string;
}
```
This is standard TypeScript. Wrapping an async function in `api` is what makes `world` a public API endpoint, and Encore then handles authentication, HTTP routing, request validation, error handling, observability, and API documentation for it.
The `world` endpoint belongs to the `hello` service, defined by `encore.service.ts` in the same folder:
```ts
-- hello/encore.service.ts --
import { Service } from "encore.dev/service";
export default new Service("hello");
```
Everything in `hello/` and its subdirectories is now part of the `hello` service. To add another service, create a folder with its own `encore.service.ts` exporting a new `Service`.
The [Encore.ts SDK](/docs/ts) declares other backend primitives the same way, in code: databases, Pub/Sub, and scheduled tasks. Read more about [services](/docs/ts/primitives/services) and [APIs](/docs/ts/primitives/apis).
**Encore.go:**
Open `hello/hello.go` in your editor:
```go
-- hello/hello.go --
// Service hello implements a simple hello world REST API.
package hello
import (
"context"
)
// This is a simple REST API that responds with a personalized greeting.
//
//encore:api public path=/hello/:name
func World(ctx context.Context, name string) (*Response, error) {
msg := "Hello, " + name + "!"
return &Response{Message: msg}, nil
}
type Response struct {
Message string
}
```
This is standard Go apart from the API annotation:
```
//encore:api public path=/hello/:name
```
That one line tells Encore the `hello` package is a service and `World` is a public API endpoint. To add more, create new Go packages and annotate their endpoints the same way. Read more about [defining APIs](/docs/go/primitives/defining-apis).
Encore.go declares other backend primitives in code too: databases, Pub/Sub, and scheduled tasks.
## 4. Make a code change
In the same file, change the "Hello" message to "Howdy", then save.
The Encore CLI daemon detects the change, recompiles, and reloads your local environment:
```output
Changes detected, recompiling...
Reloaded successfully.
TRC registered endpoint endpoint=World path=/hello/:name service=hello
TRC listening for incoming HTTP requests
```
Call your API again to see the change:
```shell
$ curl http://localhost:4000/hello/world
{"Message": "Howdy, world!"}
```
Your change reloaded automatically, with no restart needed. Now deploy it.
## 5. Deploy your app
[Encore's cloud platform](https://encore.dev/use-cases/devops-automation) deploys your app for you. It includes free development hosting, and for production it deploys to your own AWS or GCP account.
### Prefer to self-host?
Build a Docker image for your app:
```shell
$ encore build docker MY-IMAGE:TAG
```
This compiles your app and produces an image you can deploy anywhere. See the [self-host docs](/docs/self-host/build).
Didn't create an account in step 1? Follow [linking an existing app to Encore's cloud platform](/docs/platform/deploy/deploying#already-have-a-local-app) first.
Push your changes to deploy:
```shell
$ git add -A .
$ git commit -m 'Initial commit'
$ git push encore
```
Encore's cloud platform builds and tests your app, provisions infrastructure, and deploys to a staging environment. The command prints a URL like `https://app.encore.dev/$APP_ID/deploys/...`.
Open that URL to follow the deployment in the Cloud Dashboard.
From there you can view production [traces](/docs/tracing), [connect your cloud account](/docs/platform/deploy/own-cloud), and [integrate with GitHub](/docs/platform/integrations/github).
## What's next?
- Add infrastructure to your app by declaring it in code: see the **Encore.ts:**
[Encore.ts primitives](/docs/ts/primitives)**Encore.go:**
[Encore.go primitives](/docs/go/primitives) for databases, Pub/Sub, object storage, cron jobs, and secrets.
- Or let your AI editor do it. With the AI instructions installed, it knows how Encore declares infrastructure, so a prompt like _"add a Postgres database to the hello service and store each greeting"_ is enough. See [AI Tools Integration](/docs/ai-integration).
- Build a real app with the [Uptime Monitor tutorial](/docs/tutorials/uptime): an event-driven system using APIs, databases, Pub/Sub, and cron jobs.
- Join the friendly community on [Discord](/discord) to ask questions and meet other Encore developers.
 Or call it from a separate terminal:
```shell
$ curl http://localhost:4000/hello/world
{"Message": "Hello, world!"}
```
That response means your first Encore API call worked.
### Review a trace of the request
Click the request in the right column of the local dashboard to see its trace.
Or call it from a separate terminal:
```shell
$ curl http://localhost:4000/hello/world
{"Message": "Hello, world!"}
```
That response means your first Encore API call worked.
### Review a trace of the request
Click the request in the right column of the local dashboard to see its trace.
 There's not much to see for a single request and response. But in a real system, Encore automatically traces every request, showing which services, database queries, and Pub/Sub messages it touched, where time was spent, and where failures occurred, without any manual logging. See the [tracing docs](/docs/tracing).
## 3. Take a look at the code
**Encore.ts:**
Open `hello/hello.ts` in your editor:
```ts
-- hello/hello.ts --
import { api } from "encore.dev/api";
export const world = api(
{ method: "GET", path: "/hello/:name", expose: true },
async ({ name }: { name: string }): Promise
There's not much to see for a single request and response. But in a real system, Encore automatically traces every request, showing which services, database queries, and Pub/Sub messages it touched, where time was spent, and where failures occurred, without any manual logging. See the [tracing docs](/docs/tracing).
## 3. Take a look at the code
**Encore.ts:**
Open `hello/hello.ts` in your editor:
```ts
-- hello/hello.ts --
import { api } from "encore.dev/api";
export const world = api(
{ method: "GET", path: "/hello/:name", expose: true },
async ({ name }: { name: string }): Promise